Sonntag, 30. Juni 2024

Setting Up a Proxy in the Avant Browser

Setting Up a Proxy in the Avant Browser

Avant Browser is an anti-detect browser designed for convenient and secure multi-accounting tasks. Using the Avant web browser ensures the security of your Internet connection, data encryption and online anonymity. To maximize your privacy while surfing the web and tunneling traffic, the browser allows you to configure a proxy server to change your IP address.


In this guide, we will show you how to properly use this browser in connection with a proxy server.


Step 1: Open Avant Browser's Proxy Settings


To add a proxy server to Avant Browser, follow these steps:


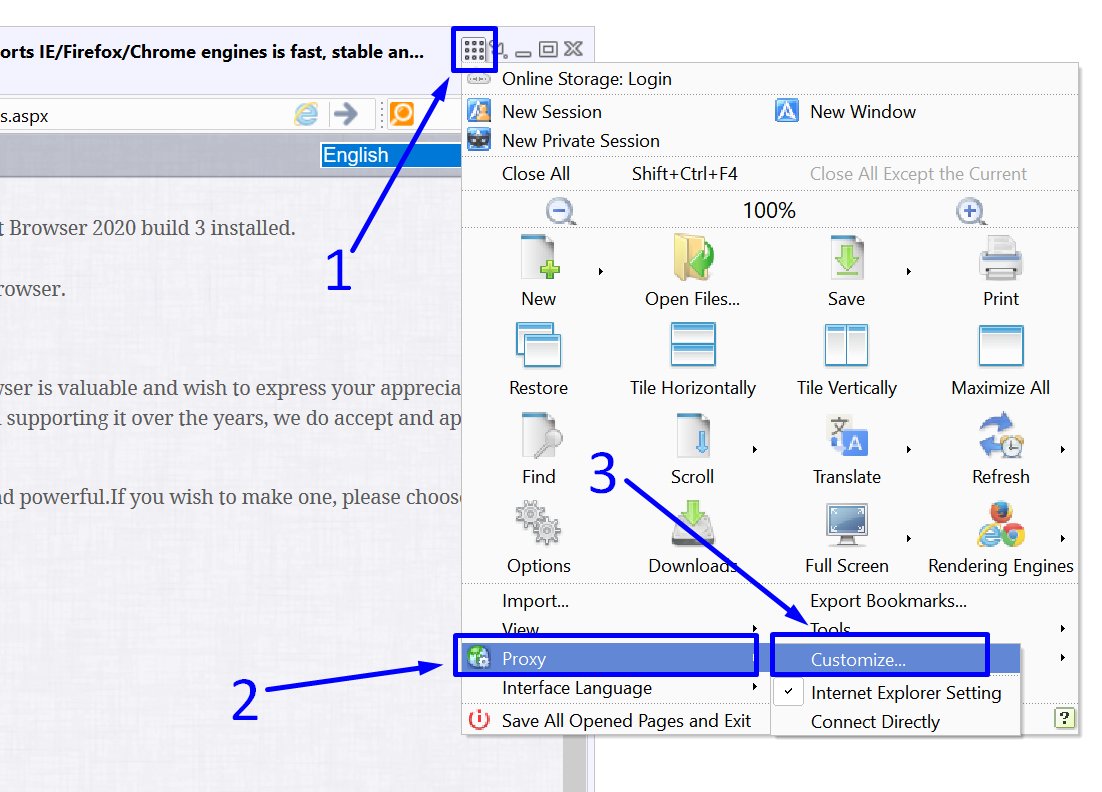
- Click on the square icon with a 9-dot image located at the top right corner of the program window.

- In the dropdown menu that appears, hover over the “Proxy” menu item.

- Move the cursor to the “Customize…” option and click on it.

Open Avant Browser's Proxy Settings

Step 2: Install HTTP or HTTPS proxy


Next, follow these steps:


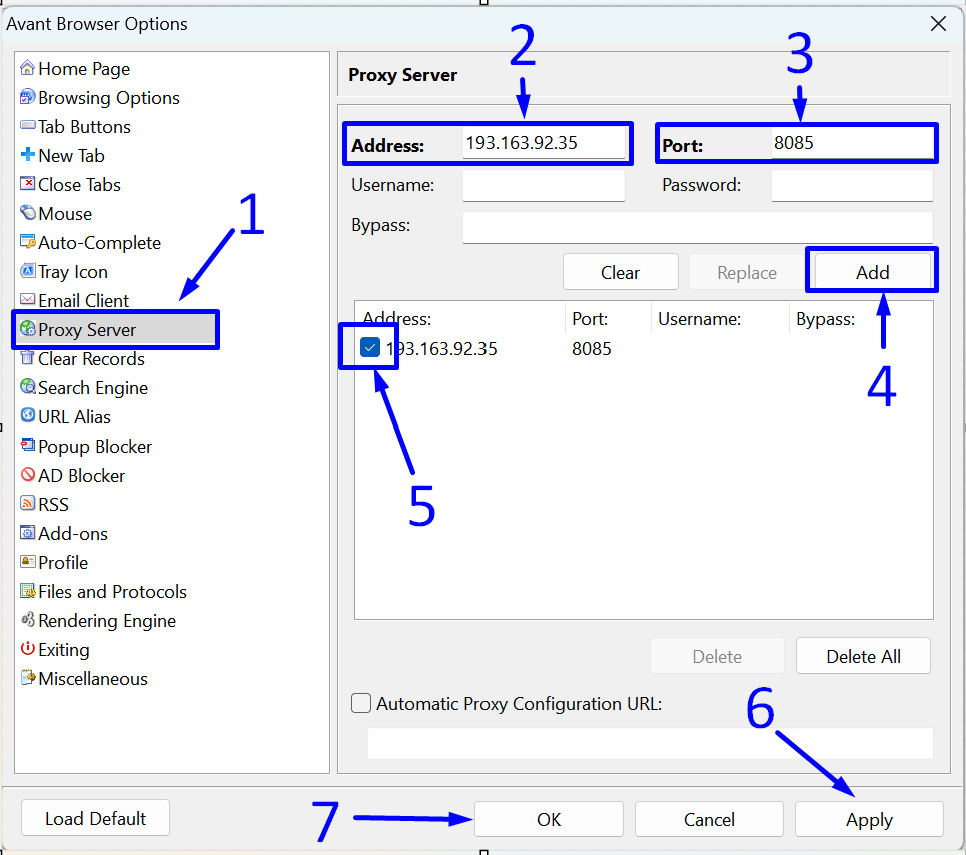
- In the left part of the browser screen, click on the "Proxy Server" item.

- In the "Proxy Server" section that appears on the right, enter the IP address of our HTTP / HTTPS proxy in the "Address:" field.

- Enter the port in the "Port:" field.

In our case, entering a username and password is not necessary, so leave these fields blank.


- Click on the "Add" button.

- Check the box next to the newly listed proxy server.

- Click on the "OK" button.

- Finish setting up the proxy by clicking on the "Apply" button.

Avant browser Install HTTP or HTTPS proxy

After completing all the steps listed above, all connections in Avant Browser will pass through the proxy server we specified.


Unfortunately, this browser does not support the use of the more versatile and anonymous SOCKS proxy. Therefore, we recommend using the more secure version of the HTTP protocol - HTTPS.


https://proxycompass.com/knowledge-base/setting-up-a-proxy-in-the-avant-browser/

Samstag, 29. Juni 2024

Setting Up a Proxy in Epic Privacy

Setting Up a Proxy in Epic Privacy

The Epic Privacy Browser enables the use of a proxy server to mask the user's real IP address and encrypt DNS queries, blocking attempts by scripts to track personal data. 


Setup of a private proxy in Epic Browser can be done through the system settings of Windows and MacOS, which also allows access to geo-restricted content like Spotify, Netflix, and YouTube. 


Epic does not store browsing history by default, deleting any sites, links, and certificates related to the browsing session upon closing the browser. 


For proxy configuration, particularly when needing authentication, setup is conducted via the comprehensive proxy settings in the Windows OS, affecting all programs and applications on the device. 


Follow these steps to configure a private proxy server with authentication.


Step 1: Open the Settings of the Epic Privacy Browser


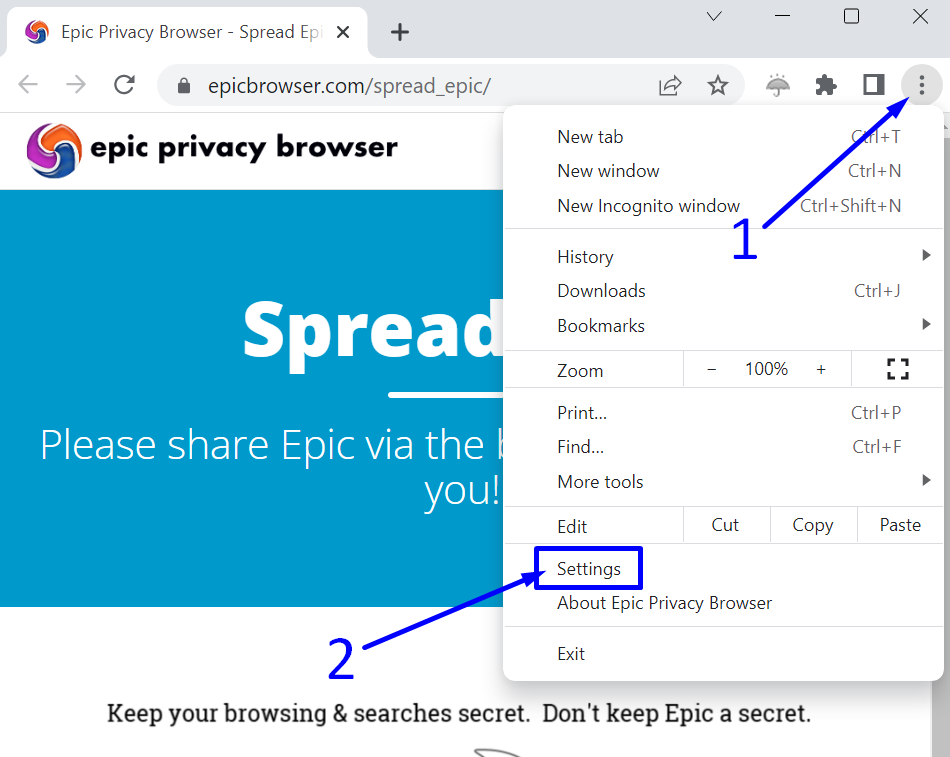
To access the browser settings, you need to:


- Click on the three vertical dots in the top right corner of the program.

- In the dropdown menu, click on "Settings".

Open the Settings of the Epic Privacy Browser

Step 2: Go to System Settings


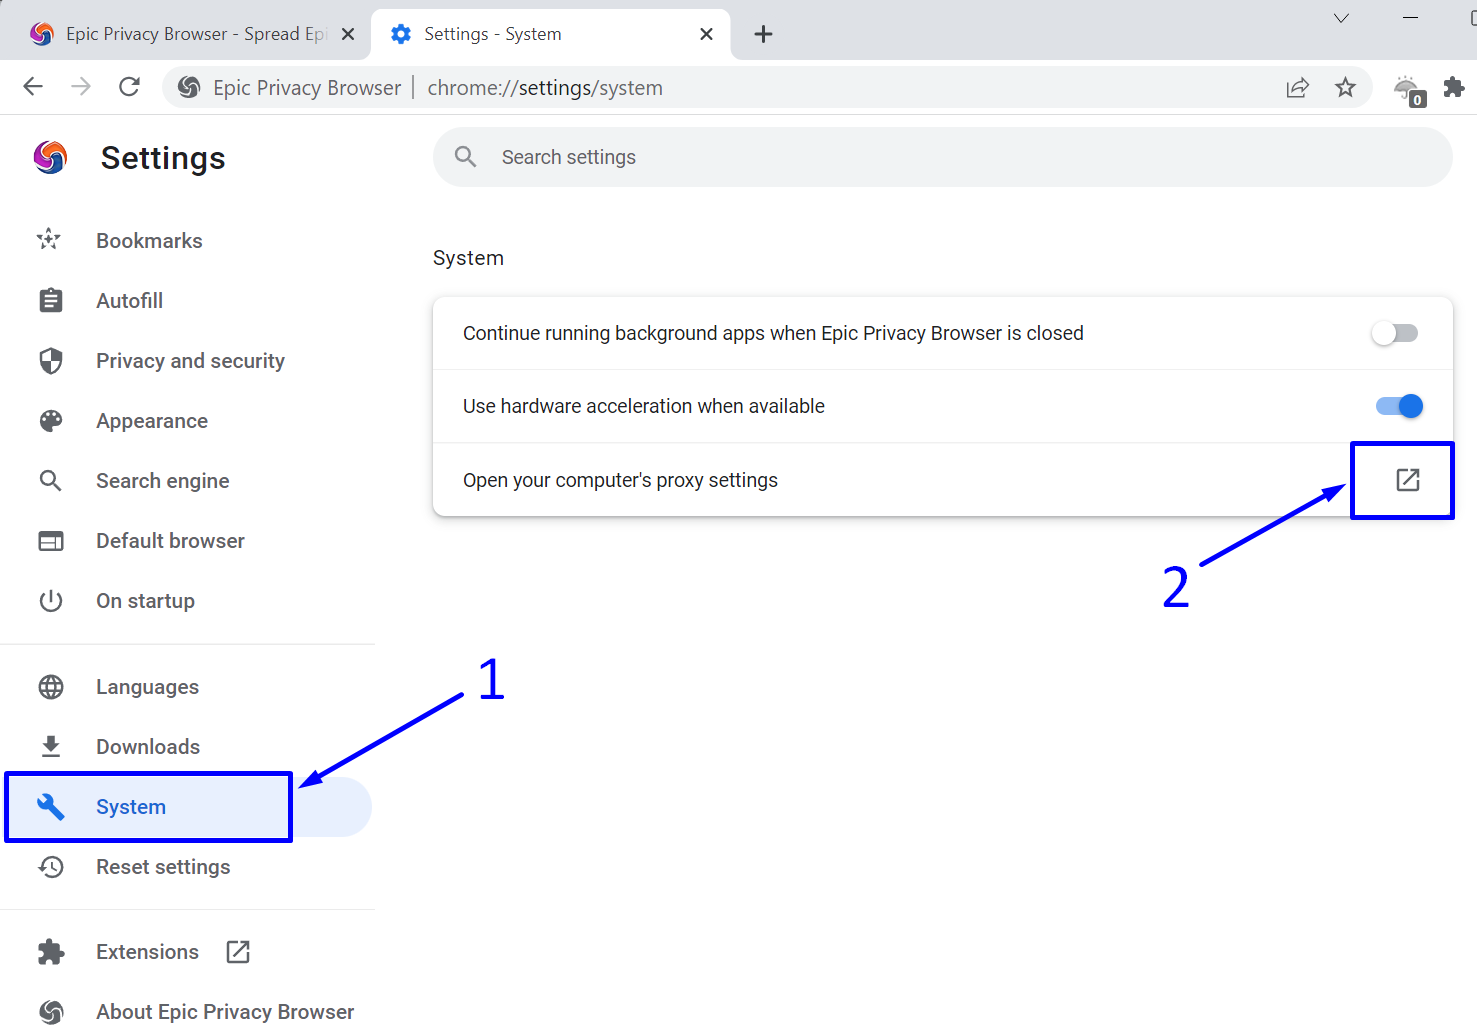
Next, on the settings page that appears, you need to:


1. Click on the "System" section in the left sidebar.


2. Then click on the arrow icon next to the item "Open your computer’s proxy settings".


Epic Privacy Go to System Settings

Step 3: Open the Operating System's Network Settings


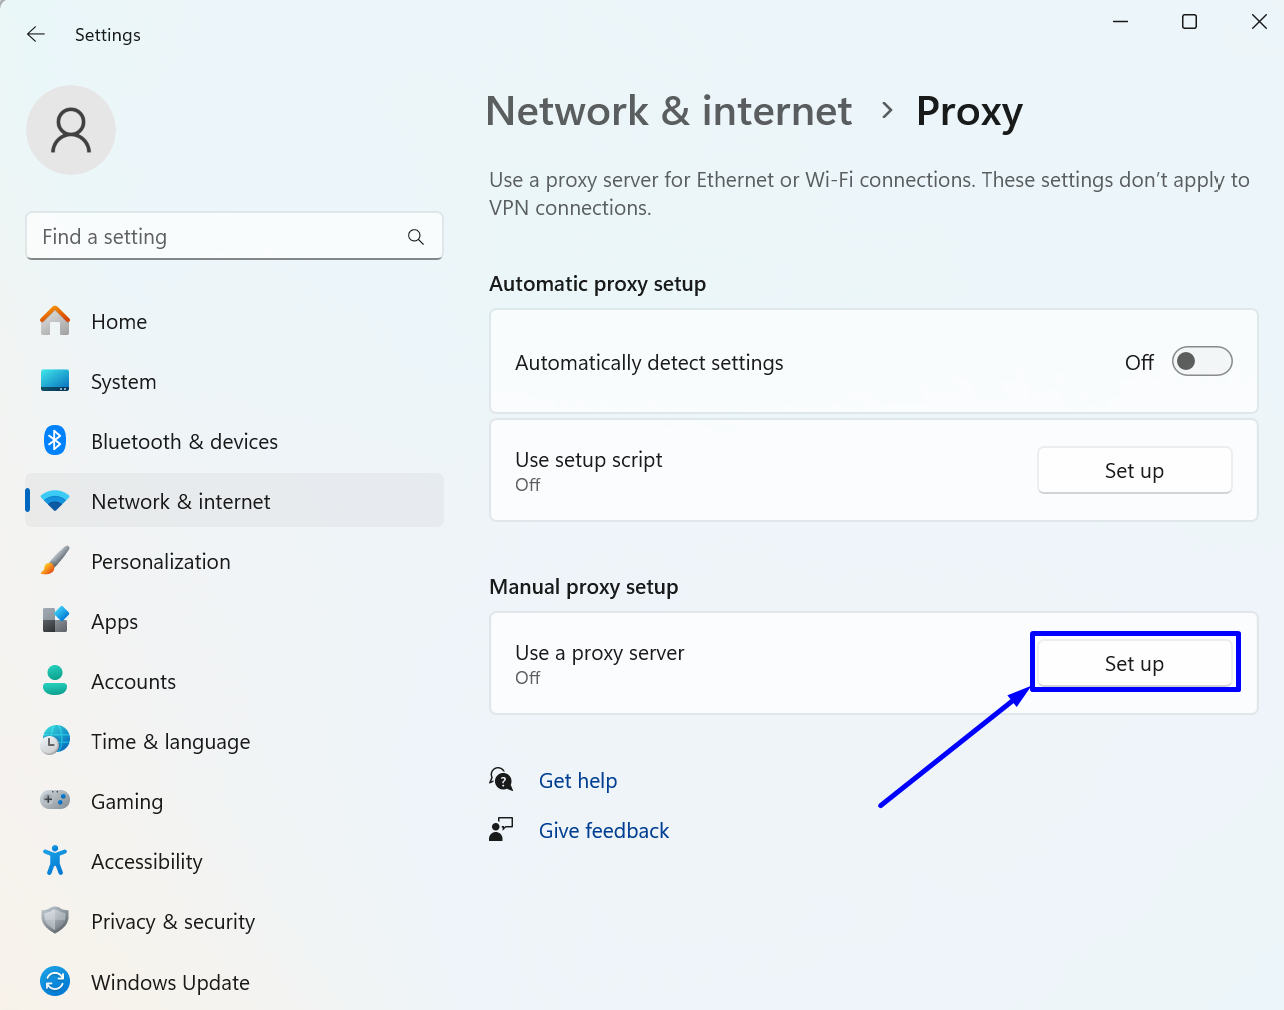
In the "Manual proxy setup" section, click on the "Set up" button.


Epic Privacy Open the Operating System's Network Settings

Step 4: Set Up an HTTP or HTTPS Proxy


Since we are changing the system settings of the operating system, in our case Windows, we have the option to set only HTTP / HTTPS proxy.


In the window that appears:


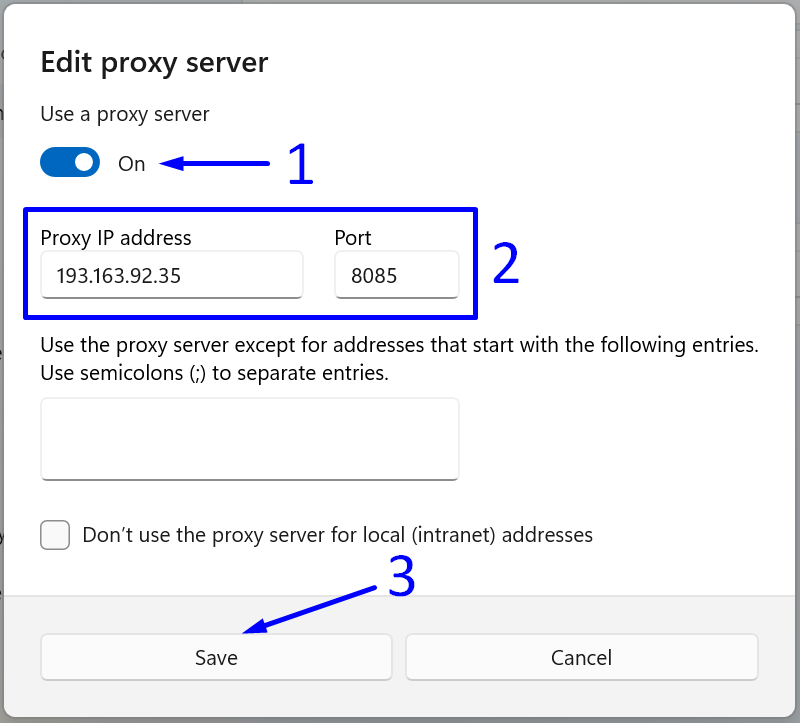
- Toggle the “Use a proxy server” switch to “On”.

- Enter the IP address and port of our proxy in the “Proxy IP address” and “Port” fields.

- Save the settings by clicking the “Save” button.

Epic Privacy Set Up an HTTP or HTTPS Proxy

To check the result of the settings change, you can visit the IP address verification page.


Our Verdict on Proxy Integration with Epic Privacy Browser


Despite the anonymity options offered by the developers of the Epic Privacy Browser, this browser does not have its own network settings. Therefore, any attempt to change the IP in this browser will also affect all other browsers using the operating system's common network settings, meaning the IP will also change in browsers like Chrome, Internet Explorer, Edge, and other programs.


Another drawback of the Epic Privacy Browser is the lack of support for SOCKS protocol and other detailed proxy server settings.


https://proxycompass.com/knowledge-base/setting-up-a-proxy-in-the-epic-privacy-browser/

Freitag, 28. Juni 2024

Setting Up a Proxy in Hidemyacc

Setting Up a Proxy in Hidemyacc

Hidemyacc is a sophisticated anti-detect browser built on the Chromium platform and designed specifically for multi-account management. It facilitates the creation of unique digital fingerprints, making it ideal for online marketing, web analytics, cryptocurrency trading, and other activities that require multiple accounts.


Compatible with both Windows and MacOS, Hidemyacc allows users to create an unlimited number of accounts while providing advanced proxy server configurations for enhanced privacy and security.


Next, we will demonstrate the proper methods for integrating this browser with proxy servers using real-world examples.


Step 1: Create a New Profile


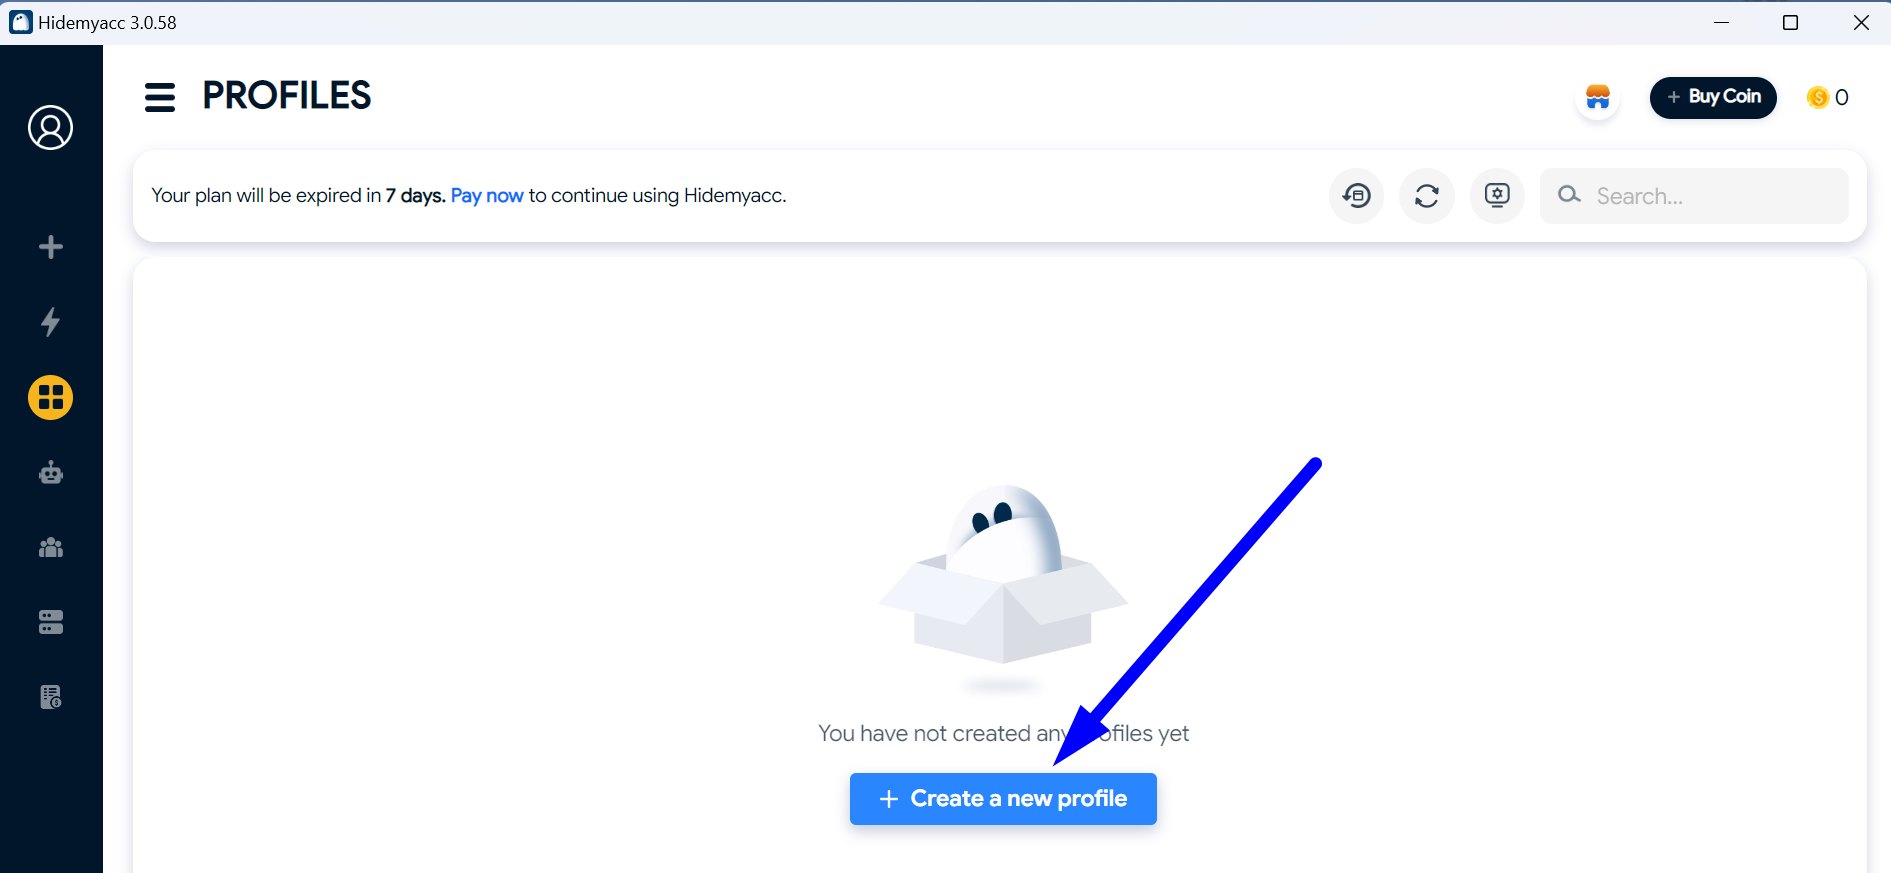
Initially, you need to create a profile. Click on the "+ Create a new profile" button to get started.


Hidemyacc Create a New Profile

Scenario 1: Creating a Profile with a Static Proxy


The most typical use case for the Hidemyacc browser is managing multiple online accounts simultaneously for activities such as online marketing or social media management. 


In such scenarios, using a static proxy is essential to maintain consistent IP addresses, ensuring that each account appears to operate from a unique and stable location, thereby reducing the risk of detection and bans.


To add a static proxy to a Hidemyacc profile, follow these steps:


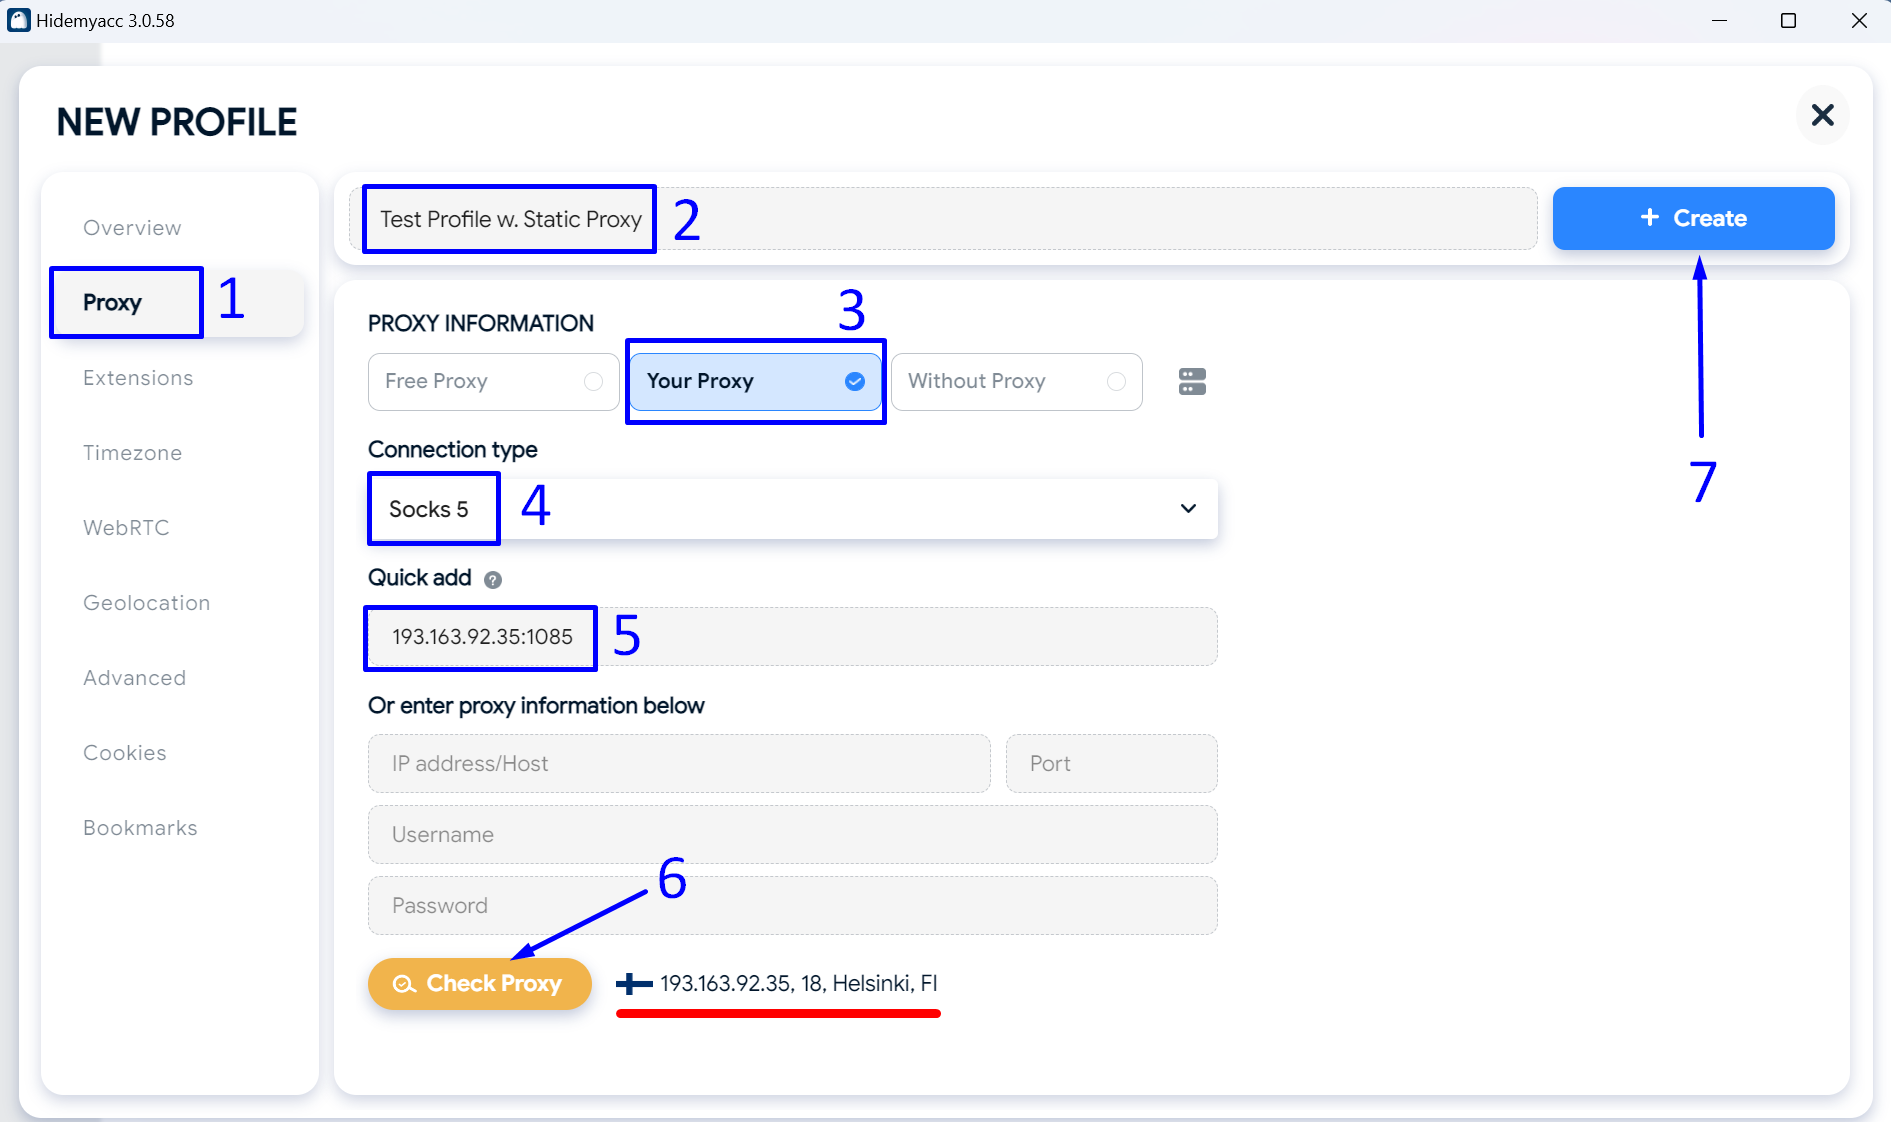
- In the left menu, click on the “Proxy” section.


- Name the profile with a memorable title.


- In the Proxy Information section, select “Your Proxy”.


- Choose the protocol supported by your proxy. If available, we recommend choosing the “Socks5” protocol as it is the most versatile and anonymous.


- Enter the IP address of your proxy and its port.


In our case, the proxy does not require authentication with a username and password, so we leave the Username and Password fields blank.


- Click on “Check Proxy” to test the connection with the proxy server.

If the connection is successfully established, a flag of the proxy's country and its geo-data will appear (highlighted in red on the screenshot).


- Save the settings by clicking the “+ Create” button.

Hidemyacc Creating a Profile with a Static Proxy

Szenario 2:  Creating a Profile with a Rotating Proxy


An unconventional yet important use case for the Hidemyacc browser is conducting competitive research across different regions. 


For such tasks, utilizing a rotating proxy is crucial. Rotating proxies change the IP address periodically, allowing for anonymous access to geo-restricted content from various locations without raising suspicion. 


This setup is particularly valuable for businesses that need to gather data on regional market trends or monitor competitor activities across different geographic areas.


To add a rotating proxy to the Hidemyacc browser, follow these steps:


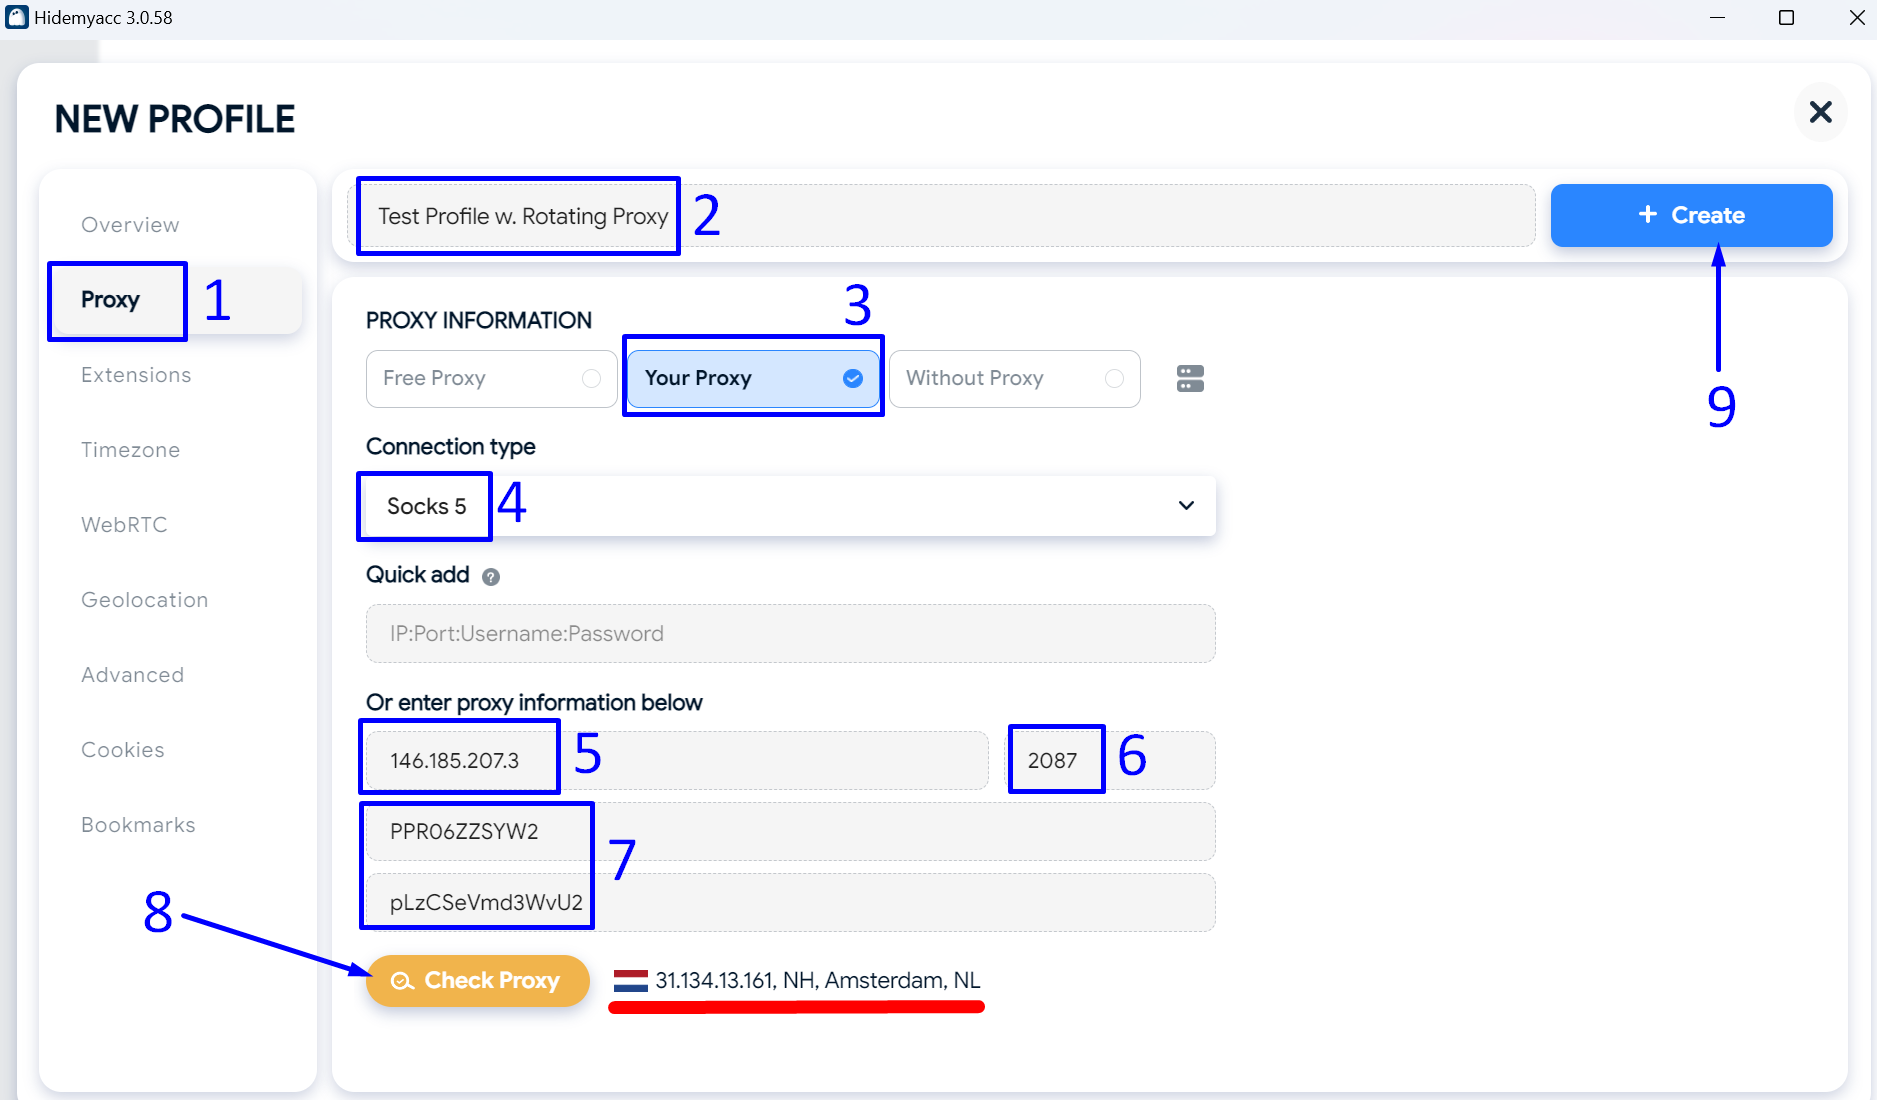
- In the left sidebar, click on the “Proxy” section.


- Name the profile with a memorable name.


- In the Proxy Information section, select “Your Proxy”.


- Choose the protocol of your proxy. In our case, we chose “Socks5”.


- Enter the IP address of the proxy gateway. Note that this is not the IP address your profile will receive, but rather the gateway through which your profile will receive a new IP each time.


- Enter the port of your gateway.


- Provide the login and password for the authentication of your proxy gateway.


- Click on the “Check Proxy” button to test the connection with the gateway.

Hidemyacc will attempt to connect to the specified gateway and retrieve a random IP. If a message appears with a flag and geolocation of the proxy (highlighted in red), everything is in order.


- Save the settings by clicking the “+ Create” button.

Hidemyacc Creating a Profile with a Rotating Proxy

Results


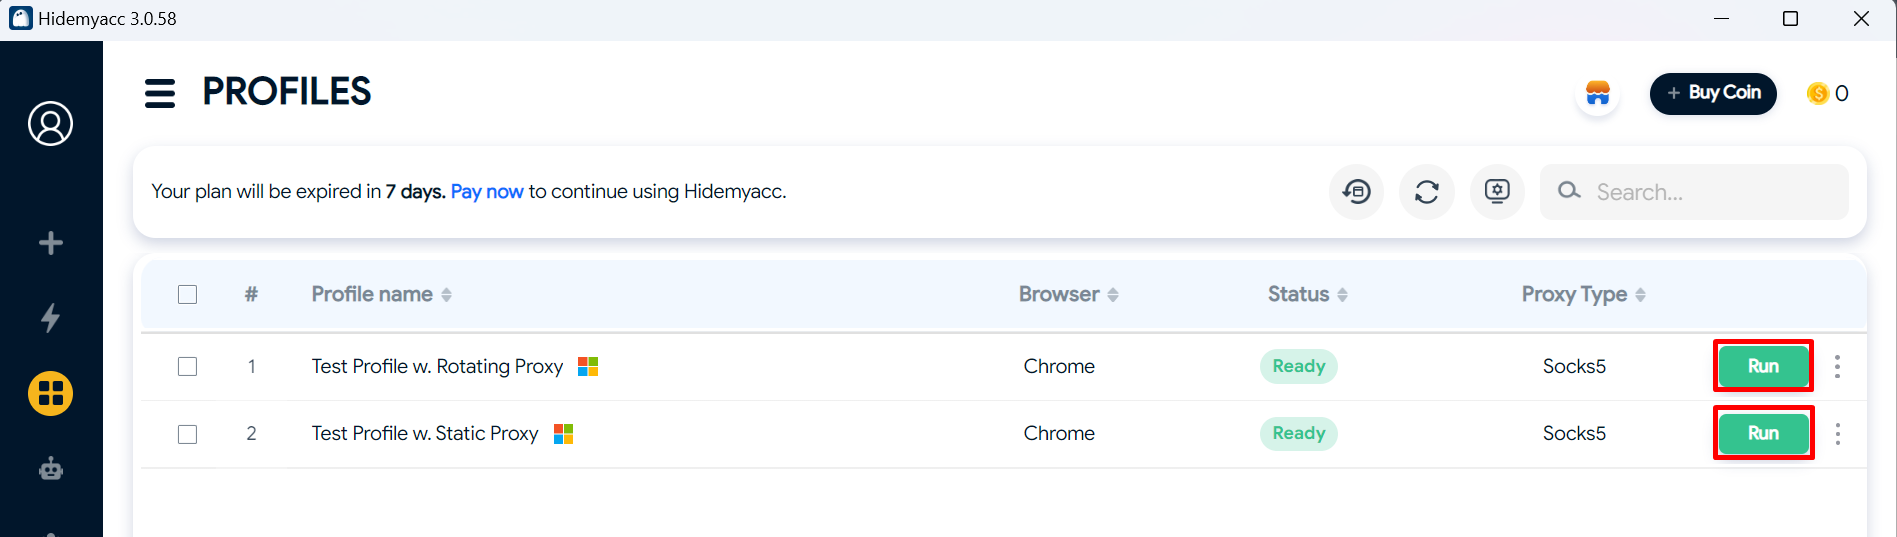
As you can see in the screenshot below, our two profiles (static and rotating) are ready for use.


To launch the Hidemyacc browser with the required profile settings, simply click on the "Run" button next to the corresponding profile.


Hidemyacc adding proxies successful


https://proxycompass.com/knowledge-base/setting-up-a-proxy-in-hidemyacc/

Donnerstag, 27. Juni 2024

Setting Up a Proxy in MoreLogin

Setting Up a Proxy in MoreLogin

The MoreLogin browser secures account and user data using digital fingerprint technology. It supports both Windows and Mac OS devices. As an anti-detect browser, MoreLogin allows secure management of multiple accounts on a single device, presenting each profile as a new device.


It provides API automation integration for tasks related to opening or creating configuration files. Designed to provide an extra layer of anonymity and protection against user identification and tracking online, the highest level of security in MoreLogin can be achieved through proxy settings.


Installing a proxy server in the browser allows access to blocked resources, secures personal information and data, and facilitates testing of websites and applications.


In this guide we will show you different ways to add proxies to MoreLogin browser.


Step 1: Create a New Profile


First you need to create a new profile. To do this, click the "+ New Profile" button. We will do this twice to create two profiles to demonstrate adding two different types of proxies for each profile: a static proxy and a rotating proxy.
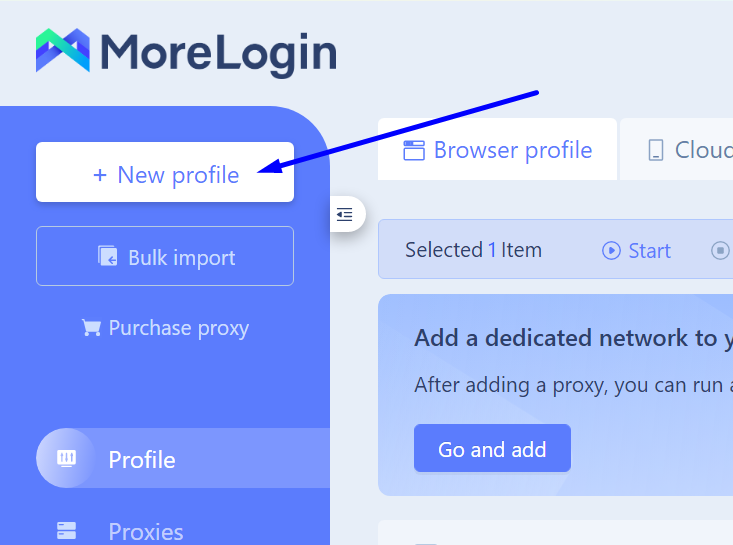


MORELOGIN Create a New Profile

Step 2: Adding a New Proxy to the Profile


To add a proxy to an already created profile, without leaving the "Profile" section, click on the pencil icon in the "Proxy" column next to the selected profile.


In our example below, it is the Static Profile.
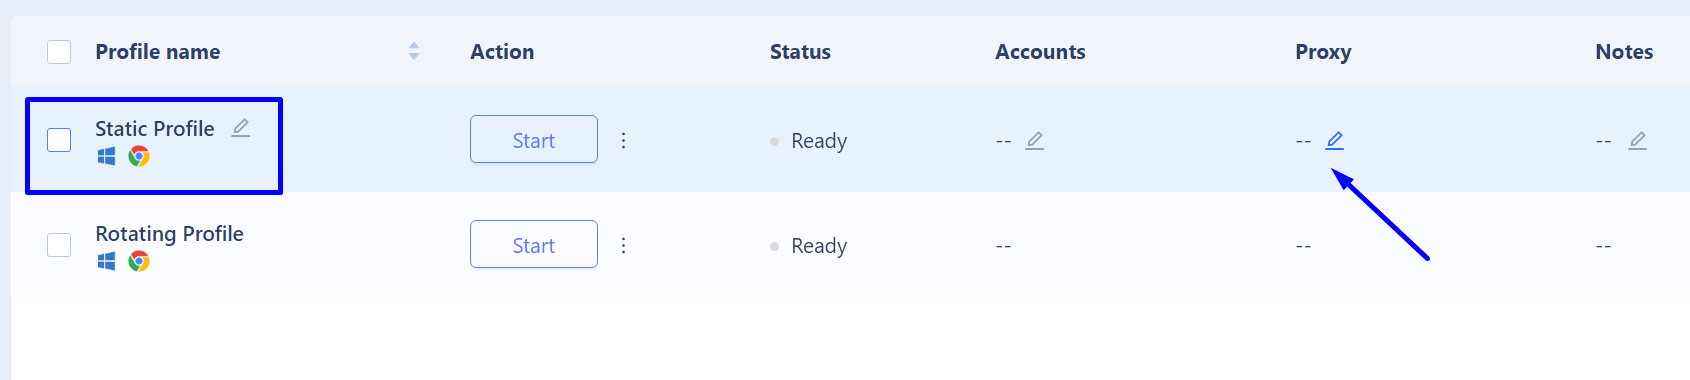


morelogin Adding a New Proxy to the Profile

After clicking on the pencil icon, a settings window for this profile will open, labeled "Modify Proxy".


In this window, you need to:


- Click on the "New proxy" label.

- Select the protocol for the proxy you are adding. We choose the Socks5 protocol as the most versatile and anonymous option available.
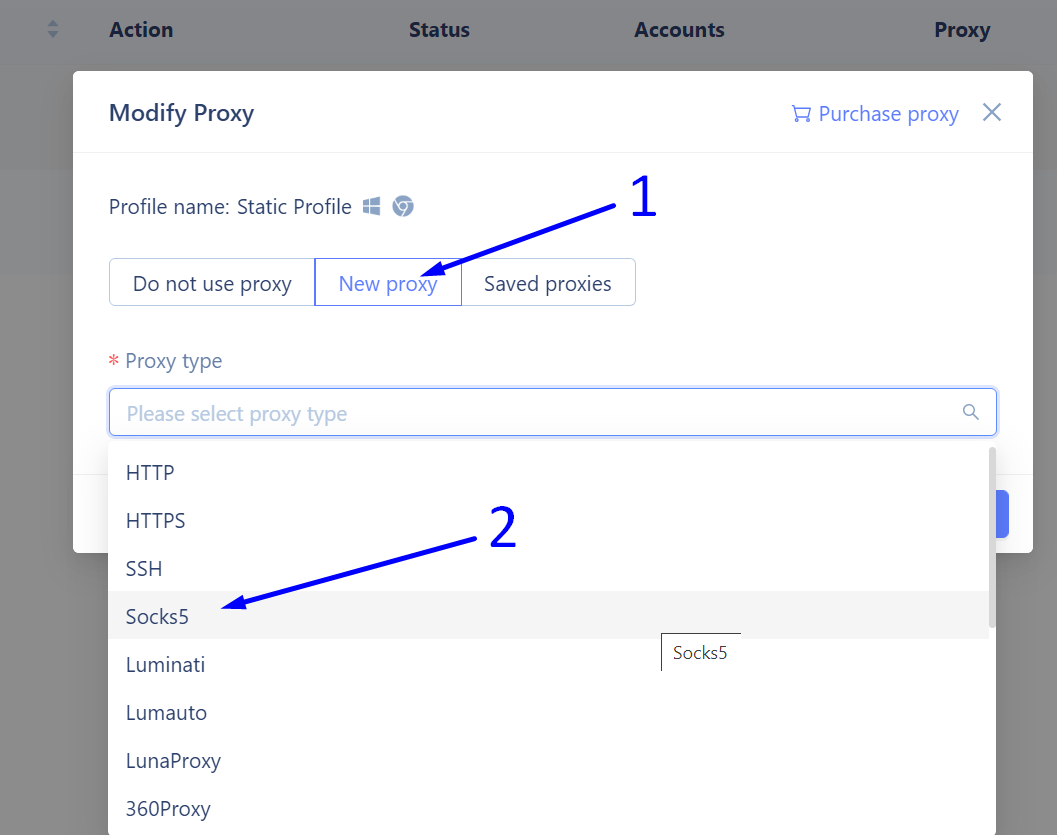
morelogin add socks5 proxy

Szenario 1: Add a Static SOCKS5 Proxy


Moving forward, we want to set up a proxy that has a constant IP address, so that all actions performed using the MoreLogin profile occur under the same static IP address.


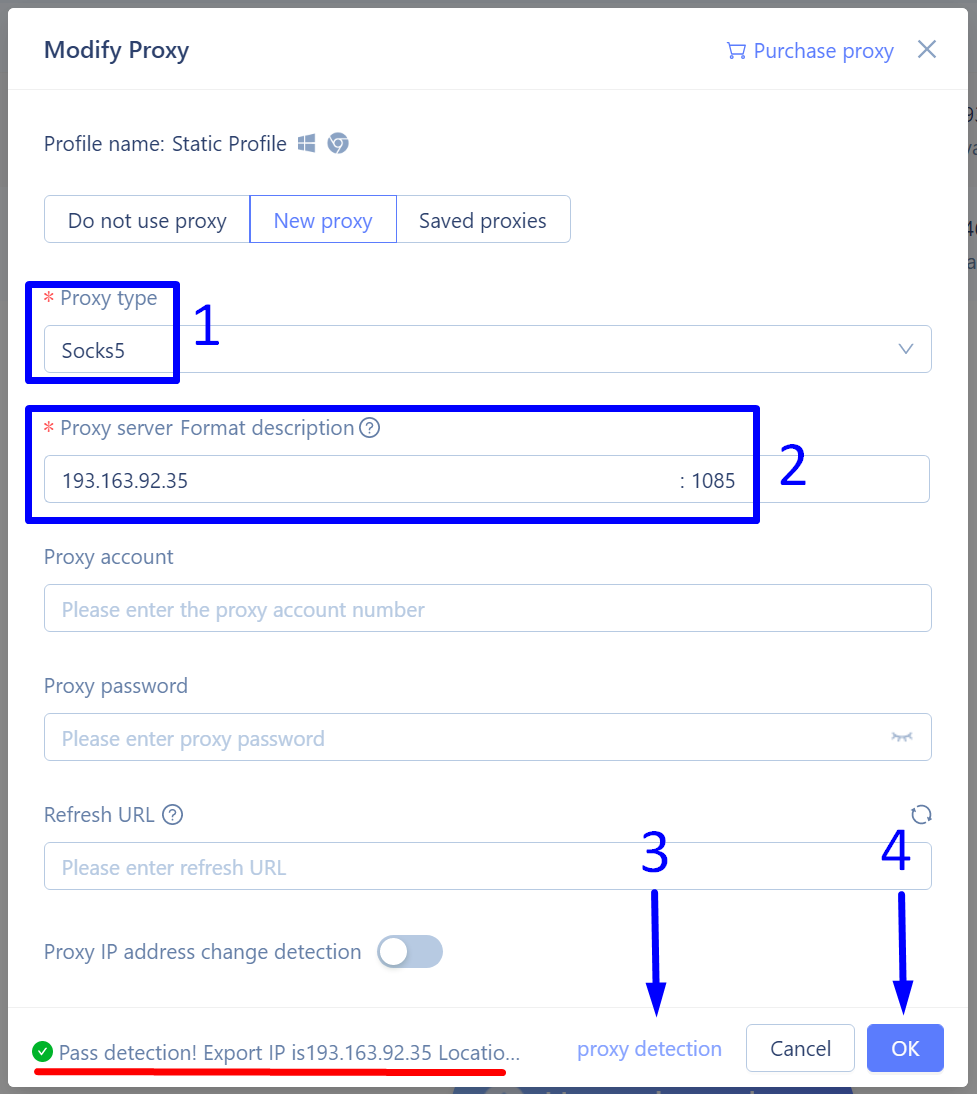
- Choose the "Socks5" protocol.

- Enter the IP address of our static proxy and its port. For ProxyCompass service users, this is always port 1085. It does not require a Username and Password, so we will leave these fields blank.

- At the bottom of the window, click on "proxy detection". The MoreLogin browser will check the connection with this proxy. If everything is in order and the proxy is accessible, the message “Pass detection! export IP is …” will appear, highlighted in red on our screenshot.

- Save the changes by clicking the "OK" button.

add static socks5 to morelogin browser

Scenario 2: Add a Rotating SOCKS5 Proxy


This scenario with MoreLogin involves having a profile with a constantly changing IP address. One way to implement this scenario is by adding a large list of different proxy servers. However, this method is not very convenient. A much simpler way to ensure a constant change of IP address is by adding a single rotating proxy.


To add a rotating proxy to the MoreLogin browser profile settings, you need to:


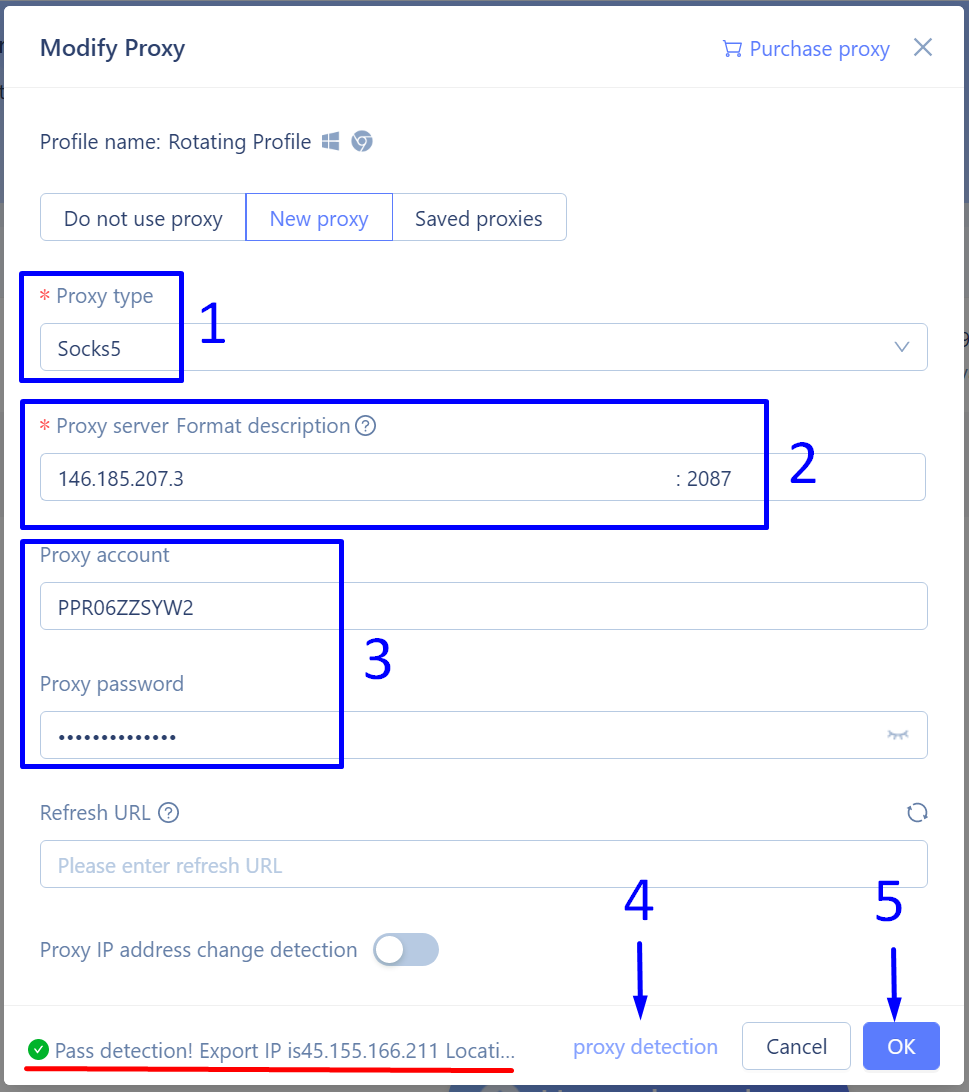
- Specify the protocol used for connecting to the proxy. Choose Socks5.

- In the “Proxy server Format description” field, enter the IP address of the rotating gateway and its port. This gateway will serve as a constant source of new IP addresses. Our gateway is 146.185.207.3, and our port is 2087.

- In the “Proxy account” section, enter your Username and Password to access the rotating gateway.

- Click on “proxy detection”. The MoreLogin browser will check the connection with this gateway and display the first random IP address from the rotating proxy. If everything is correct and the proxy is accessible, the message “Pass detection! export IP is …” will appear, highlighted in red on our screenshot.

- Save the changes by clicking on “OK”.

morelogin Add a Rotating SOCKS5 Proxy

Szenario 3: Add Proxies in Bulk


In the event that you are using a large number of profiles in the MoreLogin browser and wish to assign a dedicated IP address to each of these profiles, you will need to enter a large number of proxy servers. The most convenient way to do this is through the special bulk addition feature. To upload your list of proxies, you first need to prepare the list in the required format.


In our case, we are using SOCKS5 proxies, which do not require authentication by Username and Password, so we use the format: socks5://ip:port. Our proxy list will look like this:


socks5://185.77.220.177:1085
socks5://185.77.221.126:1085
socks5://45.66.209.198:1085
socks5://193.93.192.152:1085
socks5://193.233.228.165:1085
socks5://193.233.137.26:1085
socks5://85.239.56.14:1085
socks5://45.145.128.157:1085
socks5://193.31.127.140:1085
socks5://193.202.16.253:1085


Next:


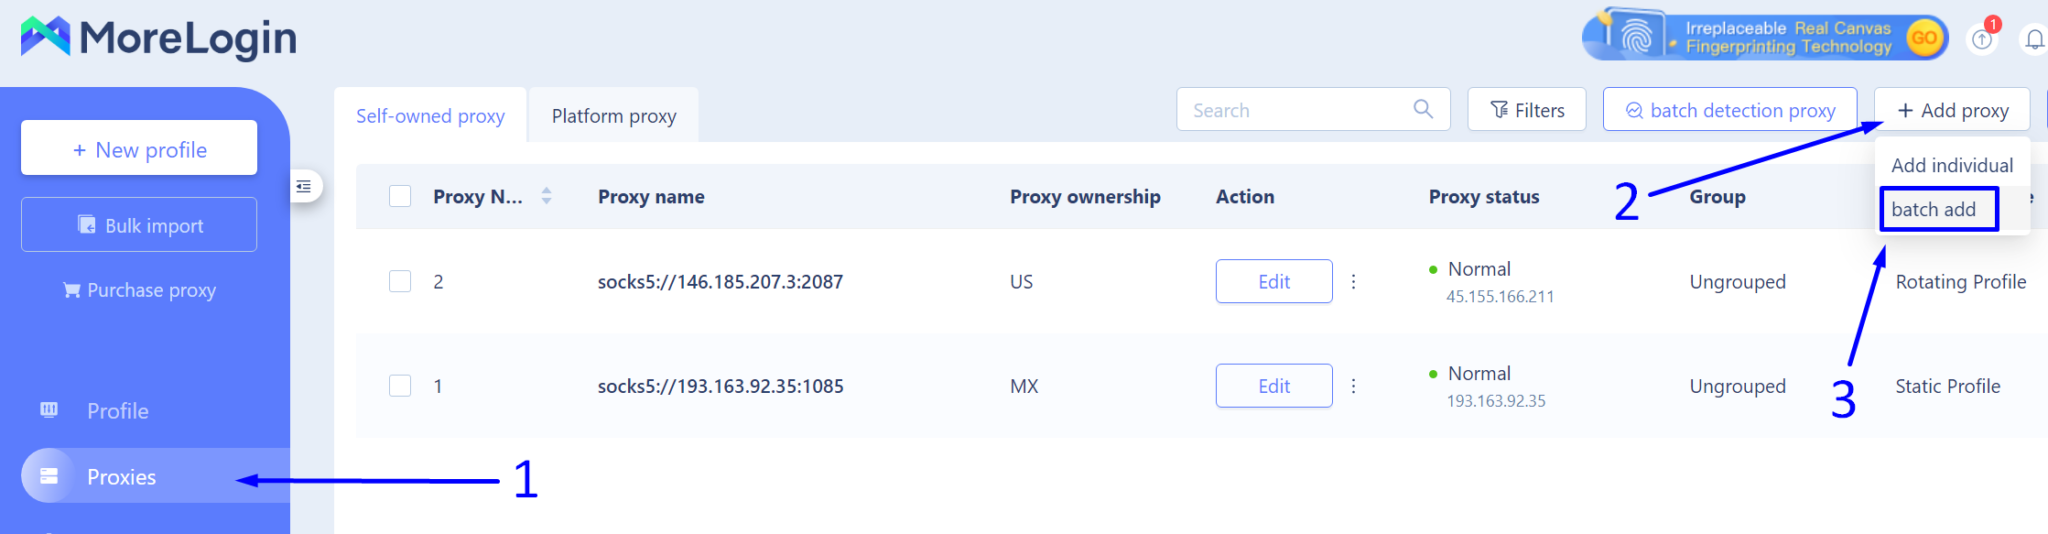
- Click on the “Proxies” section located on the left side of the browser screen.

- In the top right corner, click on the “+ Add proxy” button.

- From the dropdown menu, select the “batch add” option.

morelogin Add Proxies in Bulk

Next, in the window that appears:


- Paste the previously copied list of our proxies into the appropriate field.

- Click the "proxy detection" button to bulk check the connection with our proxy servers.
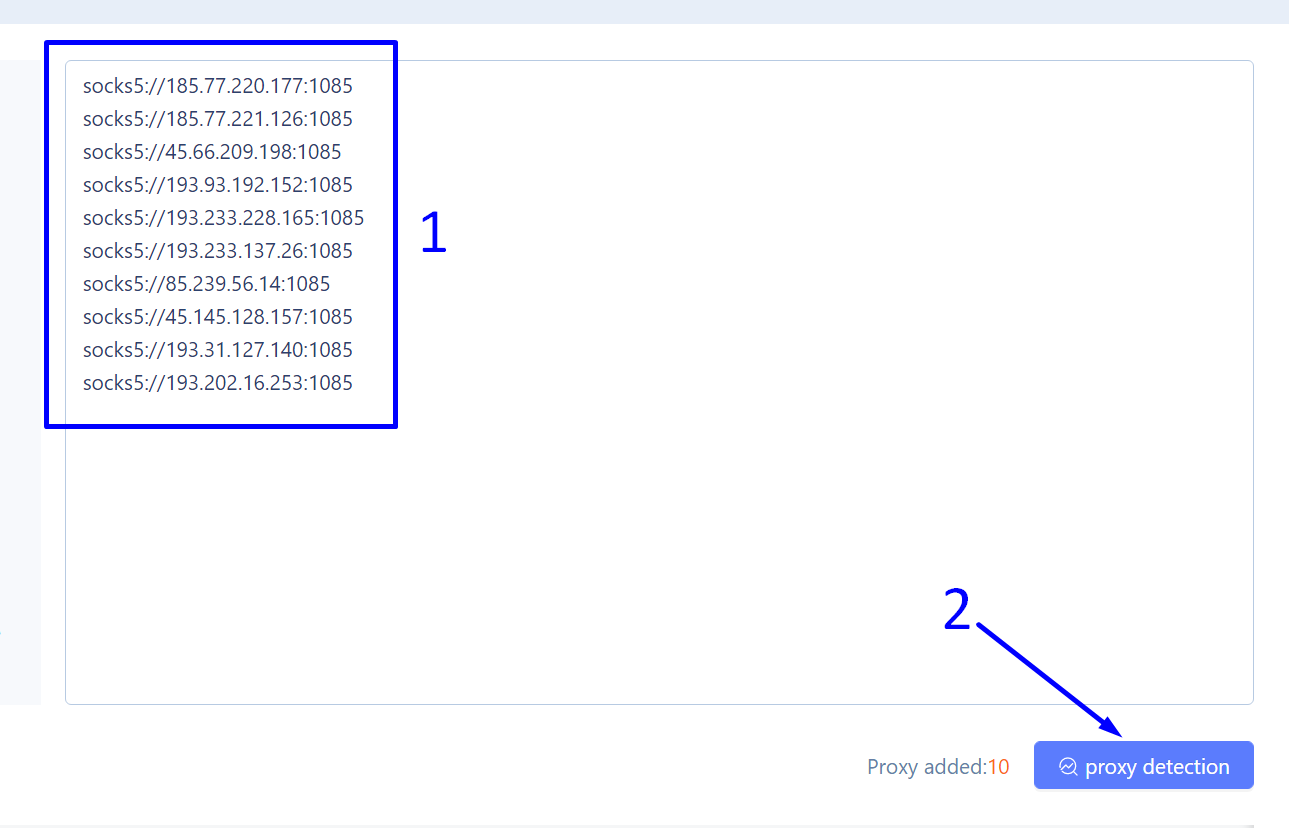
paste a batch of proxies to morelogin

The MoreLogin browser begins checking the connection with each proxy from our list. If the check is successful, the results for each proxy appear in the far right column, showing a status of "Normal" and the geolocation of that proxy.


Everything is in order. Complete the proxy import by clicking the "OK" button.
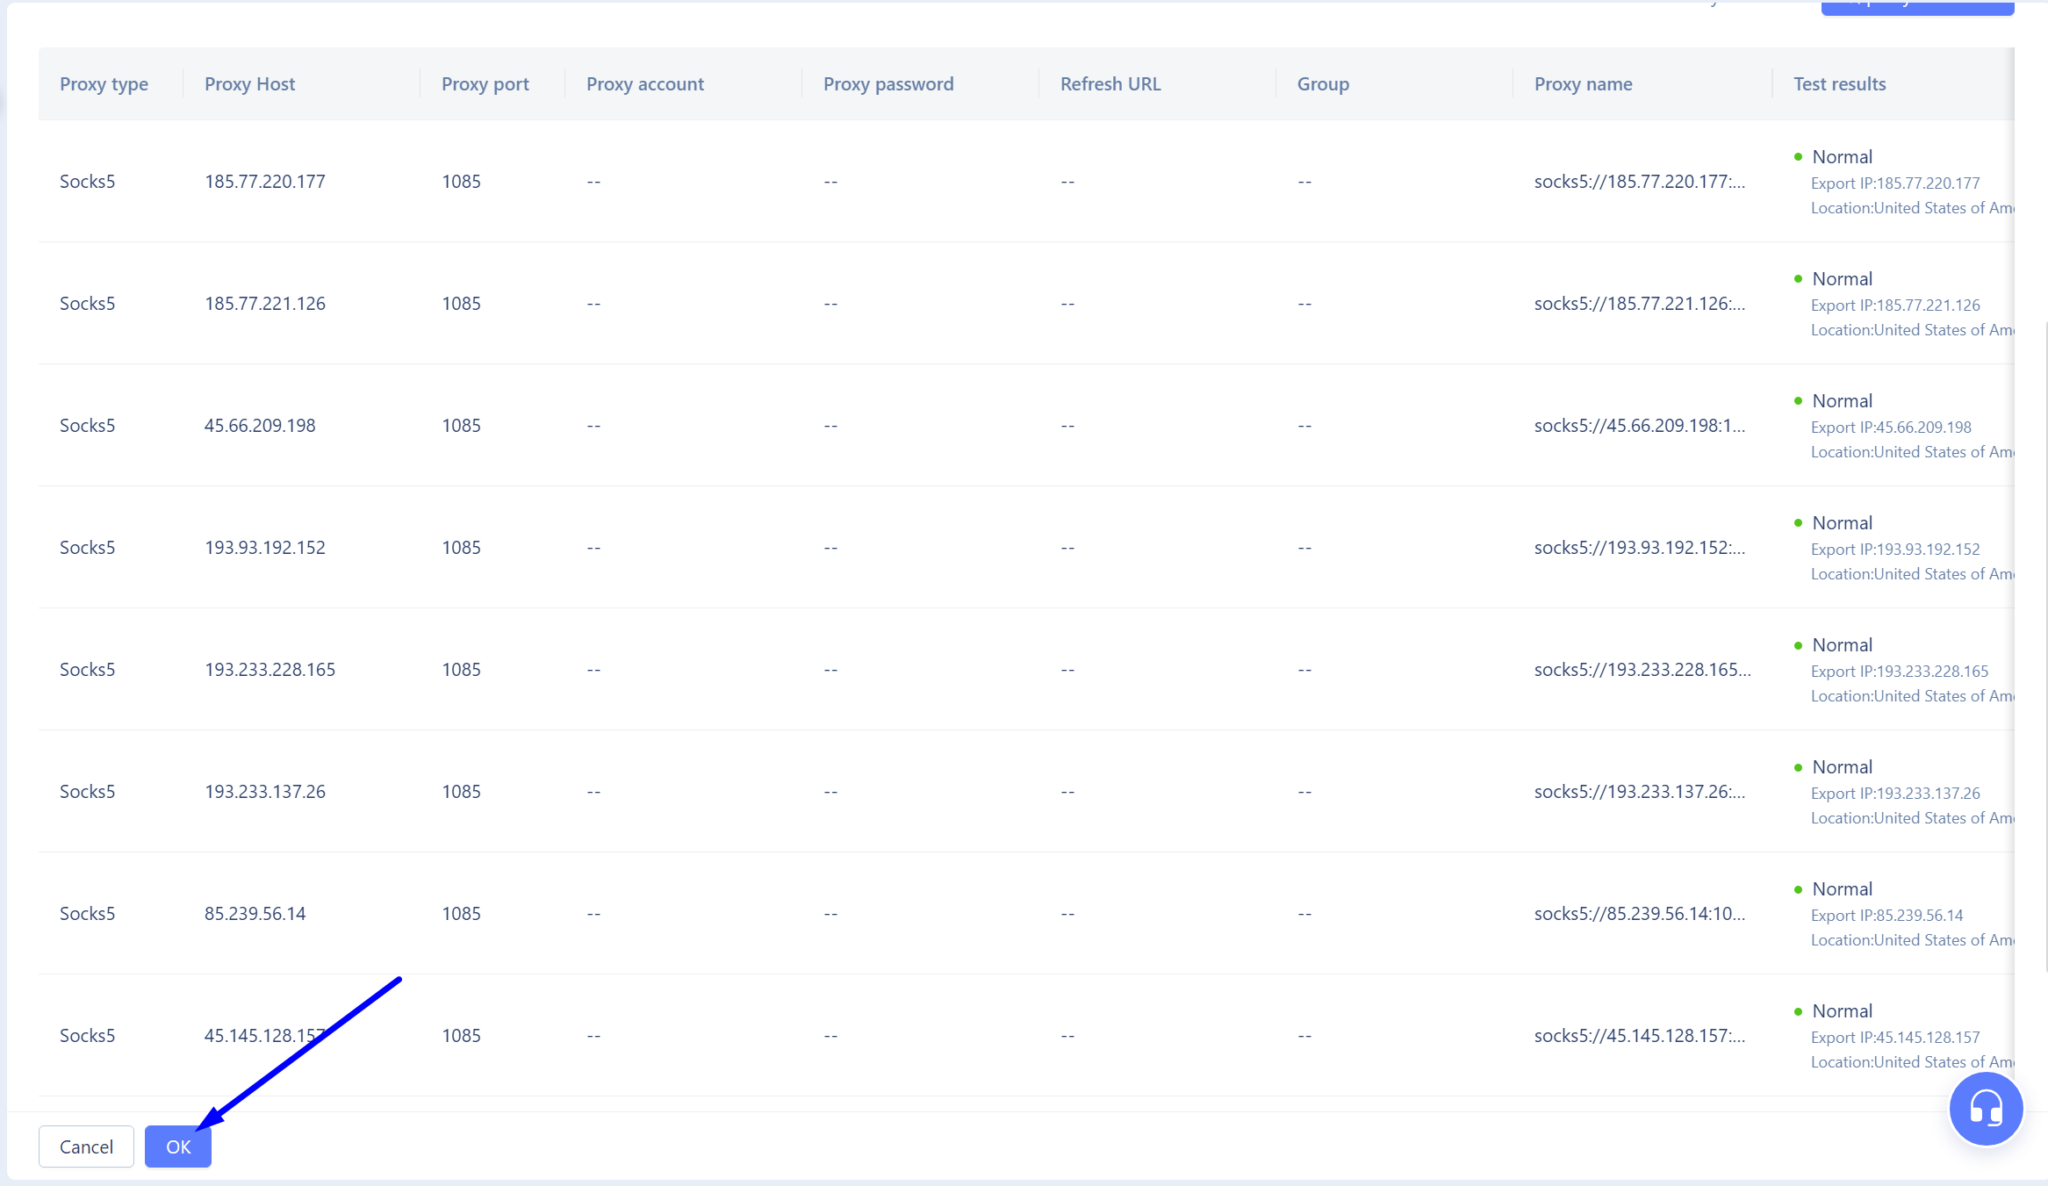


morelogin bulk add socks5 proxies successful

Proxy Addition Results


In the screenshot below, we see the result of successfully adding a group of proxies. Now, the only remaining step is to link each browser profile with the required proxy server.
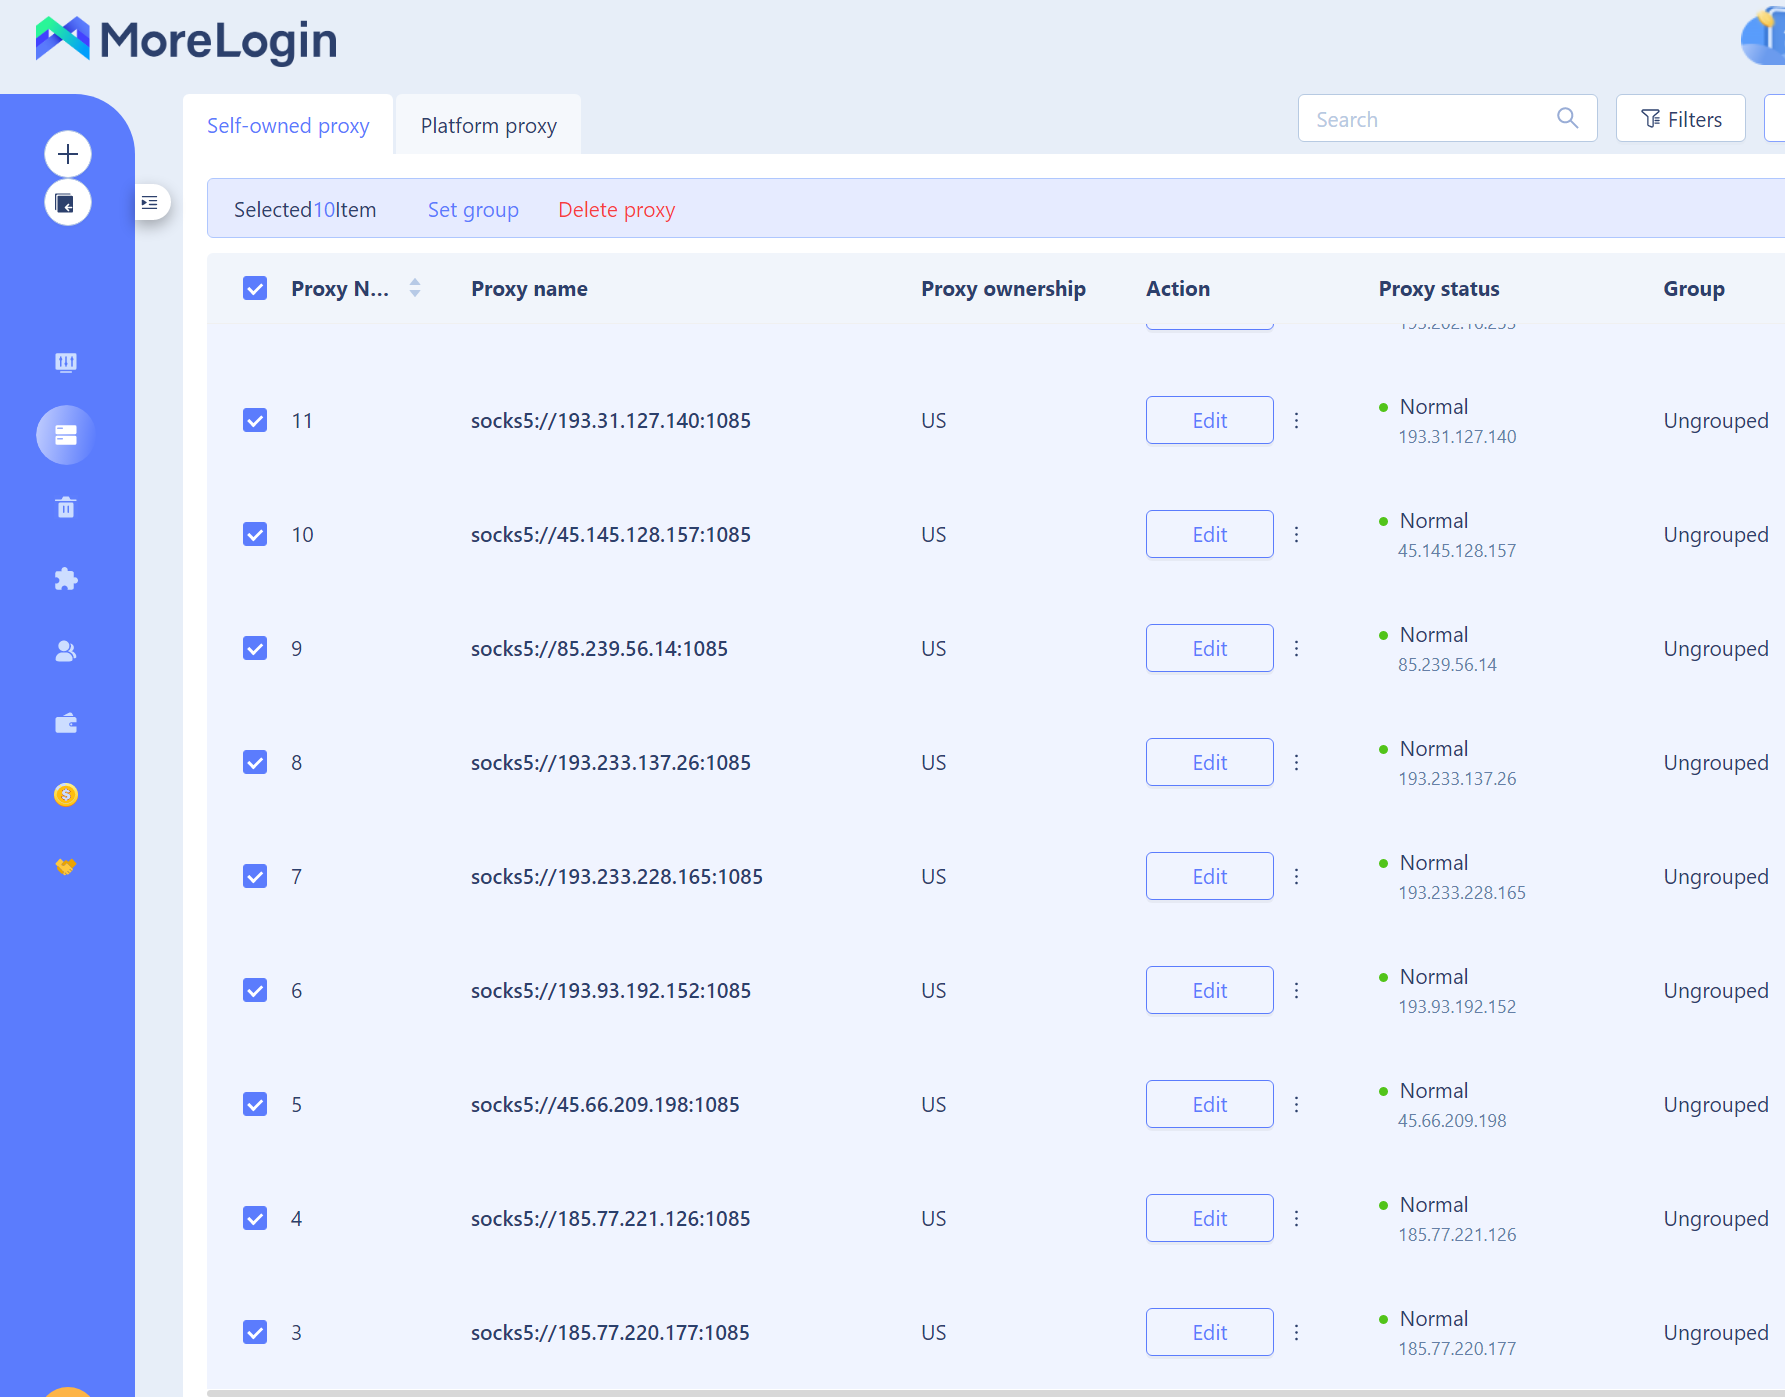


morelogin Proxy Addition Results

All is set up correctly. Now, each profile will operate under its own IP address. This will prevent potential negative consequences for all profiles if one of them gets banned on your target site.


https://proxycompass.com/knowledge-base/setting-up-a-proxy-in-morelogin/
Mittwoch, 26. Juni 2024

Setting Up a Proxy in the Antik Browser

Setting Up a Proxy in the Antik Browser

Antik Browser is an elegantly designed anti-detect browser with a simple interface, perfect for securely managing multiple online accounts with complete anonymity. It is well suited for platforms such as Facebook, Google, and Tik-Tok, and is especially beneficial for users of betting sites, crypto exchanges, and in arbitrage activities.


The browser is compatible with macOS (Intel), macOS (M1), and Windows, and offers advanced features such as the ability to create and customize digital fingerprints for each platform, and the ability to share them with other Antik users.


The integration of proxy servers in the Antik browser significantly enhances user privacy and security, a critical feature when dealing with multiple accounts. This is because security systems are very good at identifying and blocking profiles associated with a single IP address. Thus, using proxies in Antik Browser is a robust solution for secure operation of multiple accounts.


Next, we will guide you through the process of correctly configuring proxies within Antik Browser to maximize your operational security and efficiency.


Step 1: Adding a New Profile in Antik Browser


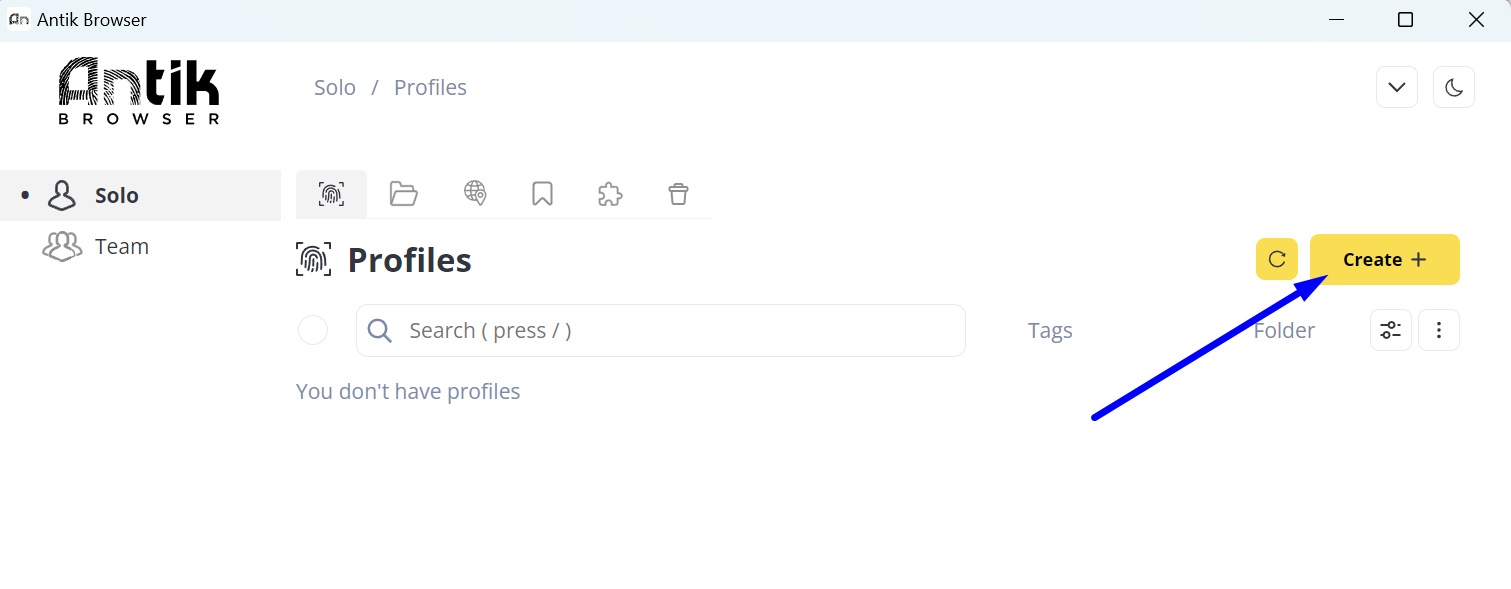
Initially, you need to add at least one profile to Antik Browser. To do this, click the “Create +” button.


Adding a New Profile in Antik Browser

Step 2: Creating a Profile with a New Proxy


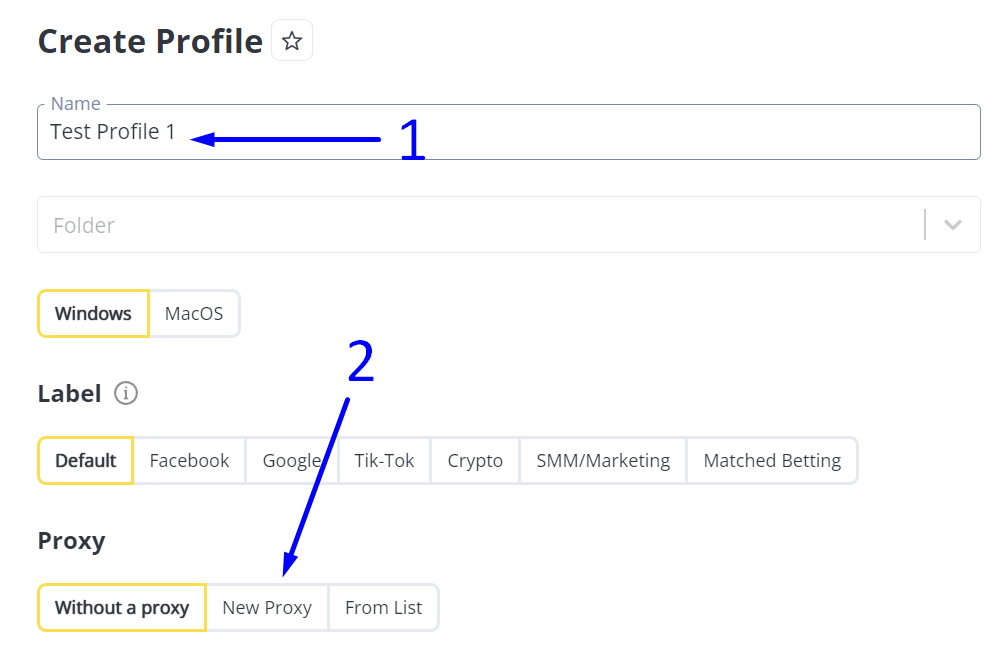
In the section that appears:


- Enter the name of your new profile.

- Click the “New Proxy” button.

Creating a Profile with a New Proxy

Step 3: Adding a Proxy


We recommend using a SOCKS5 proxy whenever possible, as it is the most anonymous and versatile protocol.


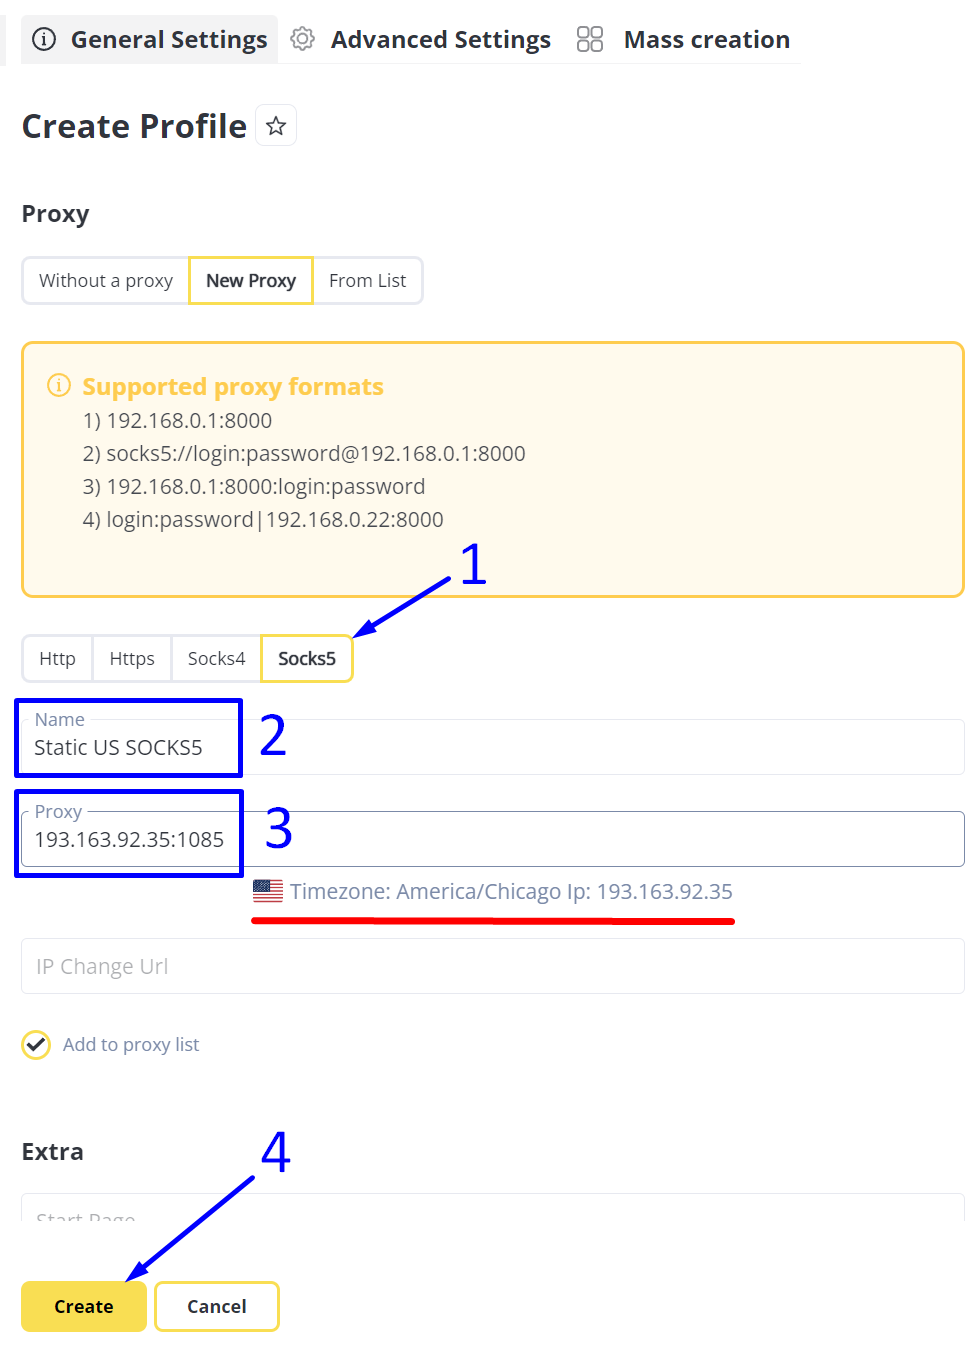
- Select SOCKS5 by clicking the corresponding button.


- Enter the name of this proxy, for example, "Static US SOCKS5". Read more about static proxies.


- Enter the IP and port of the proxy in any of the formats shown on the screenshot. In our case, it is sufficient to enter it in the IP:Port format without specifying a Username and Password.

After entering the proxy data, the Antik browser will automatically check the correctness of the data and the availability of the proxy. If everything is correct, a label will appear with the flag of the proxy's country and its geolocation (highlighted in red on the screenshot).
.

- Click the "Create" button to save the profile and its proxy.

Antik Adding a Proxy

Step 4: Bulk Adding a Proxy List


Antik Bulk Adding a Proxy List

Step 5: Uploading the Proxy List


For bulk addition of proxy lists, you need to prepare them for import by formatting them properly.


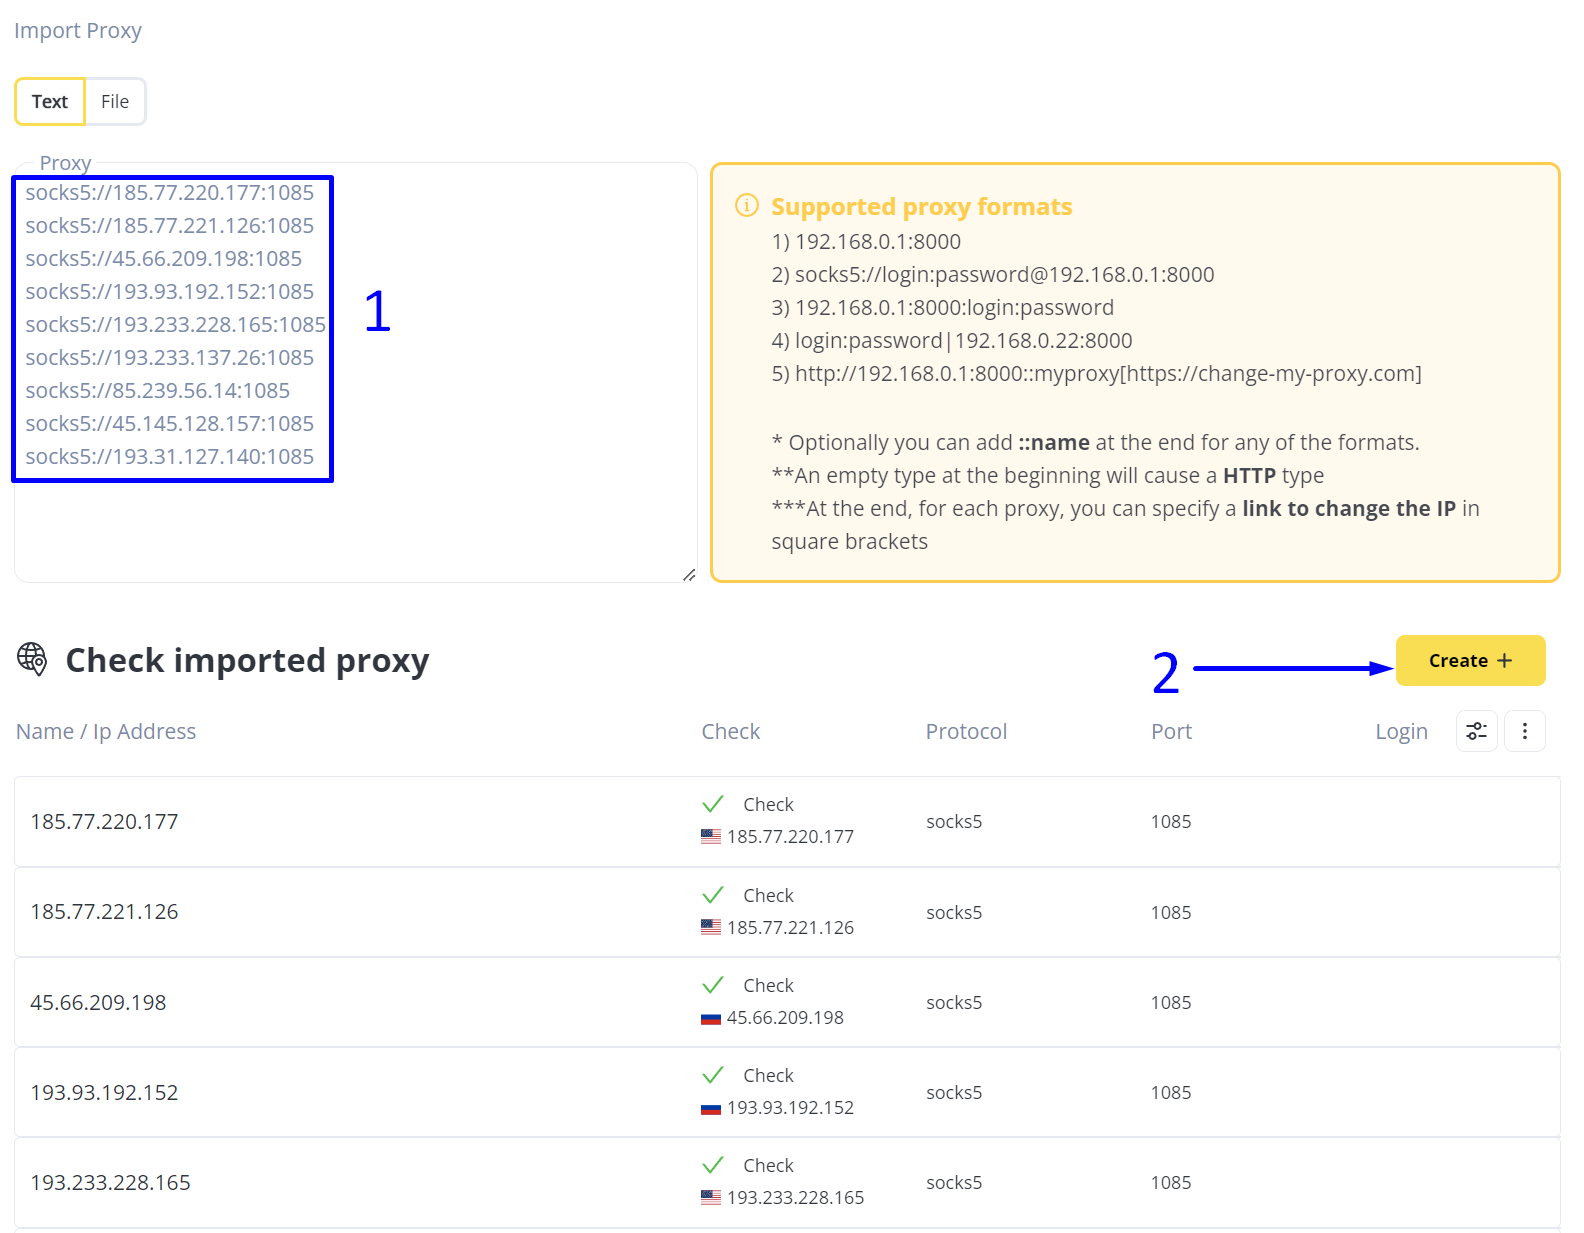
In our case, we want to add 9 proxy servers that operate on the SOCKS5 protocol and do not require username and password authorization. Therefore, we will use the format:


socks5://ip-address:port


We formatted our proxy list for import into Antik Browser as follows:


socks5://185.77.220.177:1085
socks5://185.77.221.126:1085
socks5://45.66.209.198:1085
socks5://193.93.192.152:1085
socks5://193.233.228.165:1085
socks5://193.233.137.26:1085
socks5://85.239.56.14:1085
socks5://45.145.128.157:1085
socks5://193.31.127.140:1085


Moving on:


- This list can be saved in a text file for import, or simply copied and pasted into the appropriate "Proxy" field. 

- Then, click on the yellow "Create +" button to complete the import.

Antik Uploading the Proxy List

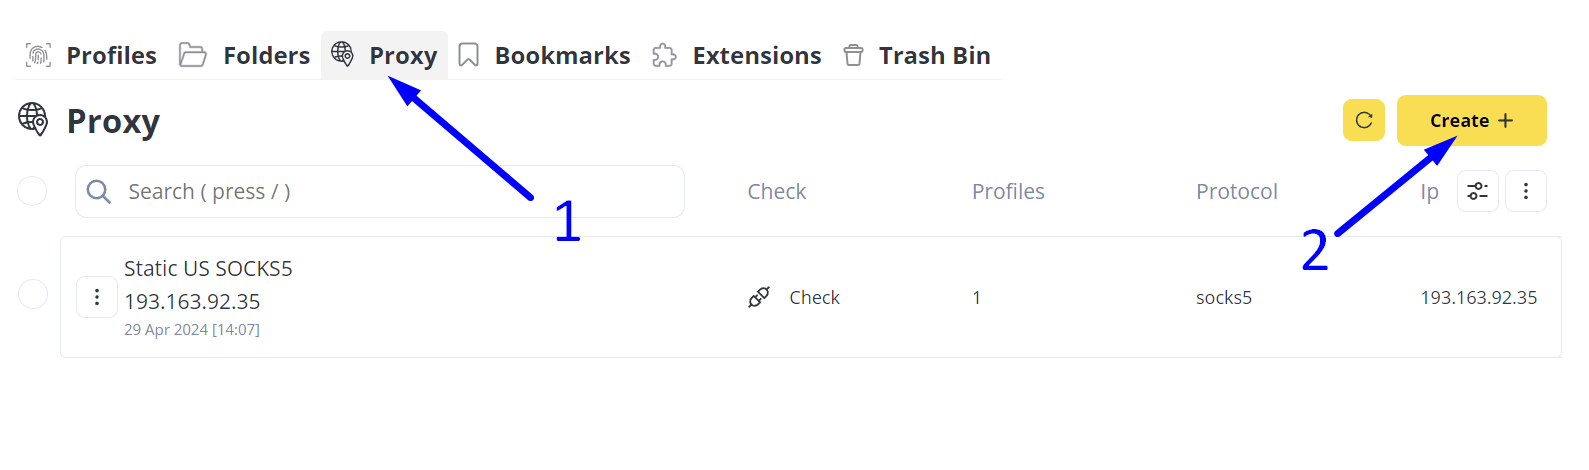
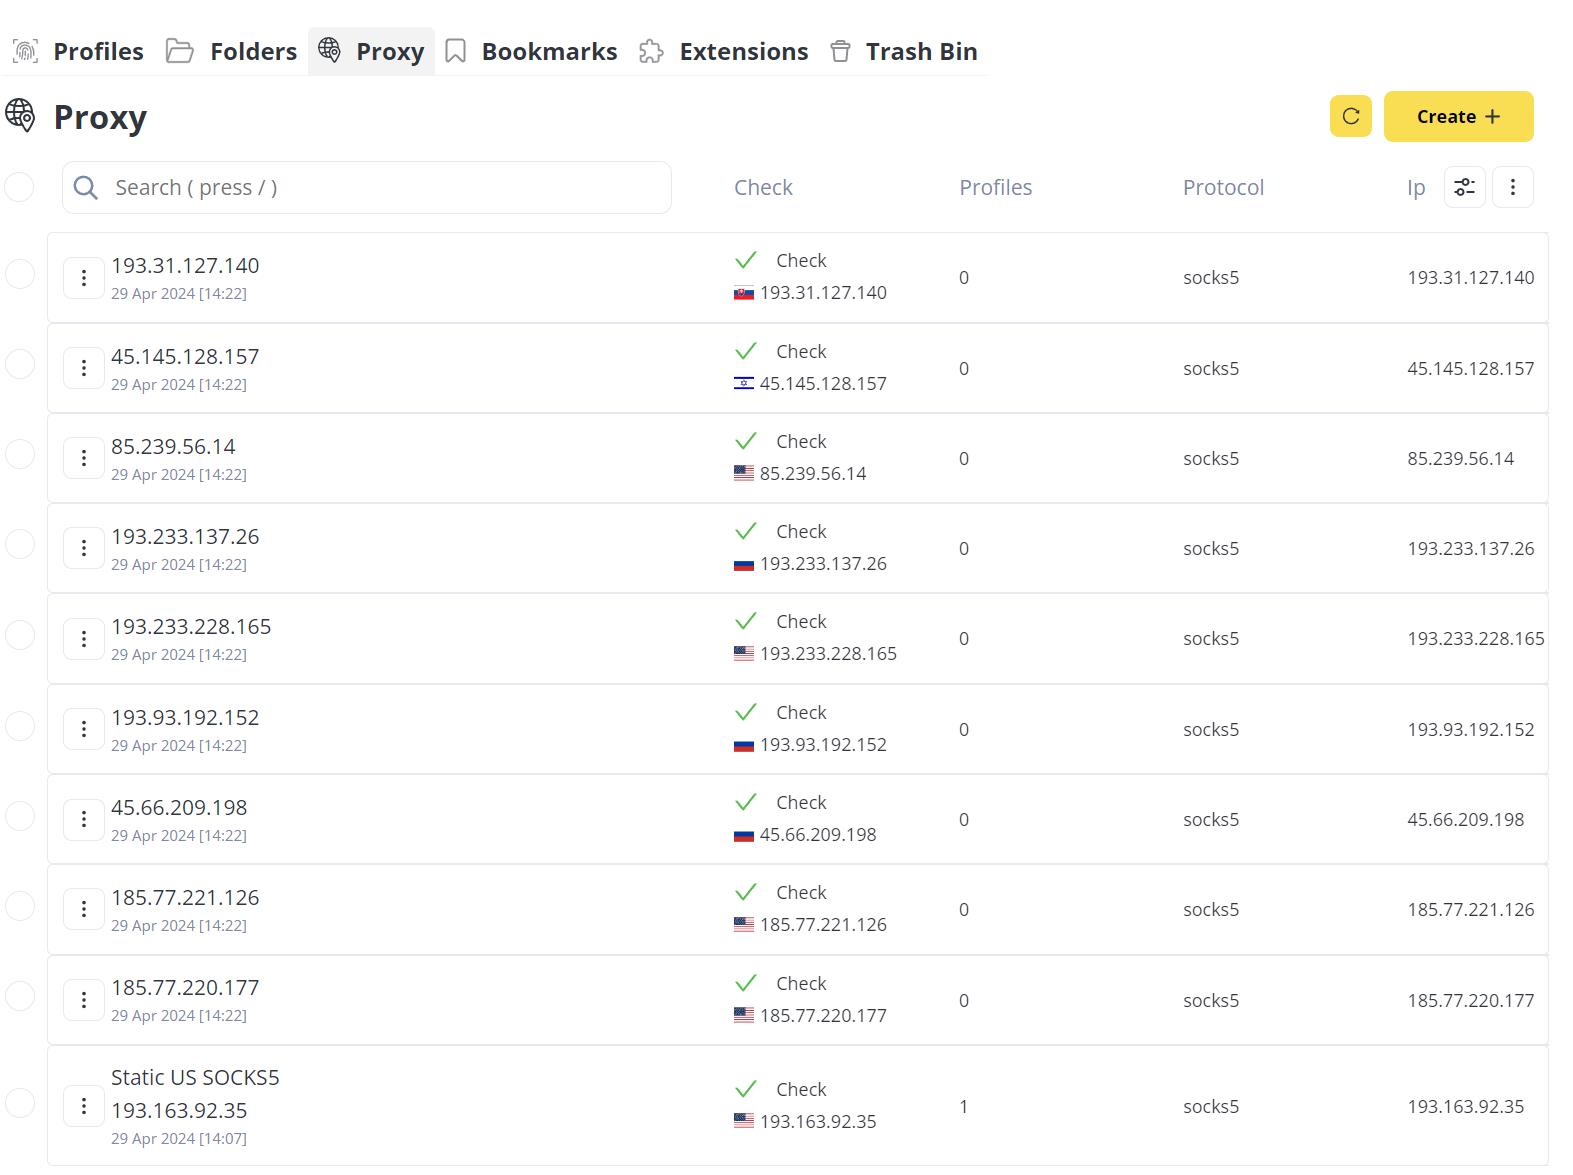
The result of importing proxies into Antik Browser


The result of importing proxies into Antik Browser

The addition of proxy servers to Antik Browser is complete. The proxies are now ready to be assigned to the relevant profiles.


https://proxycompass.com/knowledge-base/setting-up-a-proxy-in-the-antik-browser/

Dienstag, 25. Juni 2024

Setting Up a Proxy in Waterfox

Setting Up a Proxy in Waterfox

Waterfox is an anti-detect browser for secure web browsing based on the open source Mozilla platform. It supports multiple operating systems, including Windows, Linux and MacOS, and comes with built-in privacy features to prevent tracking by default. Waterfox allows for proxy server configurations to enhance user privacy and enable anonymous web browsing. This setup makes it a robust choice for users who value privacy and security online.


Because Waterfox is based on Firefox, the method for setting up proxy servers is similar.
Below, we'll show you how to set them up correctly.


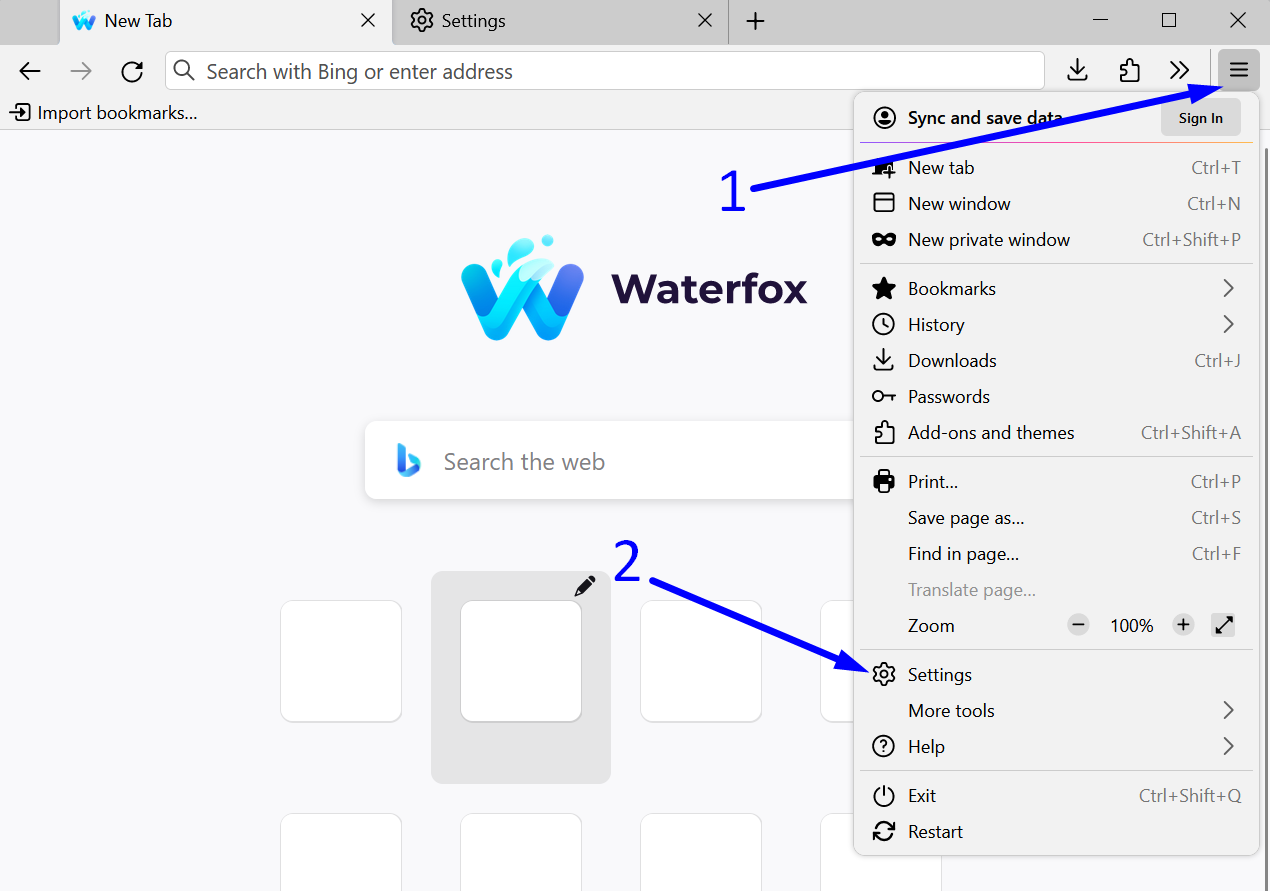
Step 1: Switch to Waterfox’s Settings


- Click on the three horizontal lines (hamburger icon) in the top right corner of the program window.

- In the menu that appears, click on the gear icon labeled “Settings”.

Switch to Waterfox’s Settings

Step 2: Open Waterfox Network Settings


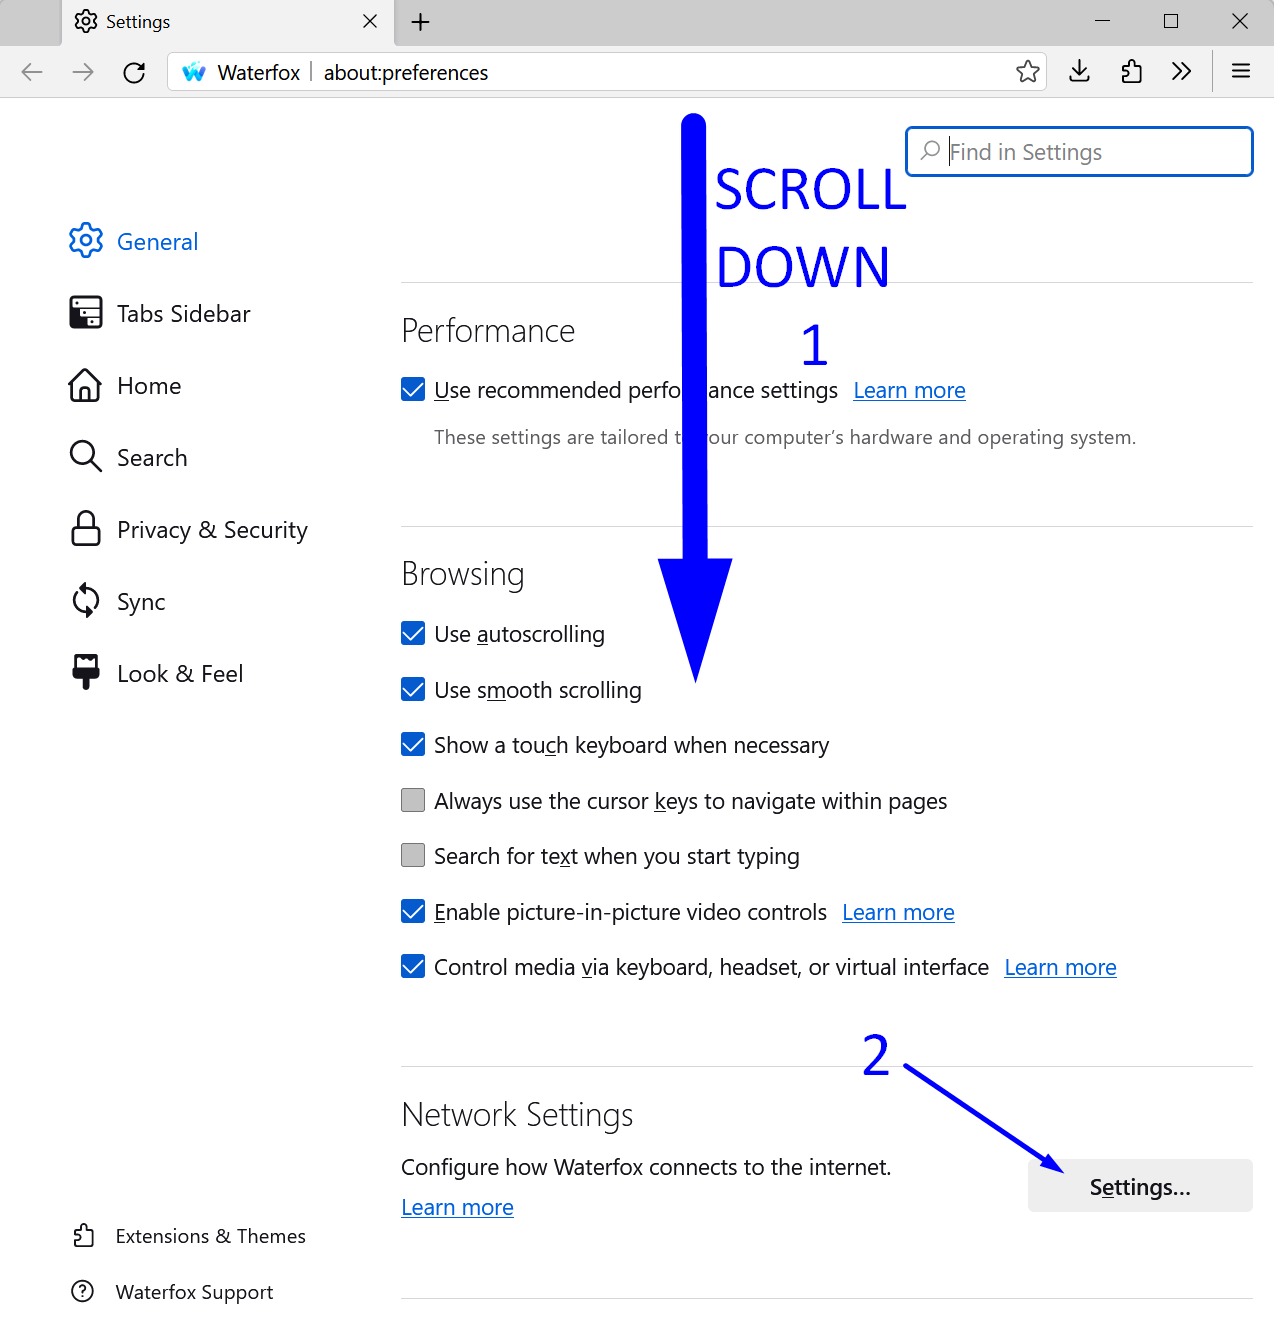
- Scroll down to the bottom of the menu.

- In the “Network Settings” section, click on the “Settings…” button.

go to network settings in waterfox

In the Waterfox proxy settings window, you have the option to choose from three available proxy protocols.


In Waterfox, you can select from three types of proxies: HTTP, HTTPS, and SOCKS5. SOCKS5 is often considered the best choice because it supports any type of traffic, offers optional authentication for added security, and does not modify the data, which improves performance and flexibility. HTTPS is suitable for secure web browsing, while HTTP is more basic and less secure.


We recommend always using SOCKS5 if your proxy supports it. Below, we will consider all three options.


Option 1: Setting Up a HTTP Proxy - Not Recommended


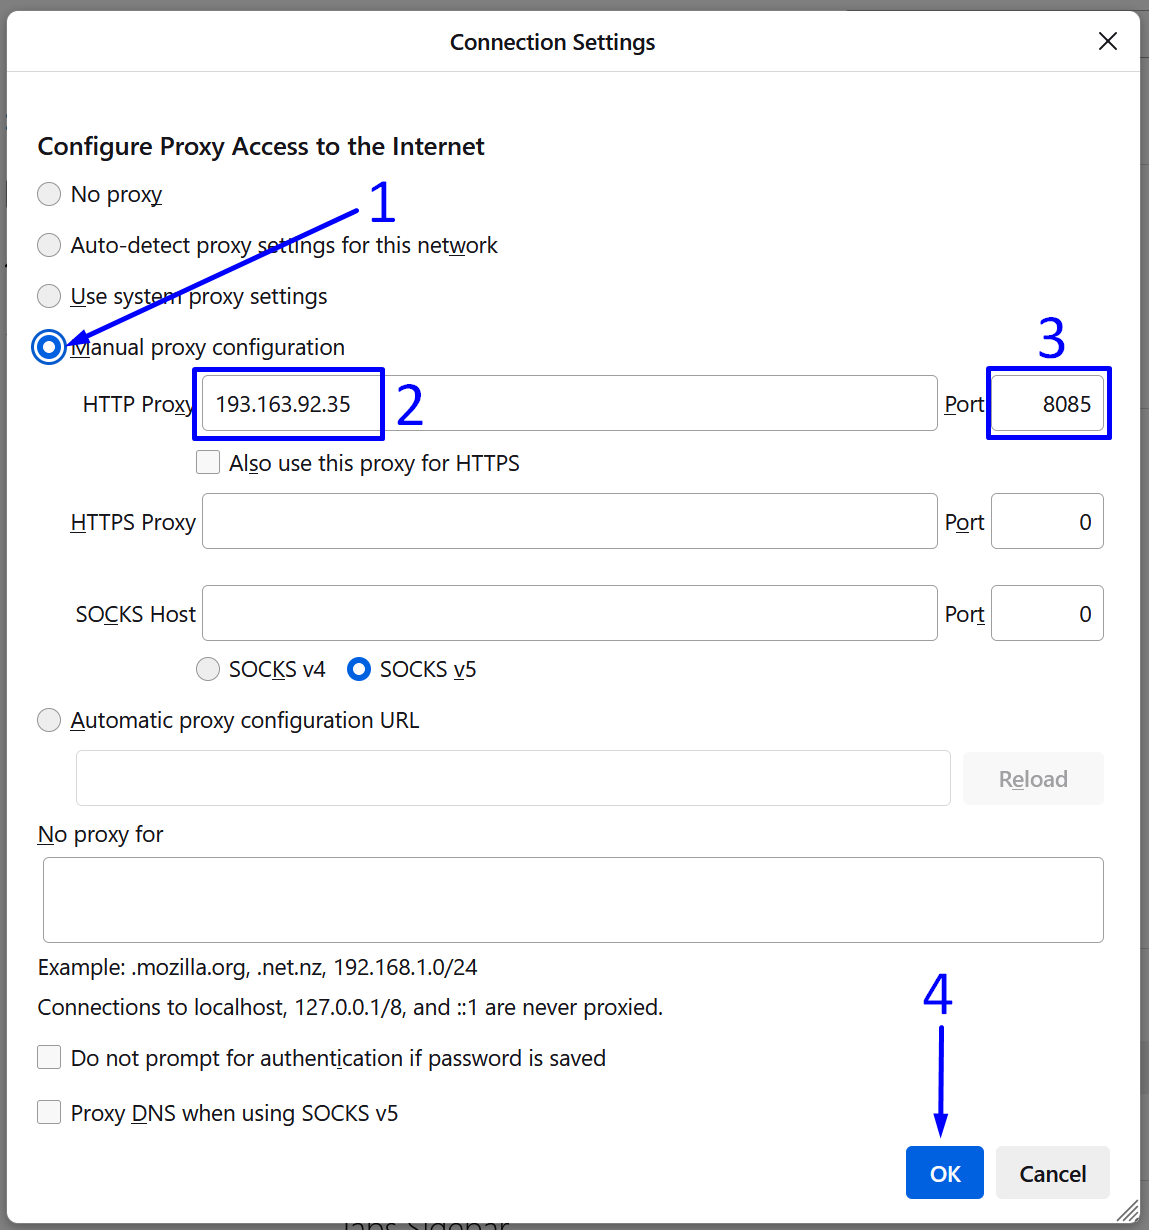
- Switch the browser to manual proxy setup by clicking on "Manual proxy configuration".

- Enter the IP address of your proxy into the "HTTP Proxy" field.

- Enter the port number in the "Port" field.

- Save the settings by clicking the "OK" button.

setting up http proxy in waterfox

Option 2: Setting Up a HTTPS Proxy - А Good Choice


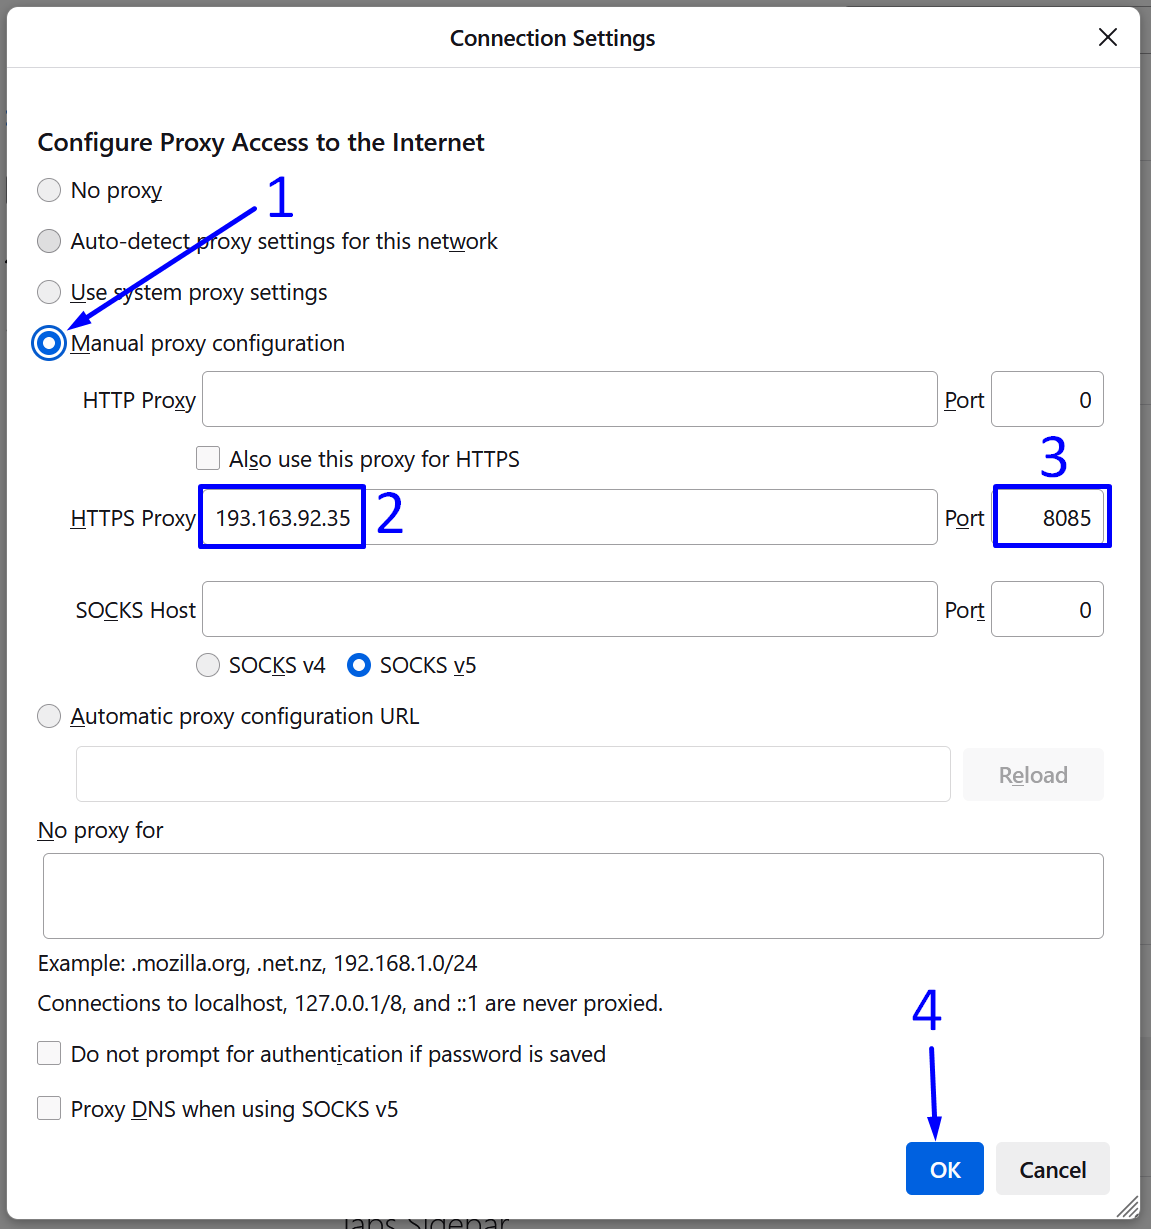
- Switch the browser to manual proxy setup by clicking on "Manual proxy configuration".

- Enter the IP address of your proxy into the "HTTPS Proxy" field.

- Enter the port number in the "Port" field.

- Save the settings by clicking the "OK" button.

setting up https proxy in waterfox

Option 3: Setting Up a SOCKS5 - The Best Choice


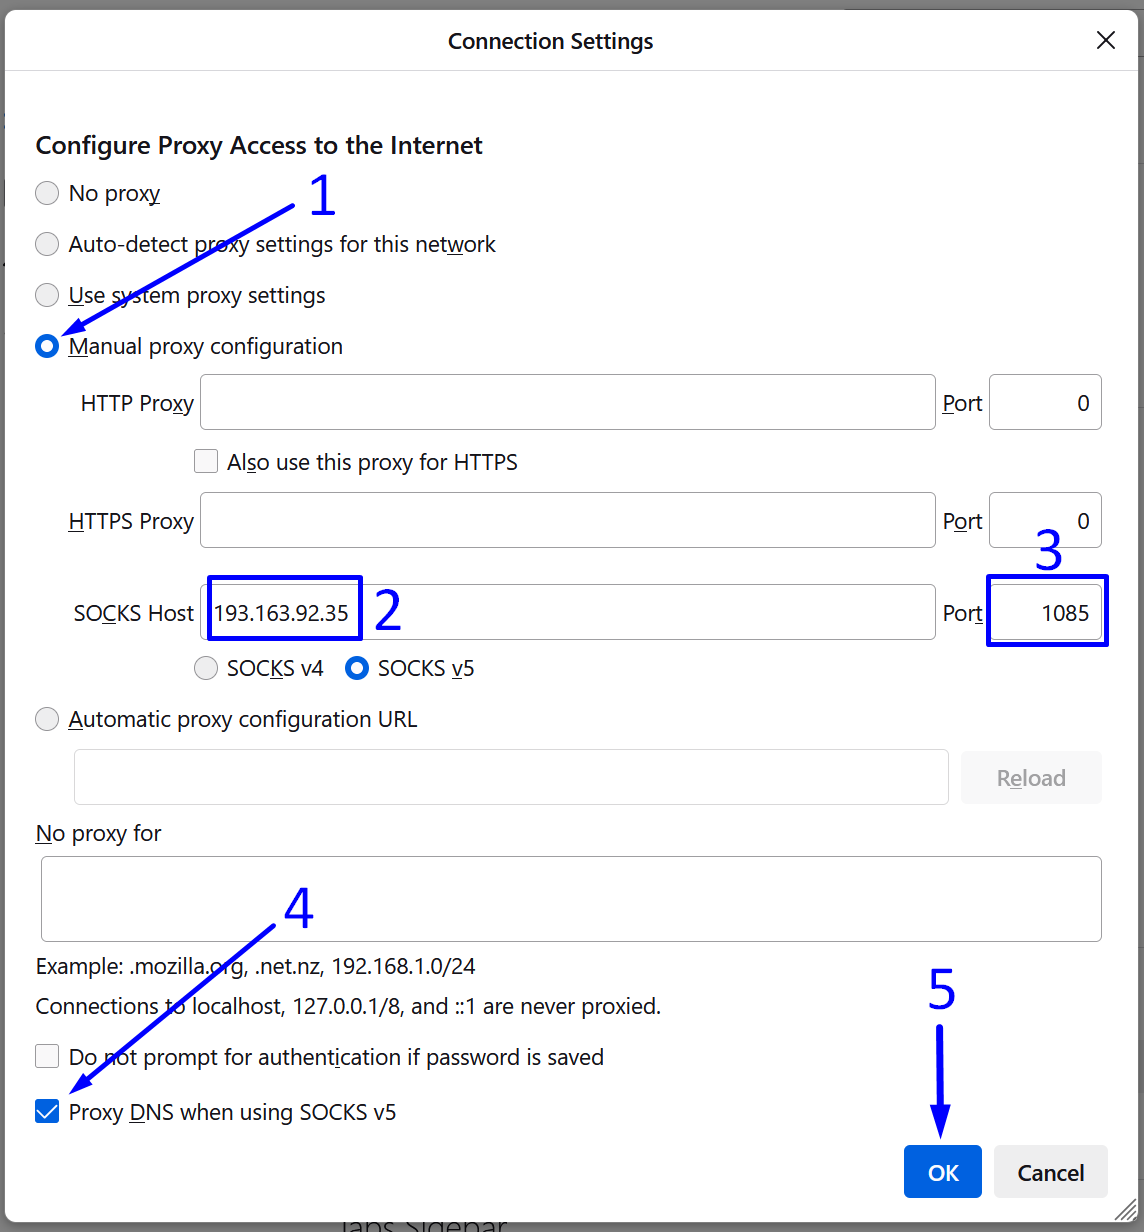
- Switch the browser to manual proxy setup by clicking on "Manual proxy configuration".

- Enter the IP address of your proxy in the "SOCKS Host" field.

- Enter the port number in the "Port" field.

- Check the option "Proxy DNS when using SOCKS v5" to route DNS requests through the SOCKS5 proxy, enhancing privacy by hiding these requests from local networks or ISPs and helping prevent DNS leaks.

- Click the “OK” button to save the SOCKS proxy settings in the browser.

setting up socks5 proxy in waterfox

The proxy setup in the anti-detect browser Waterfox is complete, and traffic is being routed through the configured IP address. Web surfing is now confidential and secure.


https://proxycompass.com/knowledge-base/setting-up-a-proxy-in-waterfox/

Montag, 24. Juni 2024

Setting Up a Proxy in the Accovod Browser

Setting Up a Proxy in the Accovod Browser

The Accovod web browser is specifically designed for users managing multiple social media accounts across platforms like VK, Facebook, Google, and LinkedIn.


Ideal for webmasters, it allows for efficient control over multiple groups, managing content, and interacting with posts and reviews. 


To fully utilize Accovod for such purposes, using proxy servers is essential, as this setup enhances the ability to manage various accounts without restrictions. 


Below, we will demonstrate how to use this program with proxy servers. Accovod supports various operating systems, including Windows, macOS, Linux, and mobile devices.


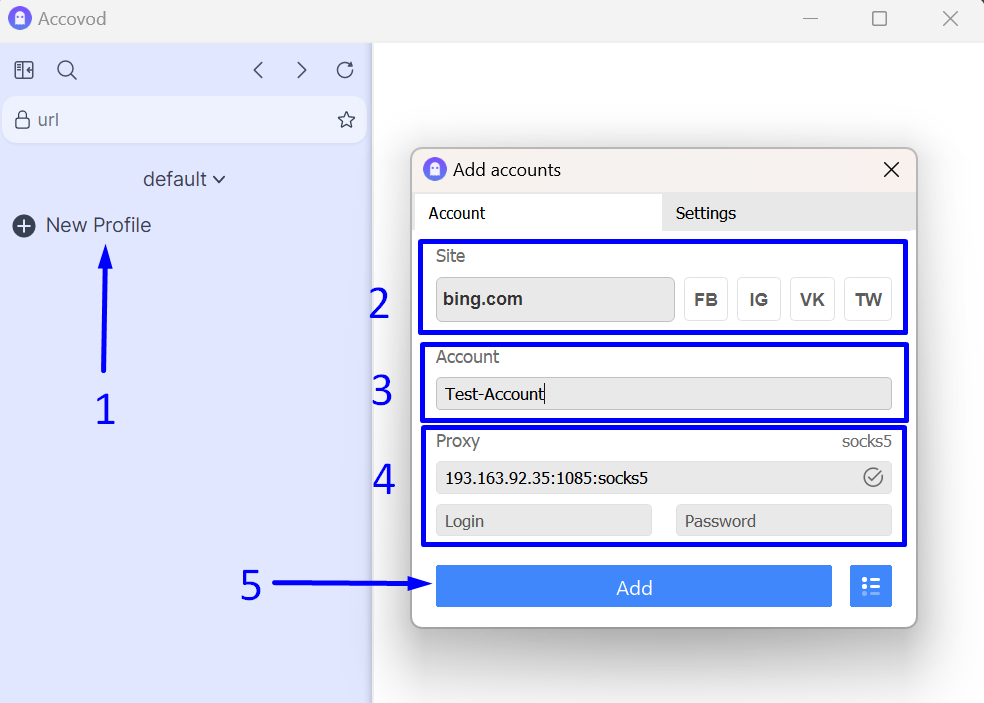
Step 1: Create a New Profile and Enter Proxy Details


To create a new profile and add specific proxy server details, follow these steps:


- Create a new profile by clicking on “New Profile” on the left side of the program.

- Enter the name of the desired website or choose from several offered sites/social networks.

- Invent a memorable name for the profile being created.

- Enter the IP address, port, and protocol of your proxy in the format:

ip:port:protocol

We recommend using the SOCKS protocol if possible.


- Click the “Add” button to save the newly created profile.

set proxy in accovod

Step 2: Manage Your Profiles


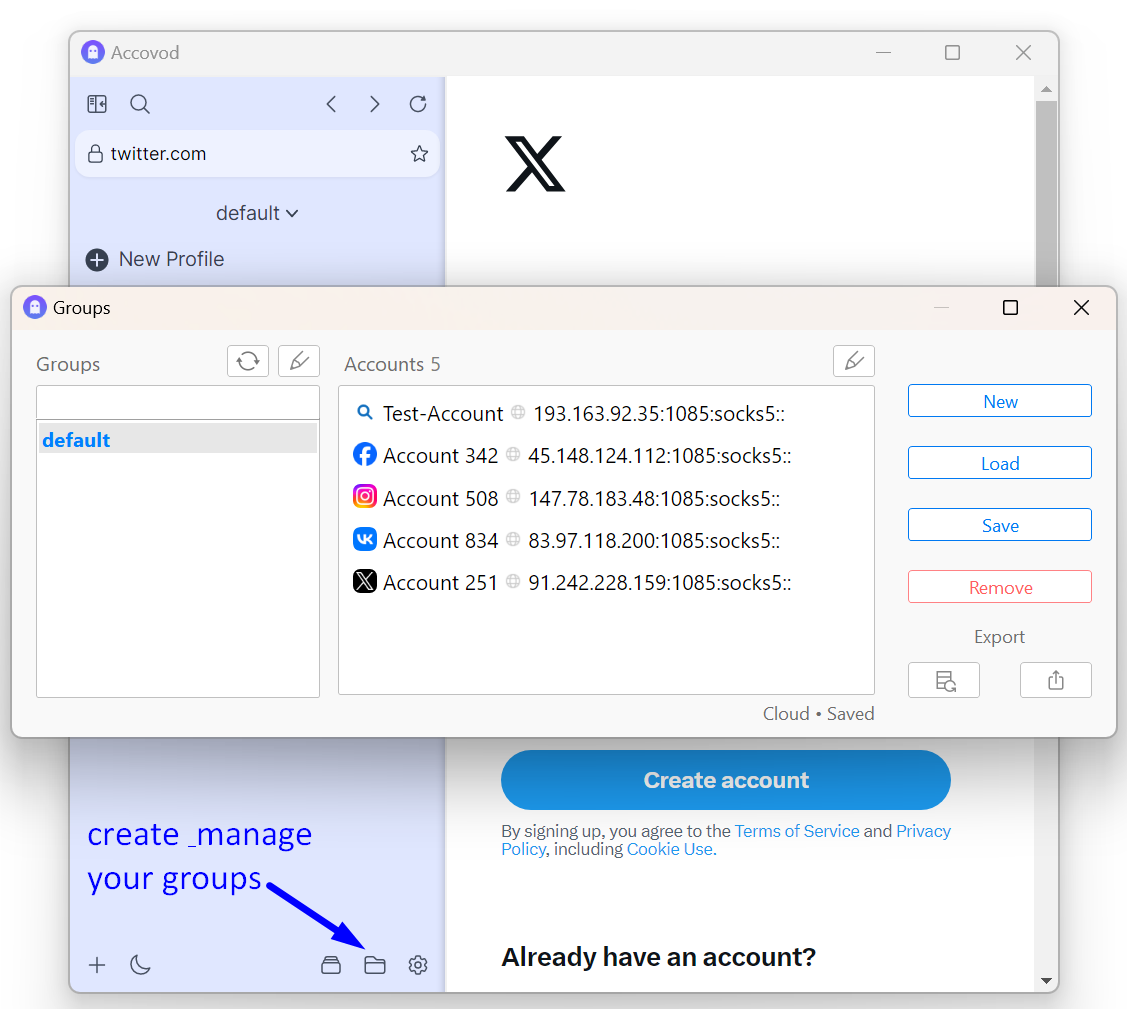
You can manage groups of created profiles using various features in Accovod. 


To see which specific proxy servers have been added to which profiles, click on the folder icon. 


This allows you to ensure that none of the proxy servers are duplicated for the same site to prevent your accounts from being blocked.


testing proxy connections in accovod

Now your Accovod is "charged" with profiles and protected by proxy servers.


Wishing you successful work and high traffic!


https://proxycompass.com/knowledge-base/setting-up-a-proxy-in-the-accovod-browser/