Sonntag, 30. Juni 2024

Setting Up a Proxy in the Avant Browser

Setting Up a Proxy in the Avant Browser

Avant Browser is an anti-detect browser designed for convenient and secure multi-accounting tasks. Using the Avant web browser ensures the security of your Internet connection, data encryption and online anonymity. To maximize your privacy while surfing the web and tunneling traffic, the browser allows you to configure a proxy server to change your IP address.


In this guide, we will show you how to properly use this browser in connection with a proxy server.


Step 1: Open Avant Browser's Proxy Settings


To add a proxy server to Avant Browser, follow these steps:


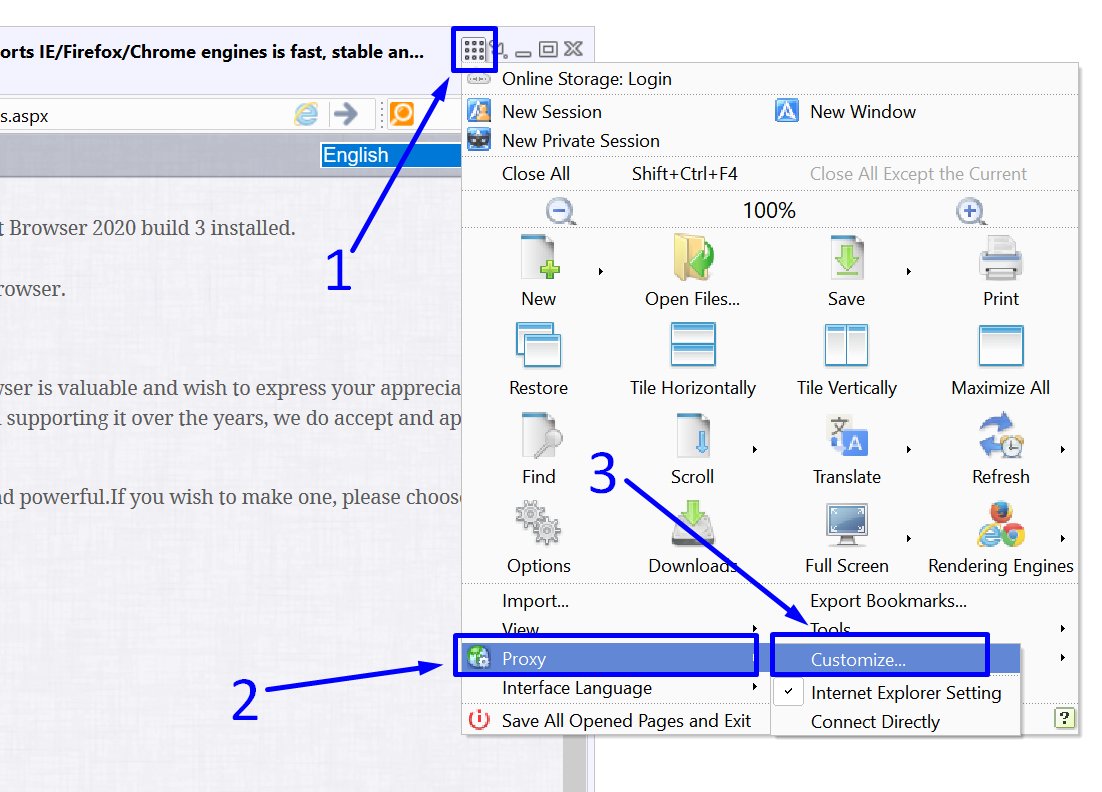
- Click on the square icon with a 9-dot image located at the top right corner of the program window.

- In the dropdown menu that appears, hover over the “Proxy” menu item.

- Move the cursor to the “Customize…” option and click on it.

Open Avant Browser's Proxy Settings

Step 2: Install HTTP or HTTPS proxy


Next, follow these steps:


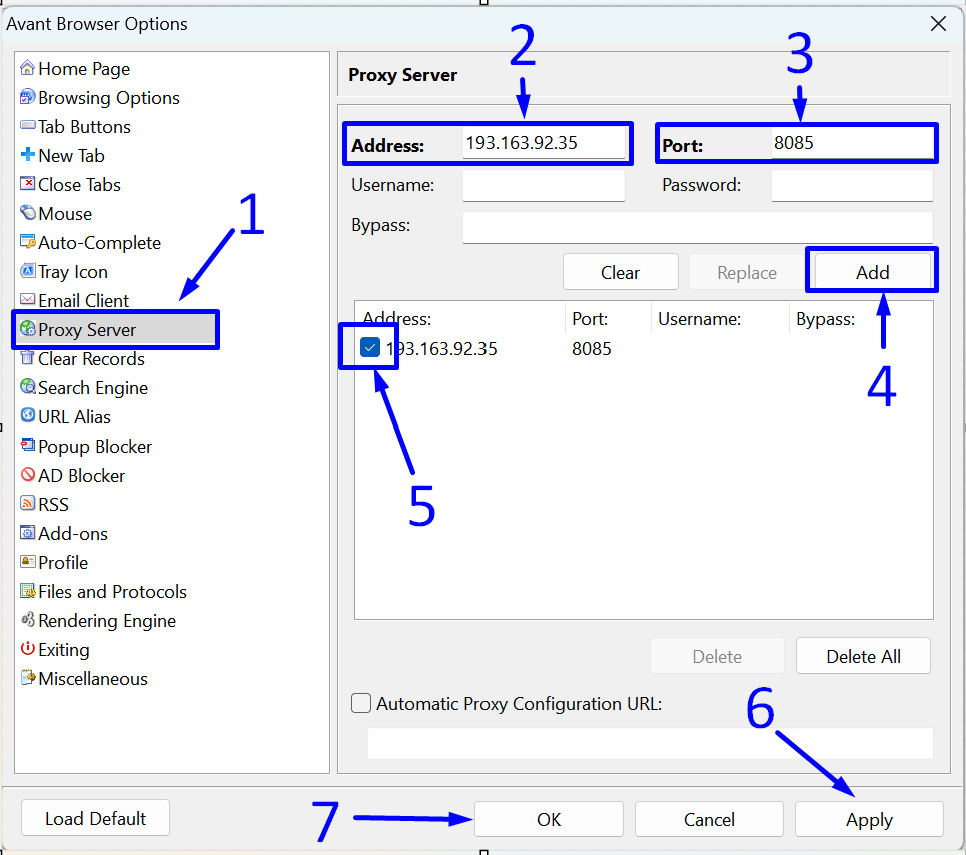
- In the left part of the browser screen, click on the "Proxy Server" item.

- In the "Proxy Server" section that appears on the right, enter the IP address of our HTTP / HTTPS proxy in the "Address:" field.

- Enter the port in the "Port:" field.

In our case, entering a username and password is not necessary, so leave these fields blank.


- Click on the "Add" button.

- Check the box next to the newly listed proxy server.

- Click on the "OK" button.

- Finish setting up the proxy by clicking on the "Apply" button.

Avant browser Install HTTP or HTTPS proxy

After completing all the steps listed above, all connections in Avant Browser will pass through the proxy server we specified.


Unfortunately, this browser does not support the use of the more versatile and anonymous SOCKS proxy. Therefore, we recommend using the more secure version of the HTTP protocol - HTTPS.


https://proxycompass.com/knowledge-base/setting-up-a-proxy-in-the-avant-browser/

Samstag, 29. Juni 2024

Setting Up a Proxy in Epic Privacy

Setting Up a Proxy in Epic Privacy

The Epic Privacy Browser enables the use of a proxy server to mask the user's real IP address and encrypt DNS queries, blocking attempts by scripts to track personal data. 


Setup of a private proxy in Epic Browser can be done through the system settings of Windows and MacOS, which also allows access to geo-restricted content like Spotify, Netflix, and YouTube. 


Epic does not store browsing history by default, deleting any sites, links, and certificates related to the browsing session upon closing the browser. 


For proxy configuration, particularly when needing authentication, setup is conducted via the comprehensive proxy settings in the Windows OS, affecting all programs and applications on the device. 


Follow these steps to configure a private proxy server with authentication.


Step 1: Open the Settings of the Epic Privacy Browser


To access the browser settings, you need to:


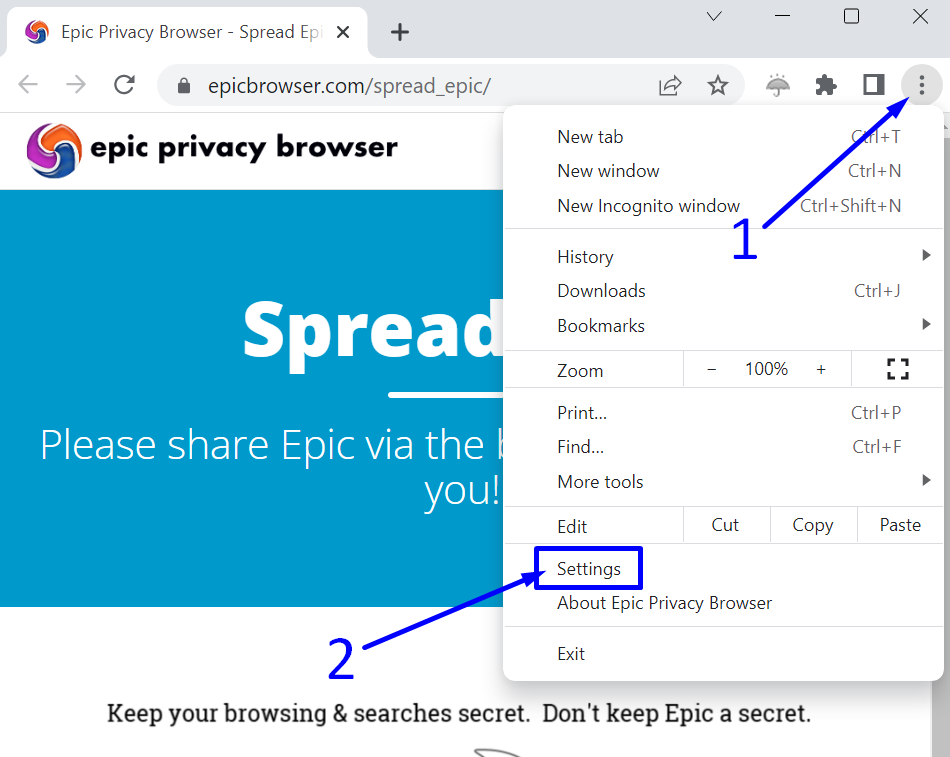
- Click on the three vertical dots in the top right corner of the program.

- In the dropdown menu, click on "Settings".

Open the Settings of the Epic Privacy Browser

Step 2: Go to System Settings


Next, on the settings page that appears, you need to:


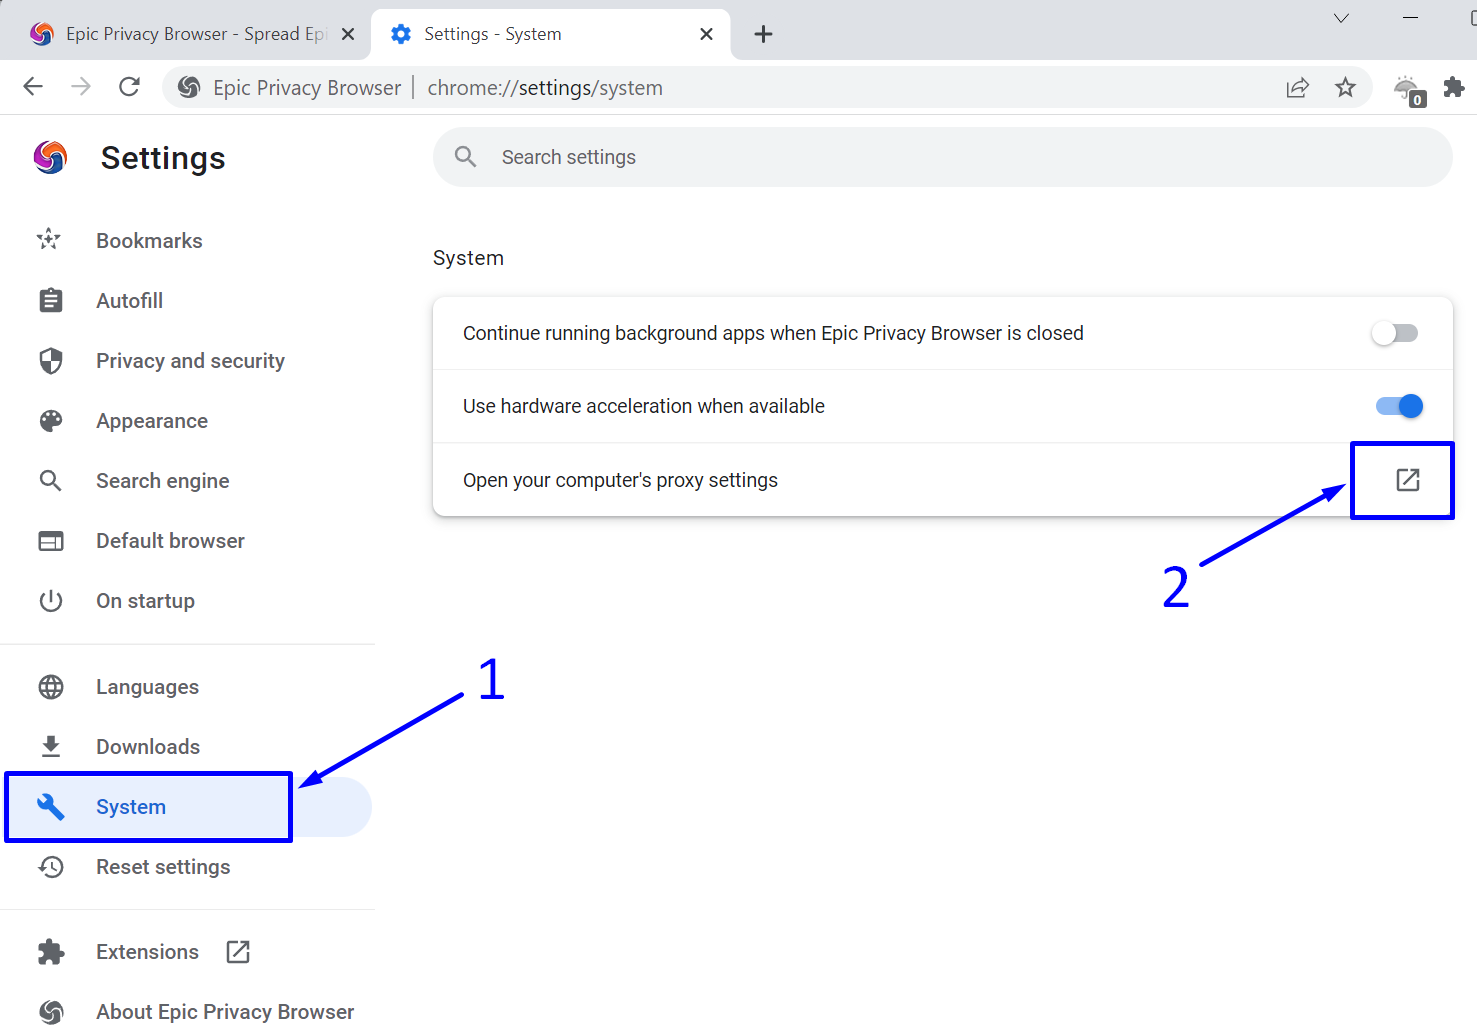
1. Click on the "System" section in the left sidebar.


2. Then click on the arrow icon next to the item "Open your computer’s proxy settings".


Epic Privacy Go to System Settings

Step 3: Open the Operating System's Network Settings


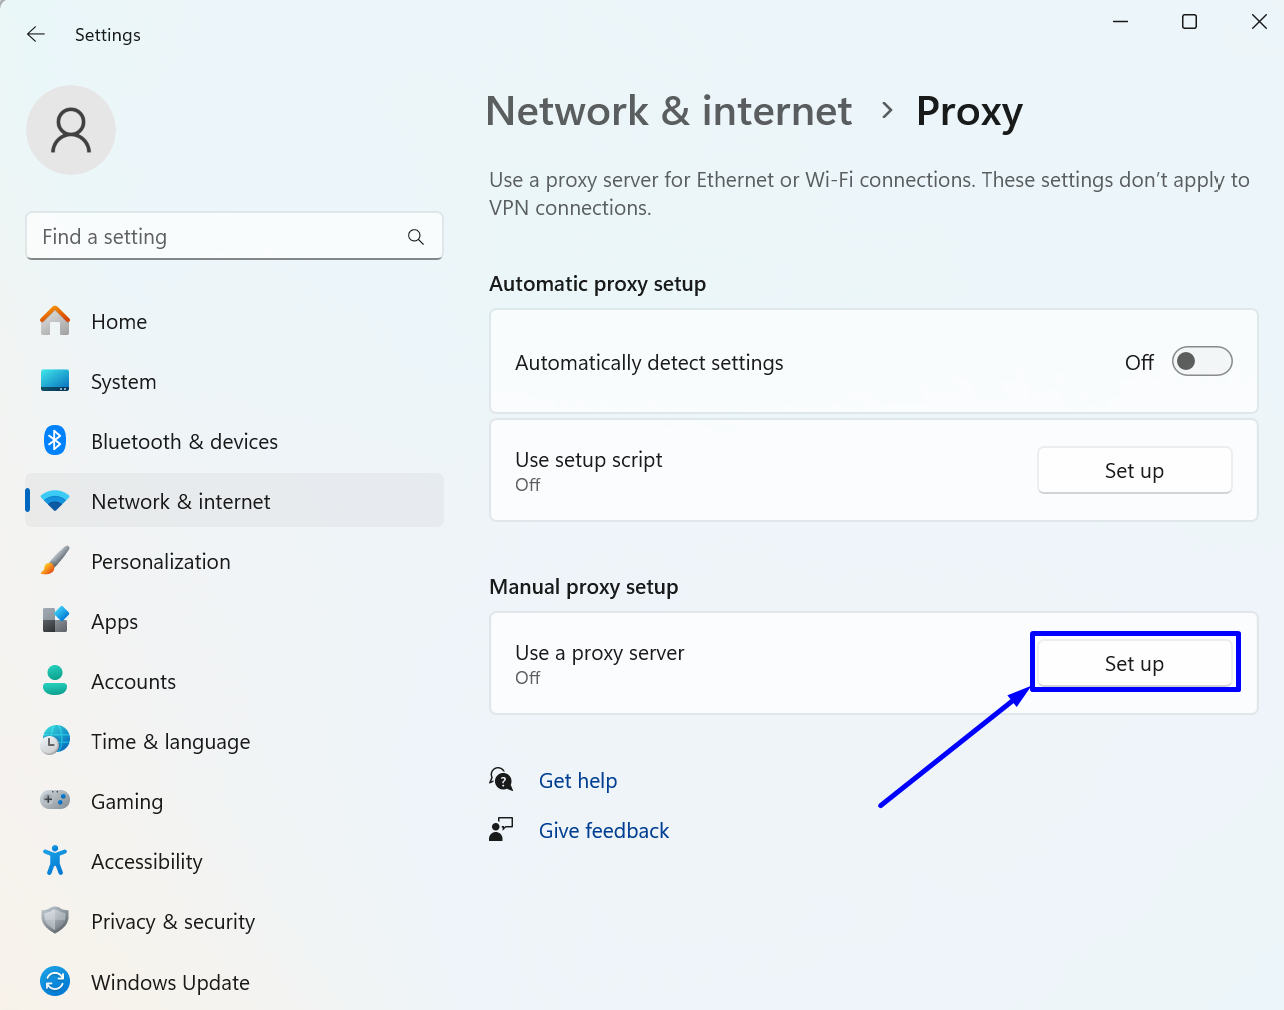
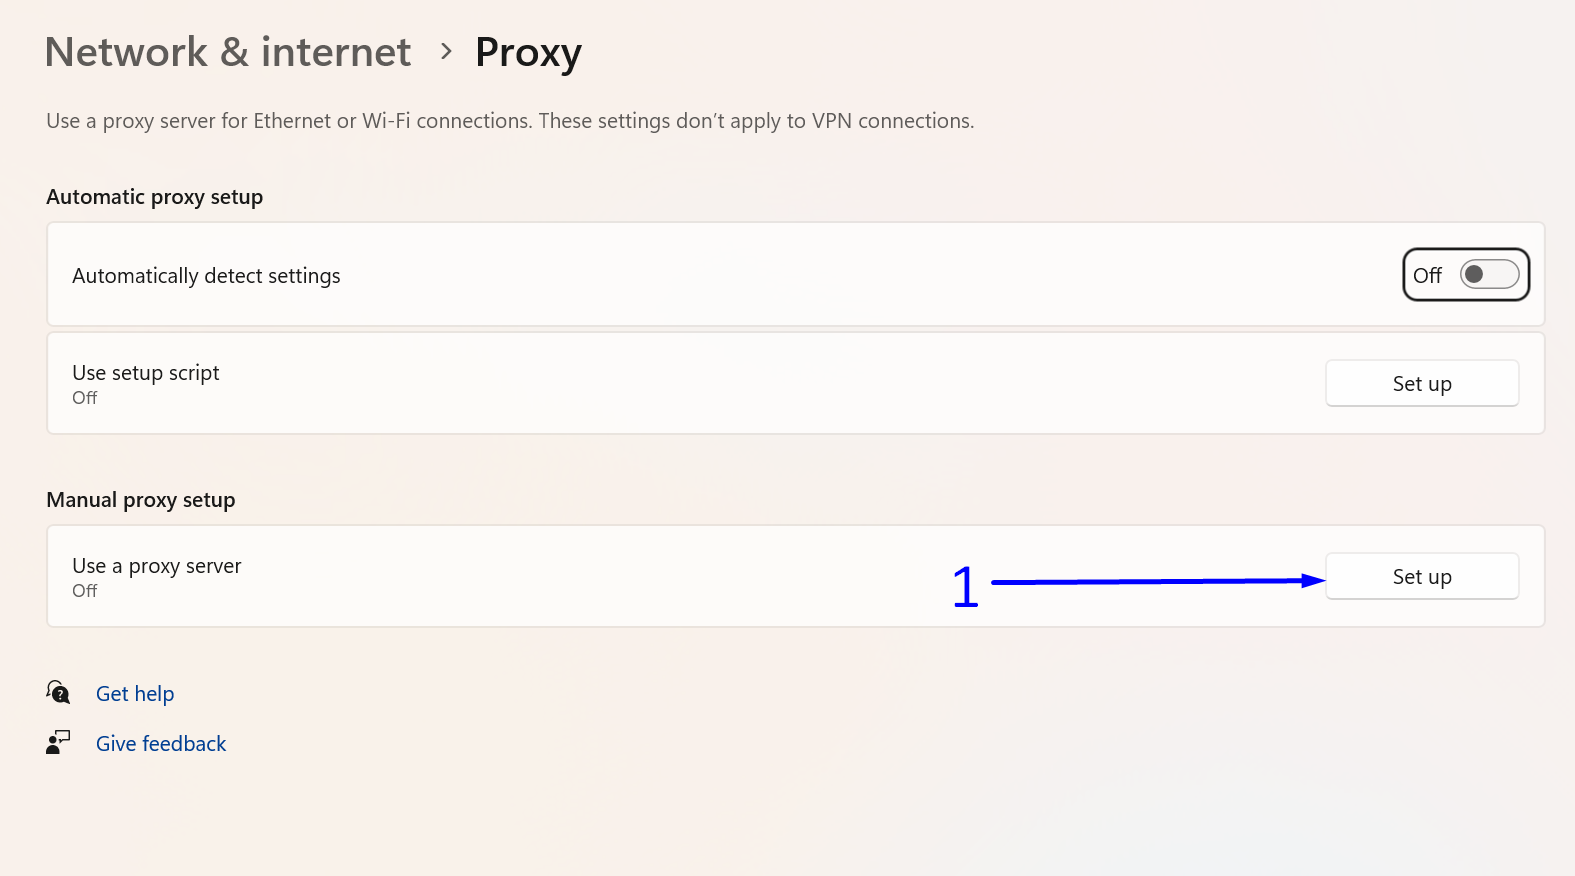
In the "Manual proxy setup" section, click on the "Set up" button.


Epic Privacy Open the Operating System's Network Settings

Step 4: Set Up an HTTP or HTTPS Proxy


Since we are changing the system settings of the operating system, in our case Windows, we have the option to set only HTTP / HTTPS proxy.


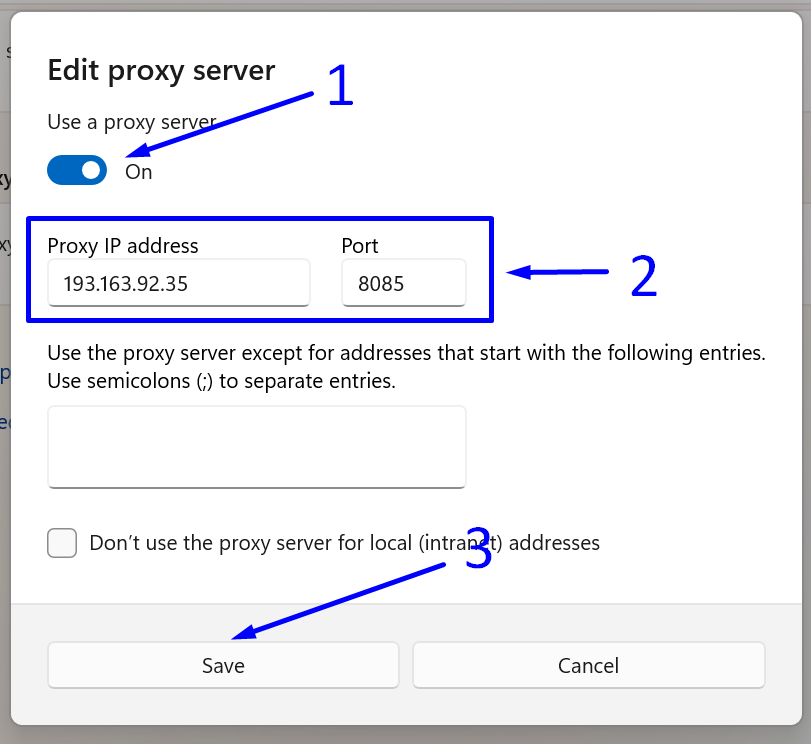
In the window that appears:


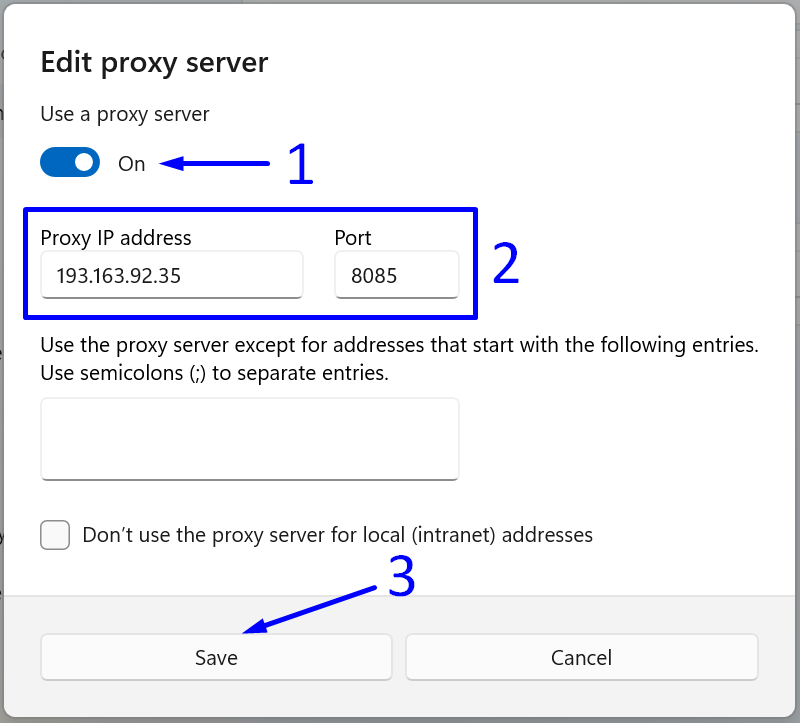
- Toggle the “Use a proxy server” switch to “On”.

- Enter the IP address and port of our proxy in the “Proxy IP address” and “Port” fields.

- Save the settings by clicking the “Save” button.

Epic Privacy Set Up an HTTP or HTTPS Proxy

To check the result of the settings change, you can visit the IP address verification page.


Our Verdict on Proxy Integration with Epic Privacy Browser


Despite the anonymity options offered by the developers of the Epic Privacy Browser, this browser does not have its own network settings. Therefore, any attempt to change the IP in this browser will also affect all other browsers using the operating system's common network settings, meaning the IP will also change in browsers like Chrome, Internet Explorer, Edge, and other programs.


Another drawback of the Epic Privacy Browser is the lack of support for SOCKS protocol and other detailed proxy server settings.


https://proxycompass.com/knowledge-base/setting-up-a-proxy-in-the-epic-privacy-browser/

Freitag, 28. Juni 2024

Setting Up a Proxy in Hidemyacc

Setting Up a Proxy in Hidemyacc

Hidemyacc is a sophisticated anti-detect browser built on the Chromium platform and designed specifically for multi-account management. It facilitates the creation of unique digital fingerprints, making it ideal for online marketing, web analytics, cryptocurrency trading, and other activities that require multiple accounts.


Compatible with both Windows and MacOS, Hidemyacc allows users to create an unlimited number of accounts while providing advanced proxy server configurations for enhanced privacy and security.


Next, we will demonstrate the proper methods for integrating this browser with proxy servers using real-world examples.


Step 1: Create a New Profile


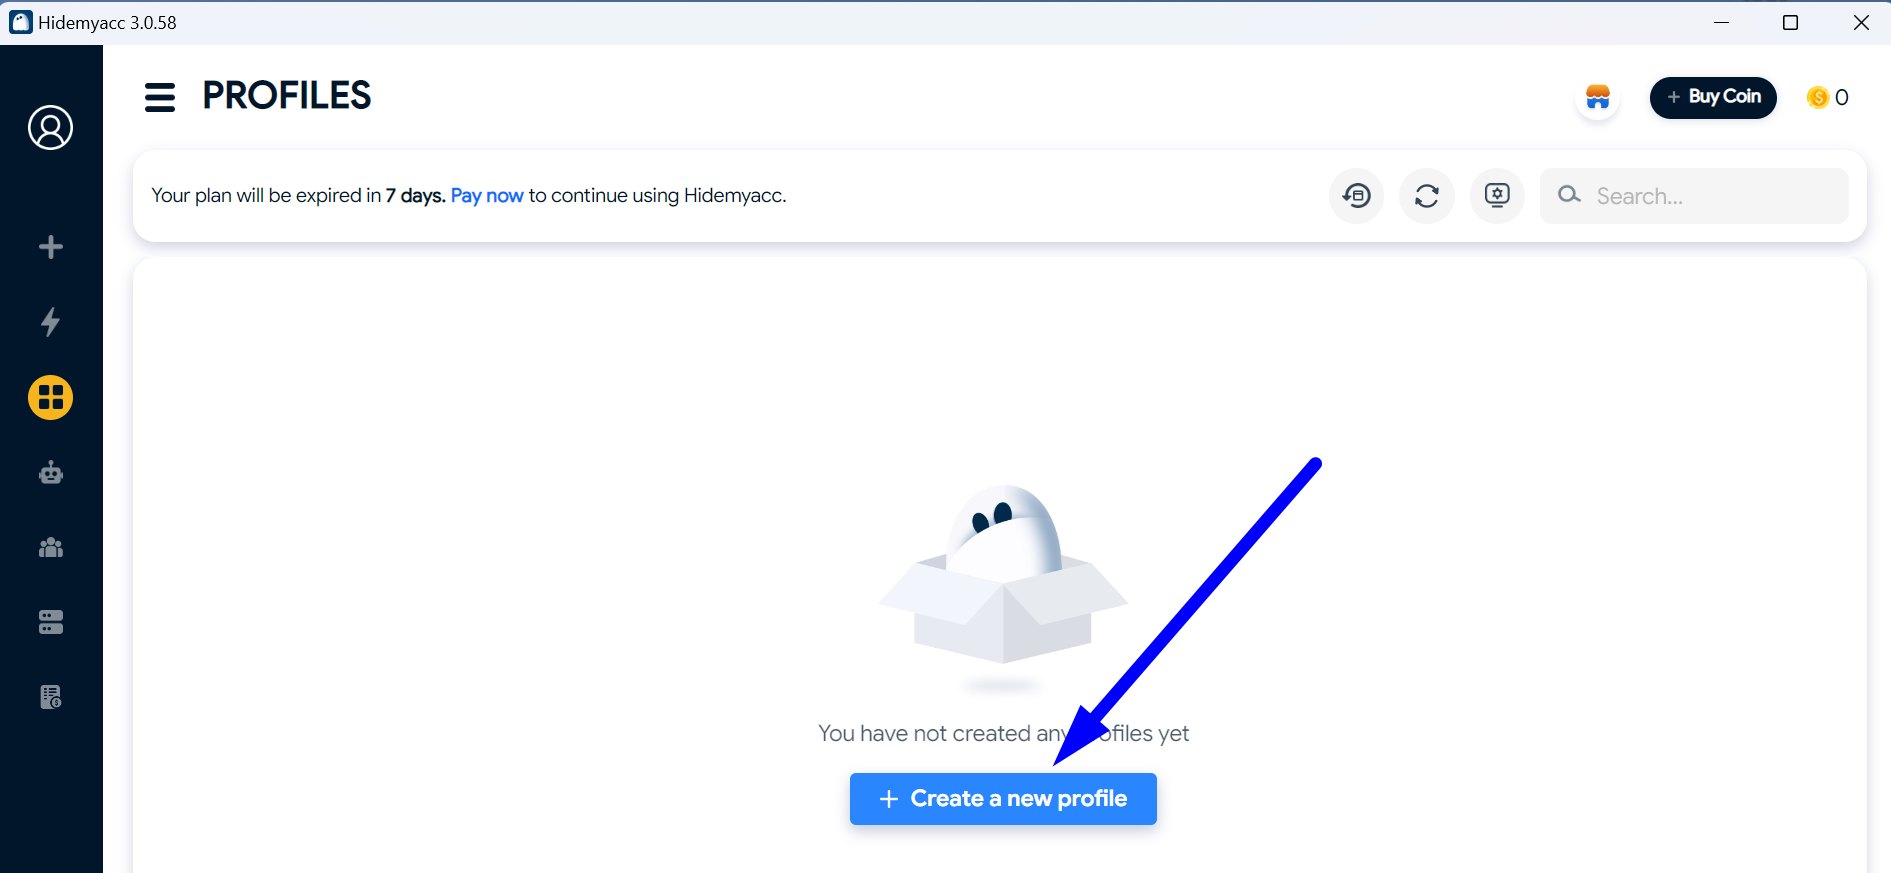
Initially, you need to create a profile. Click on the "+ Create a new profile" button to get started.


Hidemyacc Create a New Profile

Scenario 1: Creating a Profile with a Static Proxy


The most typical use case for the Hidemyacc browser is managing multiple online accounts simultaneously for activities such as online marketing or social media management. 


In such scenarios, using a static proxy is essential to maintain consistent IP addresses, ensuring that each account appears to operate from a unique and stable location, thereby reducing the risk of detection and bans.


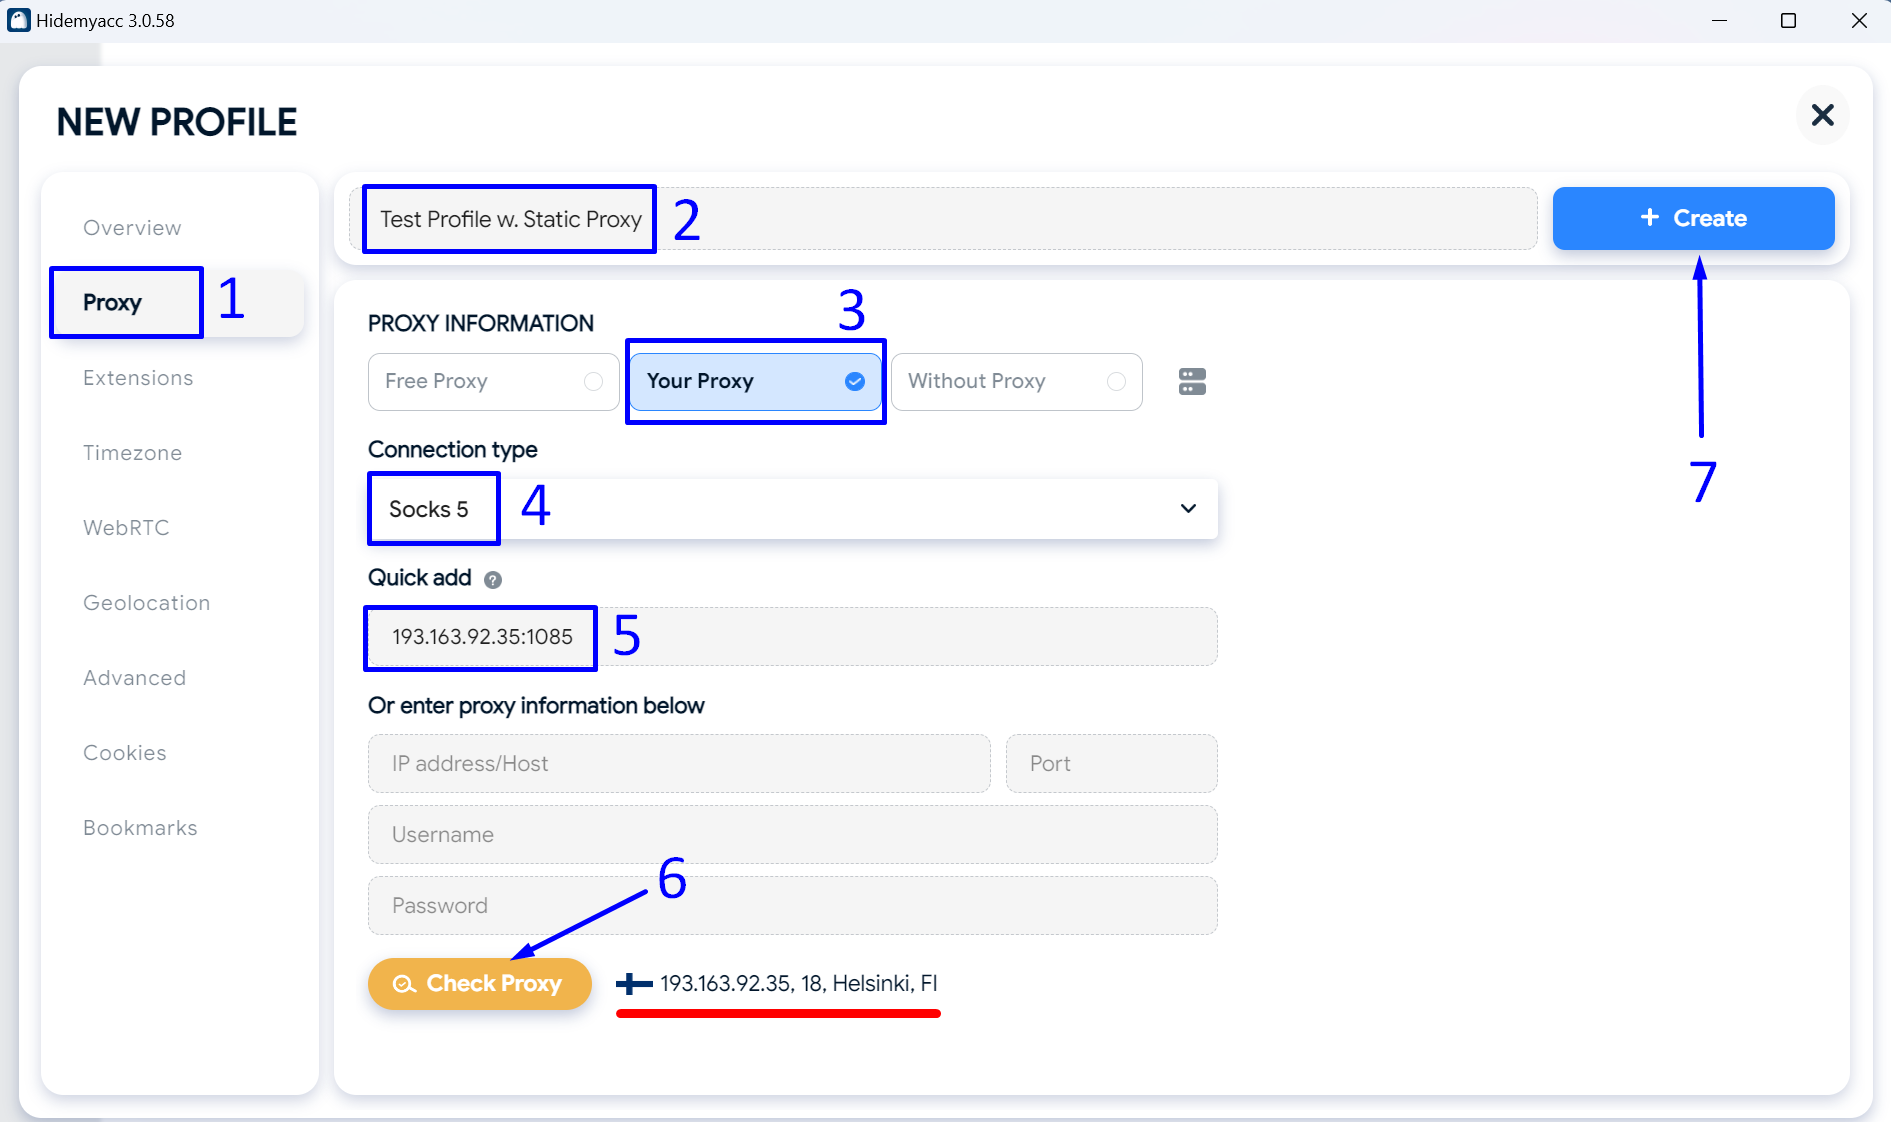
To add a static proxy to a Hidemyacc profile, follow these steps:


- In the left menu, click on the “Proxy” section.


- Name the profile with a memorable title.


- In the Proxy Information section, select “Your Proxy”.


- Choose the protocol supported by your proxy. If available, we recommend choosing the “Socks5” protocol as it is the most versatile and anonymous.


- Enter the IP address of your proxy and its port.


In our case, the proxy does not require authentication with a username and password, so we leave the Username and Password fields blank.


- Click on “Check Proxy” to test the connection with the proxy server.

If the connection is successfully established, a flag of the proxy's country and its geo-data will appear (highlighted in red on the screenshot).


- Save the settings by clicking the “+ Create” button.

Hidemyacc Creating a Profile with a Static Proxy

Szenario 2:  Creating a Profile with a Rotating Proxy


An unconventional yet important use case for the Hidemyacc browser is conducting competitive research across different regions. 


For such tasks, utilizing a rotating proxy is crucial. Rotating proxies change the IP address periodically, allowing for anonymous access to geo-restricted content from various locations without raising suspicion. 


This setup is particularly valuable for businesses that need to gather data on regional market trends or monitor competitor activities across different geographic areas.


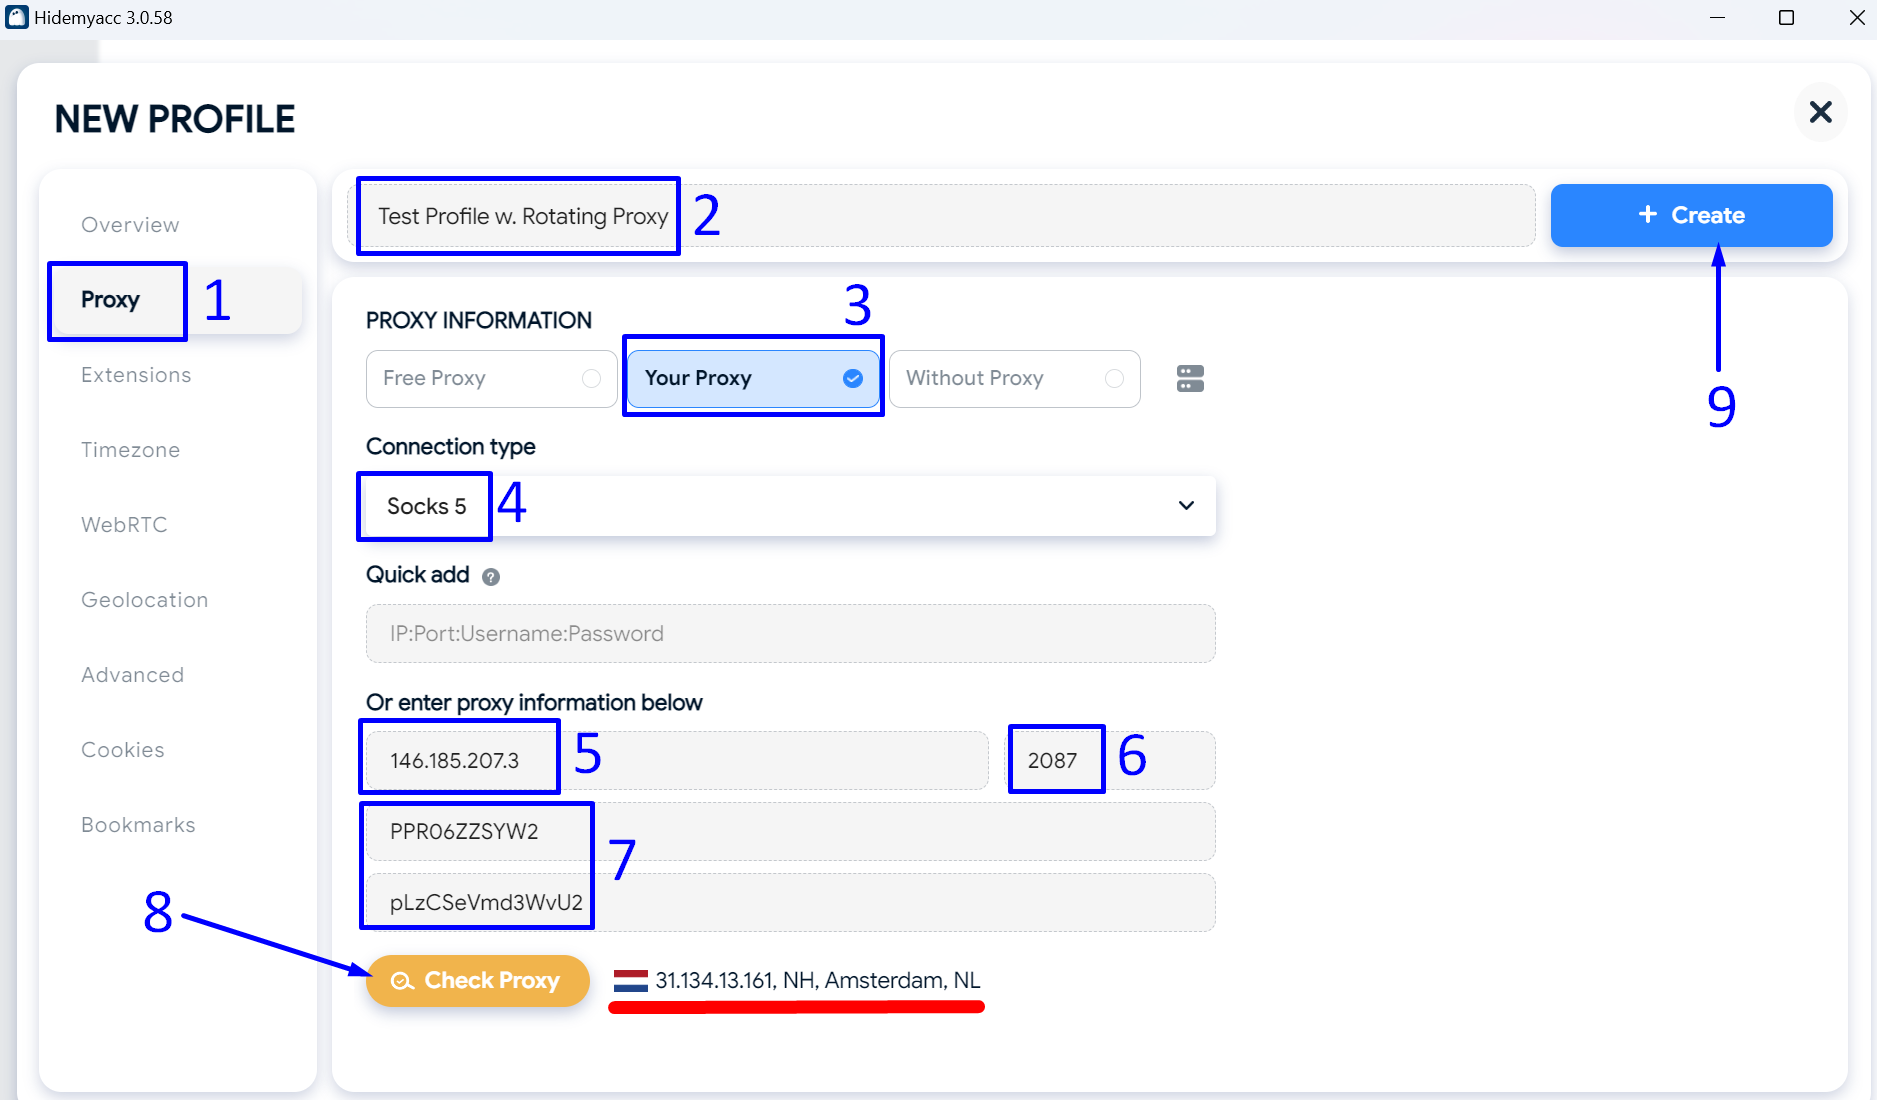
To add a rotating proxy to the Hidemyacc browser, follow these steps:


- In the left sidebar, click on the “Proxy” section.


- Name the profile with a memorable name.


- In the Proxy Information section, select “Your Proxy”.


- Choose the protocol of your proxy. In our case, we chose “Socks5”.


- Enter the IP address of the proxy gateway. Note that this is not the IP address your profile will receive, but rather the gateway through which your profile will receive a new IP each time.


- Enter the port of your gateway.


- Provide the login and password for the authentication of your proxy gateway.


- Click on the “Check Proxy” button to test the connection with the gateway.

Hidemyacc will attempt to connect to the specified gateway and retrieve a random IP. If a message appears with a flag and geolocation of the proxy (highlighted in red), everything is in order.


- Save the settings by clicking the “+ Create” button.

Hidemyacc Creating a Profile with a Rotating Proxy

Results


As you can see in the screenshot below, our two profiles (static and rotating) are ready for use.


To launch the Hidemyacc browser with the required profile settings, simply click on the "Run" button next to the corresponding profile.


Hidemyacc adding proxies successful


https://proxycompass.com/knowledge-base/setting-up-a-proxy-in-hidemyacc/

Donnerstag, 27. Juni 2024

Setting Up a Proxy in MoreLogin

Setting Up a Proxy in MoreLogin

The MoreLogin browser secures account and user data using digital fingerprint technology. It supports both Windows and Mac OS devices. As an anti-detect browser, MoreLogin allows secure management of multiple accounts on a single device, presenting each profile as a new device.


It provides API automation integration for tasks related to opening or creating configuration files. Designed to provide an extra layer of anonymity and protection against user identification and tracking online, the highest level of security in MoreLogin can be achieved through proxy settings.


Installing a proxy server in the browser allows access to blocked resources, secures personal information and data, and facilitates testing of websites and applications.


In this guide we will show you different ways to add proxies to MoreLogin browser.


Step 1: Create a New Profile


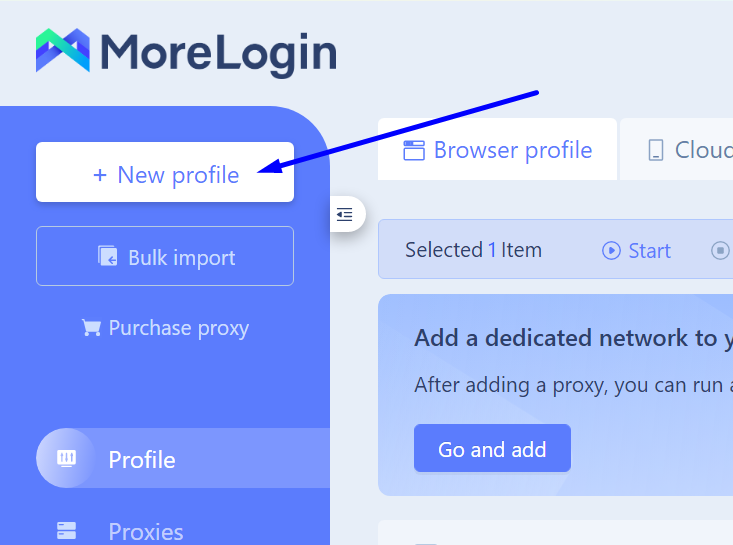
First you need to create a new profile. To do this, click the "+ New Profile" button. We will do this twice to create two profiles to demonstrate adding two different types of proxies for each profile: a static proxy and a rotating proxy.


MORELOGIN Create a New Profile

Step 2: Adding a New Proxy to the Profile


To add a proxy to an already created profile, without leaving the "Profile" section, click on the pencil icon in the "Proxy" column next to the selected profile.


In our example below, it is the Static Profile.


morelogin Adding a New Proxy to the Profile

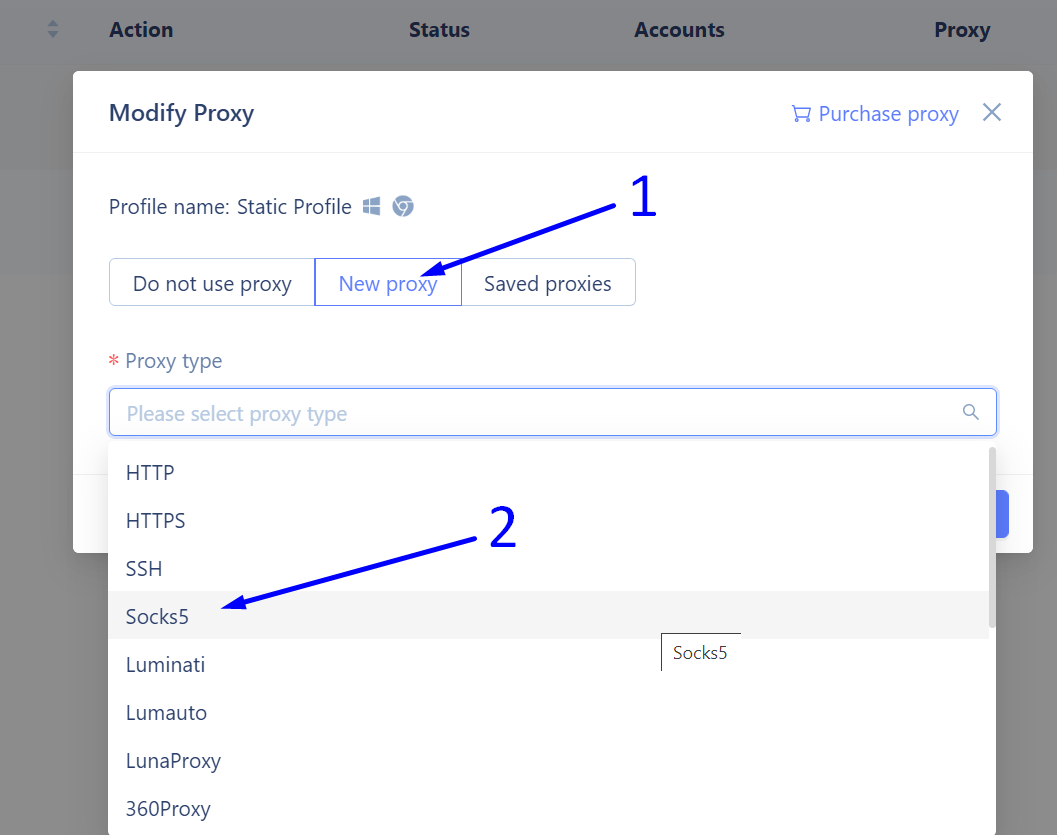
After clicking on the pencil icon, a settings window for this profile will open, labeled "Modify Proxy".


In this window, you need to:


- Click on the "New proxy" label.

- Select the protocol for the proxy you are adding. We choose the Socks5 protocol as the most versatile and anonymous option available.

morelogin add socks5 proxy

Szenario 1: Add a Static SOCKS5 Proxy


Moving forward, we want to set up a proxy that has a constant IP address, so that all actions performed using the MoreLogin profile occur under the same static IP address.


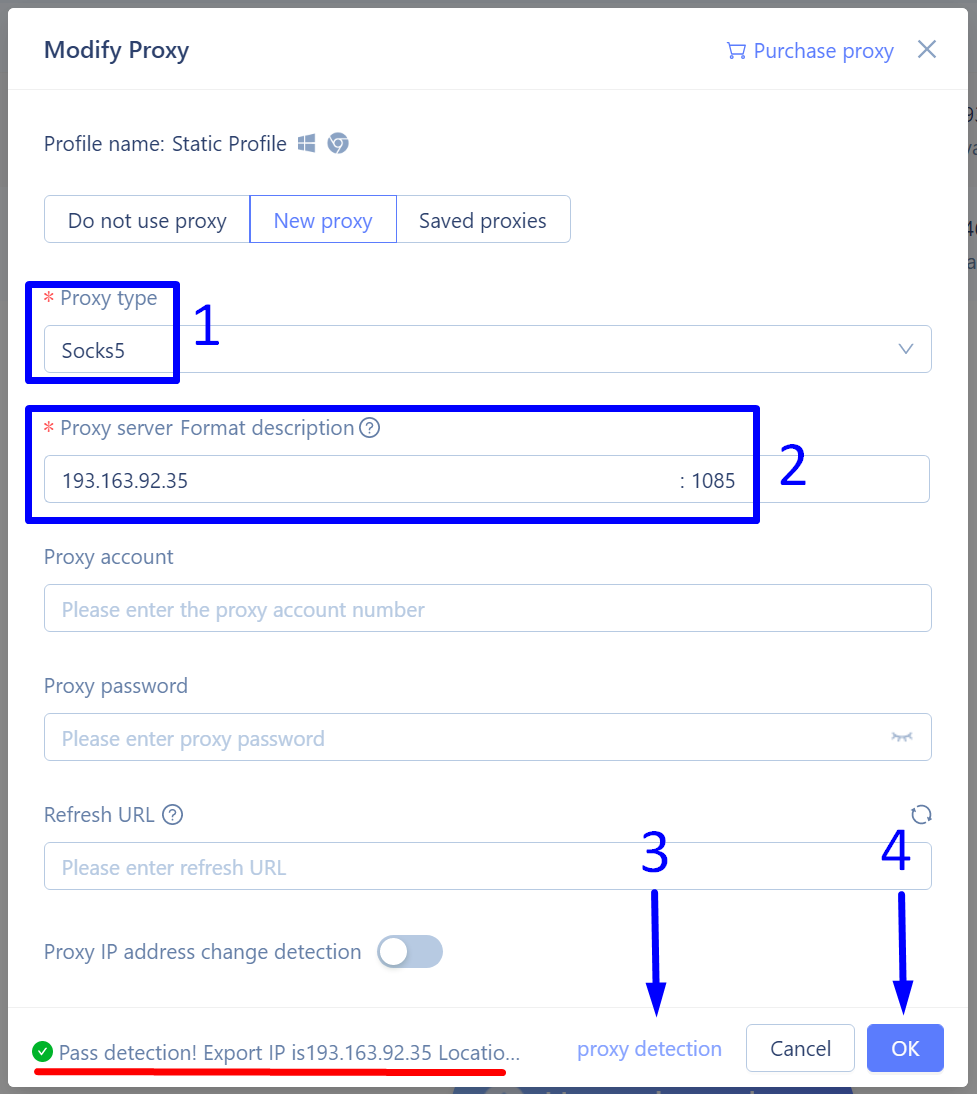
- Choose the "Socks5" protocol.

- Enter the IP address of our static proxy and its port. For ProxyCompass service users, this is always port 1085. It does not require a Username and Password, so we will leave these fields blank.

- At the bottom of the window, click on "proxy detection". The MoreLogin browser will check the connection with this proxy. If everything is in order and the proxy is accessible, the message “Pass detection! export IP is …” will appear, highlighted in red on our screenshot.

- Save the changes by clicking the "OK" button.

add static socks5 to morelogin browser

Scenario 2: Add a Rotating SOCKS5 Proxy


This scenario with MoreLogin involves having a profile with a constantly changing IP address. One way to implement this scenario is by adding a large list of different proxy servers. However, this method is not very convenient. A much simpler way to ensure a constant change of IP address is by adding a single rotating proxy.


To add a rotating proxy to the MoreLogin browser profile settings, you need to:


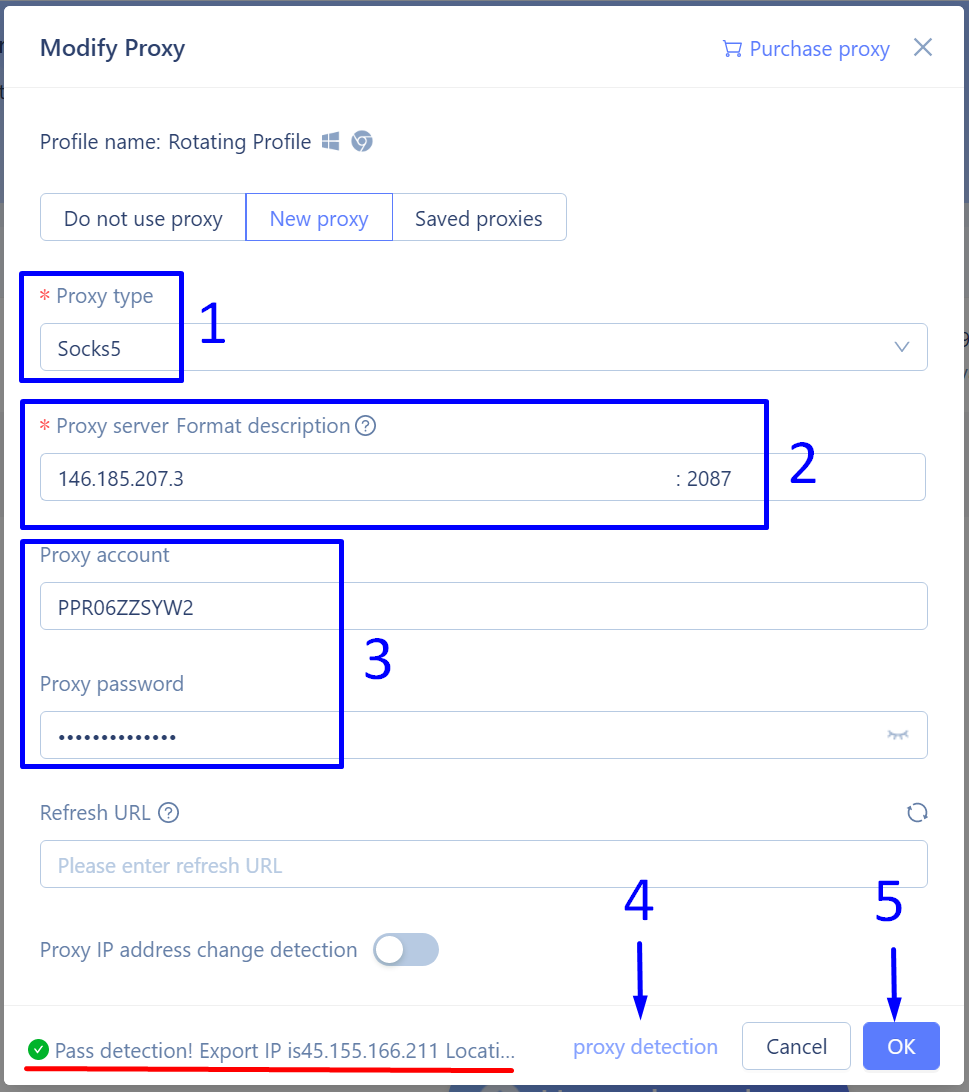
- Specify the protocol used for connecting to the proxy. Choose Socks5.

- In the “Proxy server Format description” field, enter the IP address of the rotating gateway and its port. This gateway will serve as a constant source of new IP addresses. Our gateway is 146.185.207.3, and our port is 2087.

- In the “Proxy account” section, enter your Username and Password to access the rotating gateway.

- Click on “proxy detection”. The MoreLogin browser will check the connection with this gateway and display the first random IP address from the rotating proxy. If everything is correct and the proxy is accessible, the message “Pass detection! export IP is …” will appear, highlighted in red on our screenshot.

- Save the changes by clicking on “OK”.

morelogin Add a Rotating SOCKS5 Proxy

Szenario 3: Add Proxies in Bulk


In the event that you are using a large number of profiles in the MoreLogin browser and wish to assign a dedicated IP address to each of these profiles, you will need to enter a large number of proxy servers. The most convenient way to do this is through the special bulk addition feature. To upload your list of proxies, you first need to prepare the list in the required format.


In our case, we are using SOCKS5 proxies, which do not require authentication by Username and Password, so we use the format: socks5://ip:port. Our proxy list will look like this:


socks5://185.77.220.177:1085
socks5://185.77.221.126:1085
socks5://45.66.209.198:1085
socks5://193.93.192.152:1085
socks5://193.233.228.165:1085
socks5://193.233.137.26:1085
socks5://85.239.56.14:1085
socks5://45.145.128.157:1085
socks5://193.31.127.140:1085
socks5://193.202.16.253:1085


Next:


- Click on the “Proxies” section located on the left side of the browser screen.

- In the top right corner, click on the “+ Add proxy” button.

- From the dropdown menu, select the “batch add” option.

morelogin Add Proxies in Bulk

Next, in the window that appears:


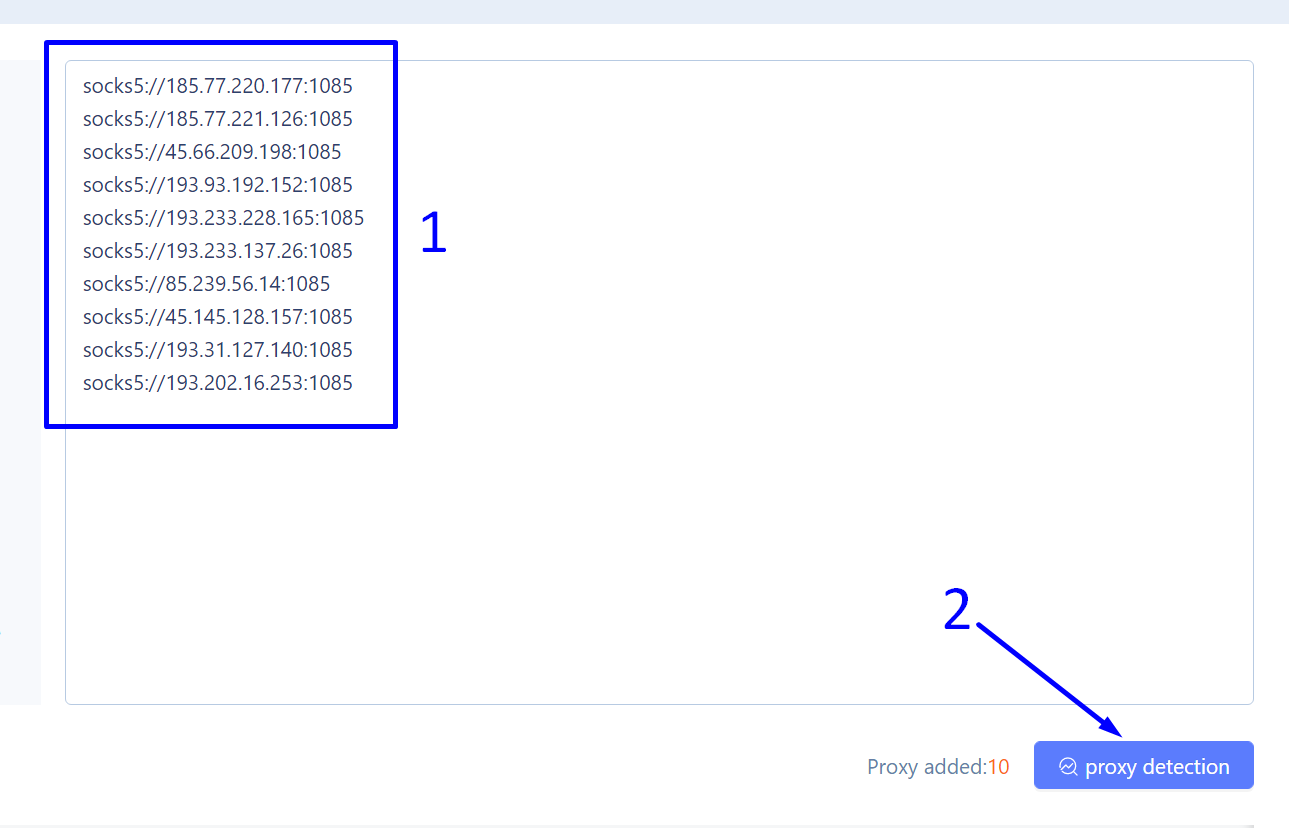
- Paste the previously copied list of our proxies into the appropriate field.

- Click the "proxy detection" button to bulk check the connection with our proxy servers.

paste a batch of proxies to morelogin

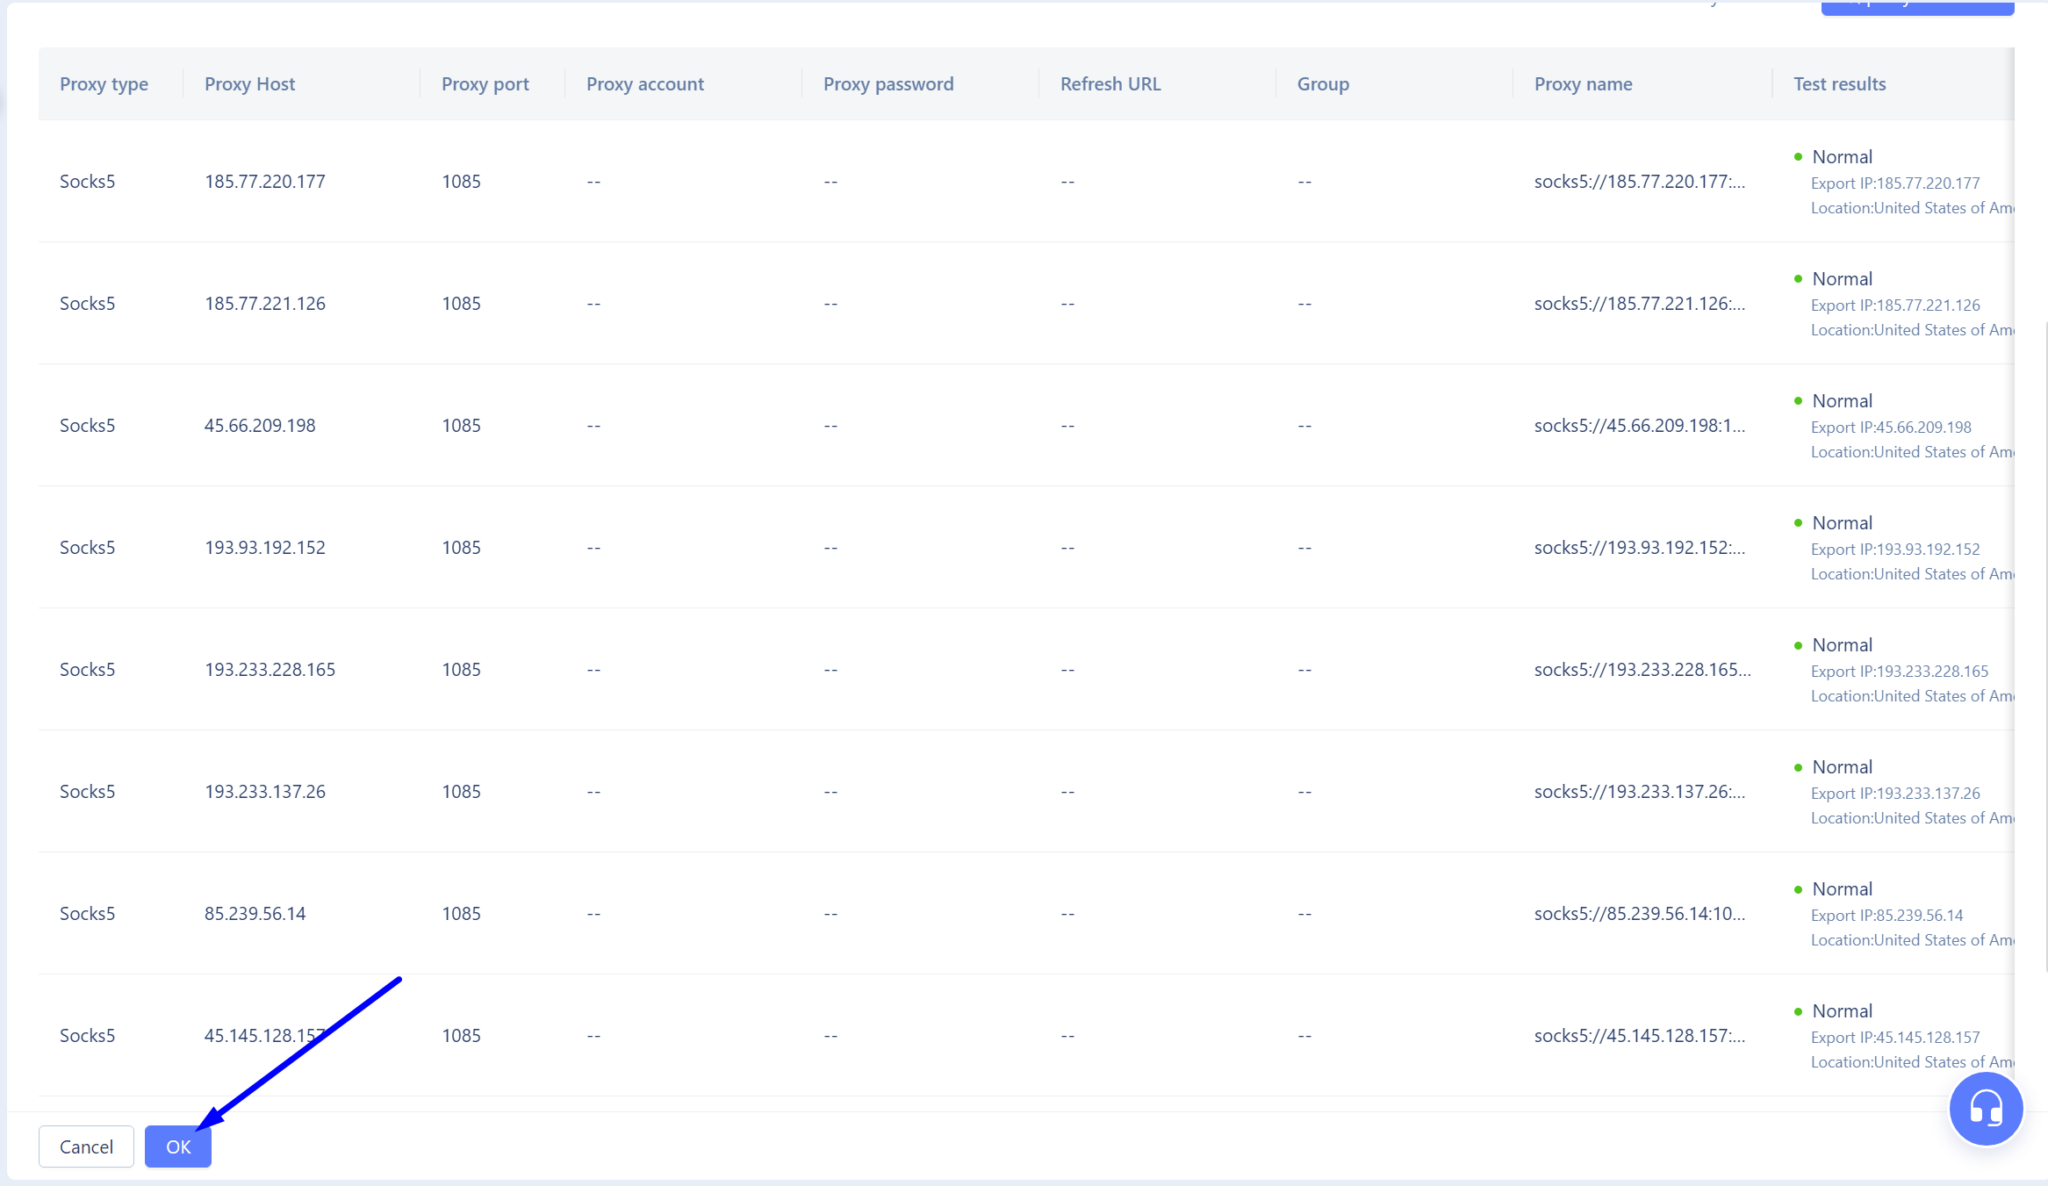
The MoreLogin browser begins checking the connection with each proxy from our list. If the check is successful, the results for each proxy appear in the far right column, showing a status of "Normal" and the geolocation of that proxy.


Everything is in order. Complete the proxy import by clicking the "OK" button.


morelogin bulk add socks5 proxies successful

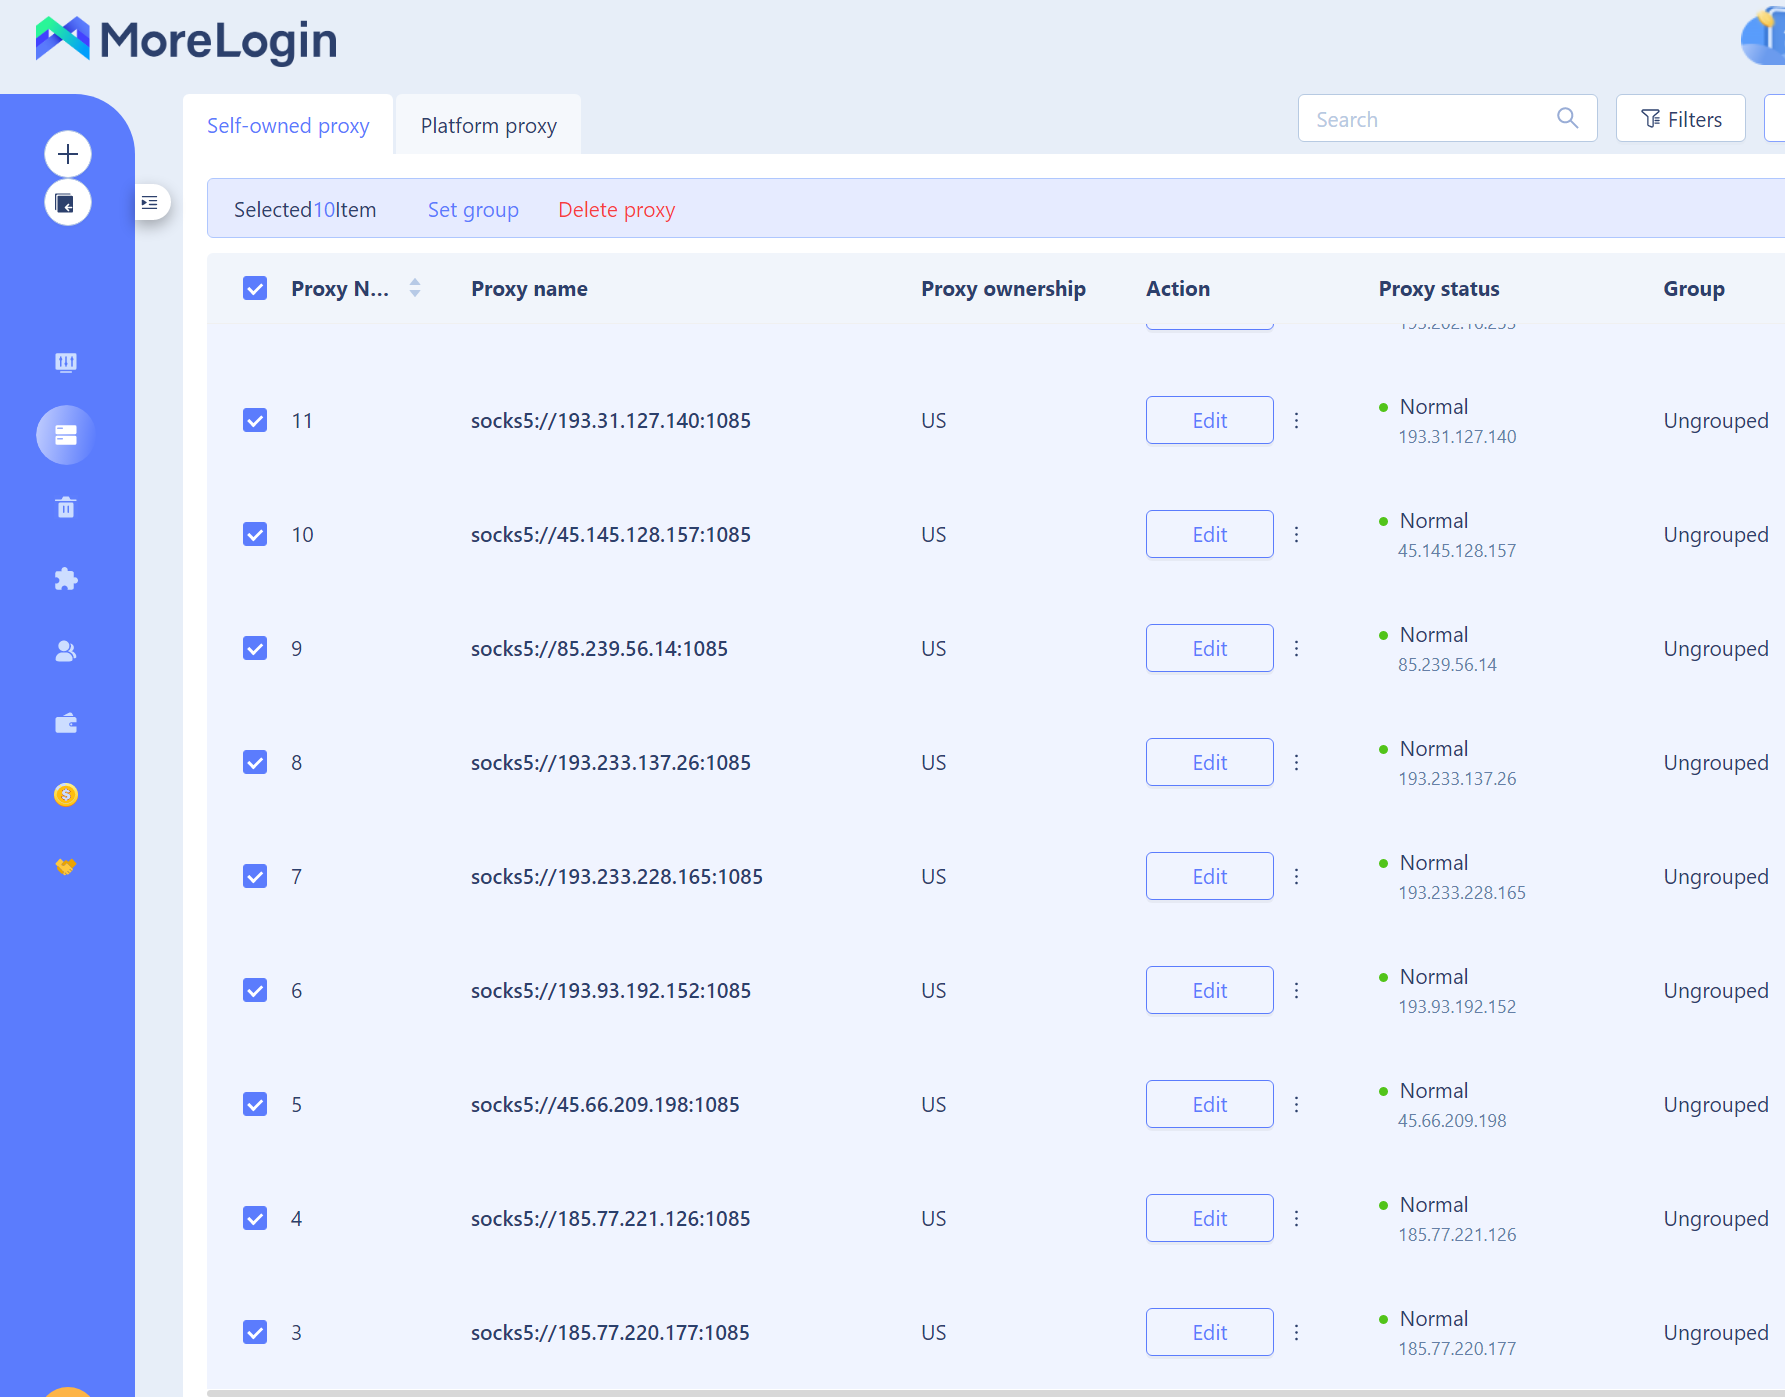
Proxy Addition Results


In the screenshot below, we see the result of successfully adding a group of proxies. Now, the only remaining step is to link each browser profile with the required proxy server.


morelogin Proxy Addition Results

All is set up correctly. Now, each profile will operate under its own IP address. This will prevent potential negative consequences for all profiles if one of them gets banned on your target site.


https://proxycompass.com/knowledge-base/setting-up-a-proxy-in-morelogin/

Mittwoch, 26. Juni 2024

Setting Up a Proxy in the Antik Browser

Setting Up a Proxy in the Antik Browser

Antik Browser is an elegantly designed anti-detect browser with a simple interface, perfect for securely managing multiple online accounts with complete anonymity. It is well suited for platforms such as Facebook, Google, and Tik-Tok, and is especially beneficial for users of betting sites, crypto exchanges, and in arbitrage activities.


The browser is compatible with macOS (Intel), macOS (M1), and Windows, and offers advanced features such as the ability to create and customize digital fingerprints for each platform, and the ability to share them with other Antik users.


The integration of proxy servers in the Antik browser significantly enhances user privacy and security, a critical feature when dealing with multiple accounts. This is because security systems are very good at identifying and blocking profiles associated with a single IP address. Thus, using proxies in Antik Browser is a robust solution for secure operation of multiple accounts.


Next, we will guide you through the process of correctly configuring proxies within Antik Browser to maximize your operational security and efficiency.


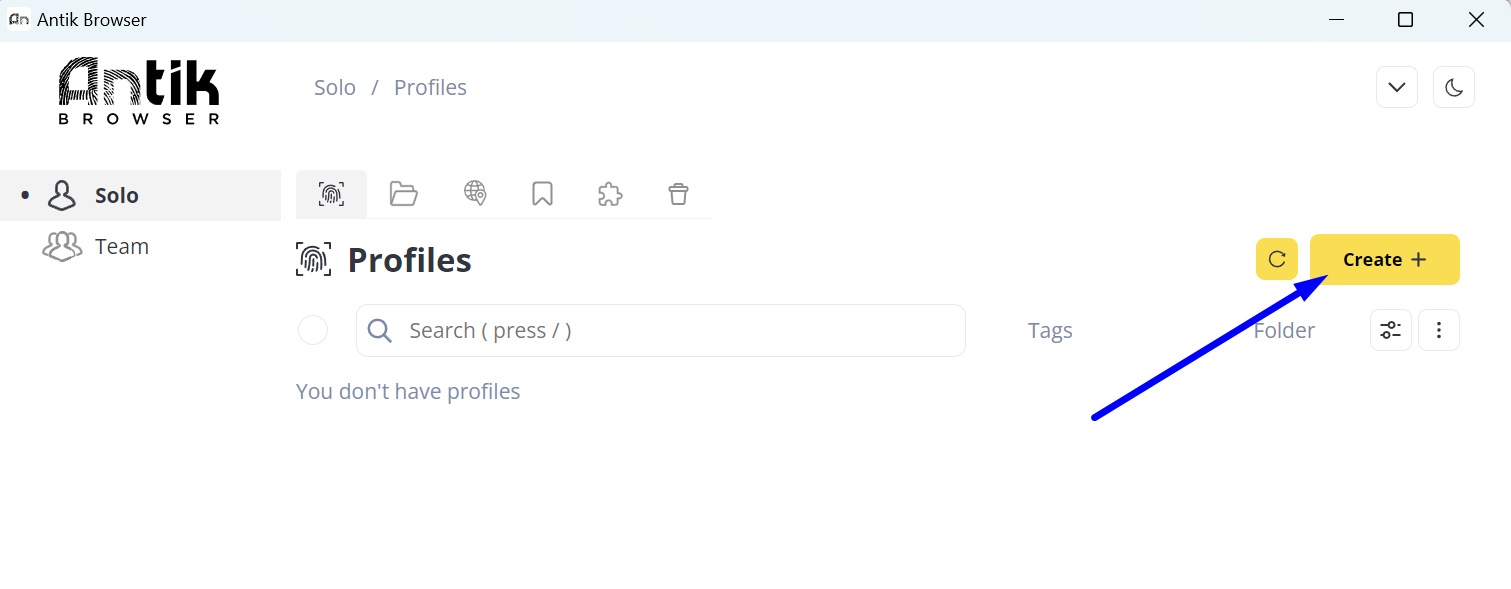
Step 1: Adding a New Profile in Antik Browser


Initially, you need to add at least one profile to Antik Browser. To do this, click the “Create +” button.


Adding a New Profile in Antik Browser

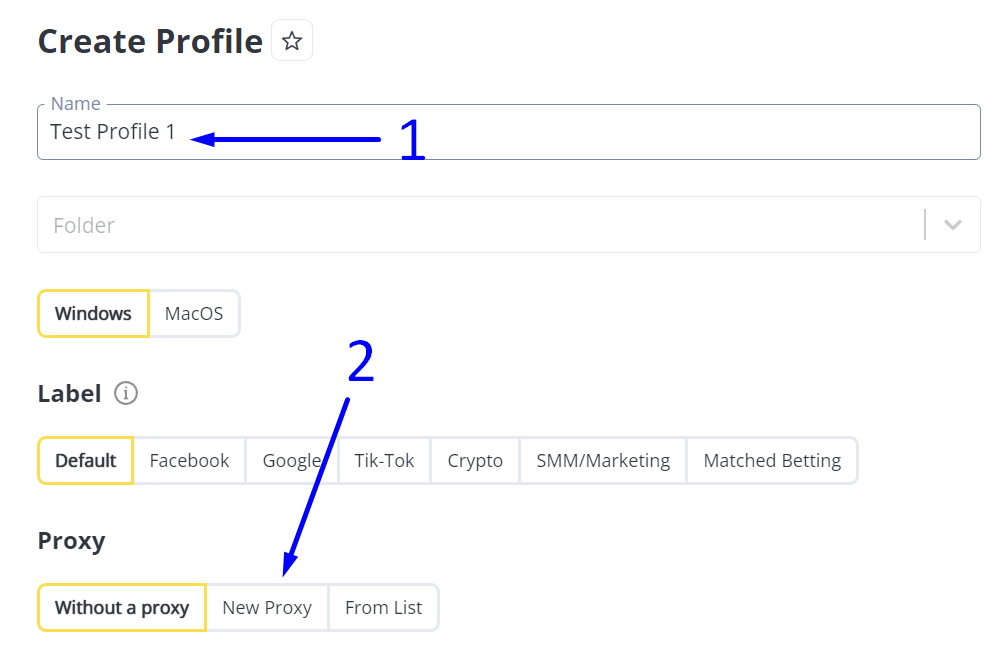
Step 2: Creating a Profile with a New Proxy


In the section that appears:


- Enter the name of your new profile.

- Click the “New Proxy” button.

Creating a Profile with a New Proxy

Step 3: Adding a Proxy


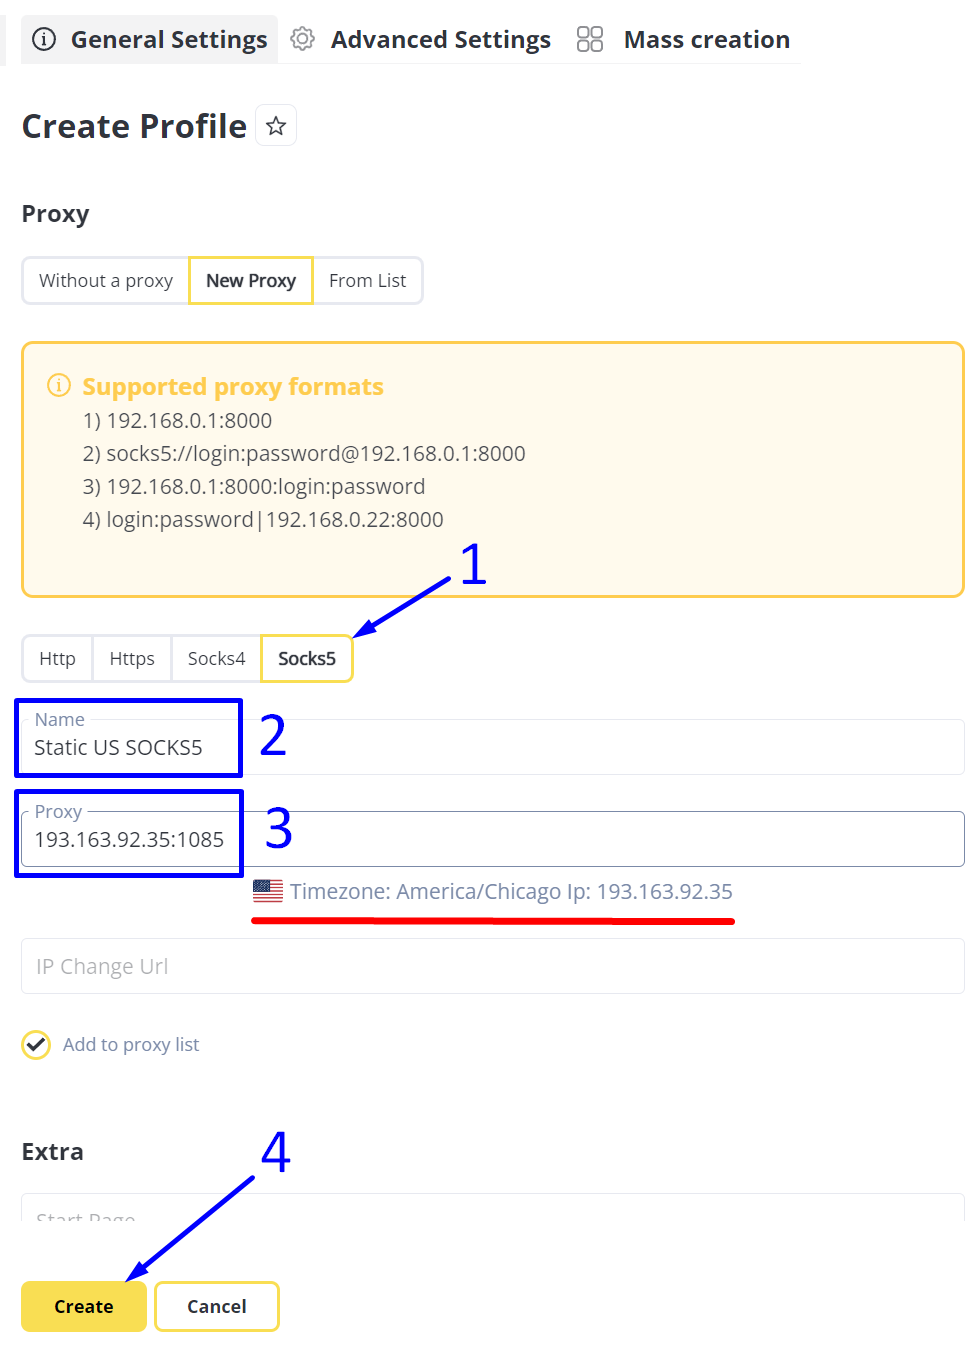
We recommend using a SOCKS5 proxy whenever possible, as it is the most anonymous and versatile protocol.


- Select SOCKS5 by clicking the corresponding button.


- Enter the name of this proxy, for example, "Static US SOCKS5". Read more about static proxies.


- Enter the IP and port of the proxy in any of the formats shown on the screenshot. In our case, it is sufficient to enter it in the IP:Port format without specifying a Username and Password.

After entering the proxy data, the Antik browser will automatically check the correctness of the data and the availability of the proxy. If everything is correct, a label will appear with the flag of the proxy's country and its geolocation (highlighted in red on the screenshot).
.

- Click the "Create" button to save the profile and its proxy.

Antik Adding a Proxy

Step 4: Bulk Adding a Proxy List


Antik Bulk Adding a Proxy List

Step 5: Uploading the Proxy List


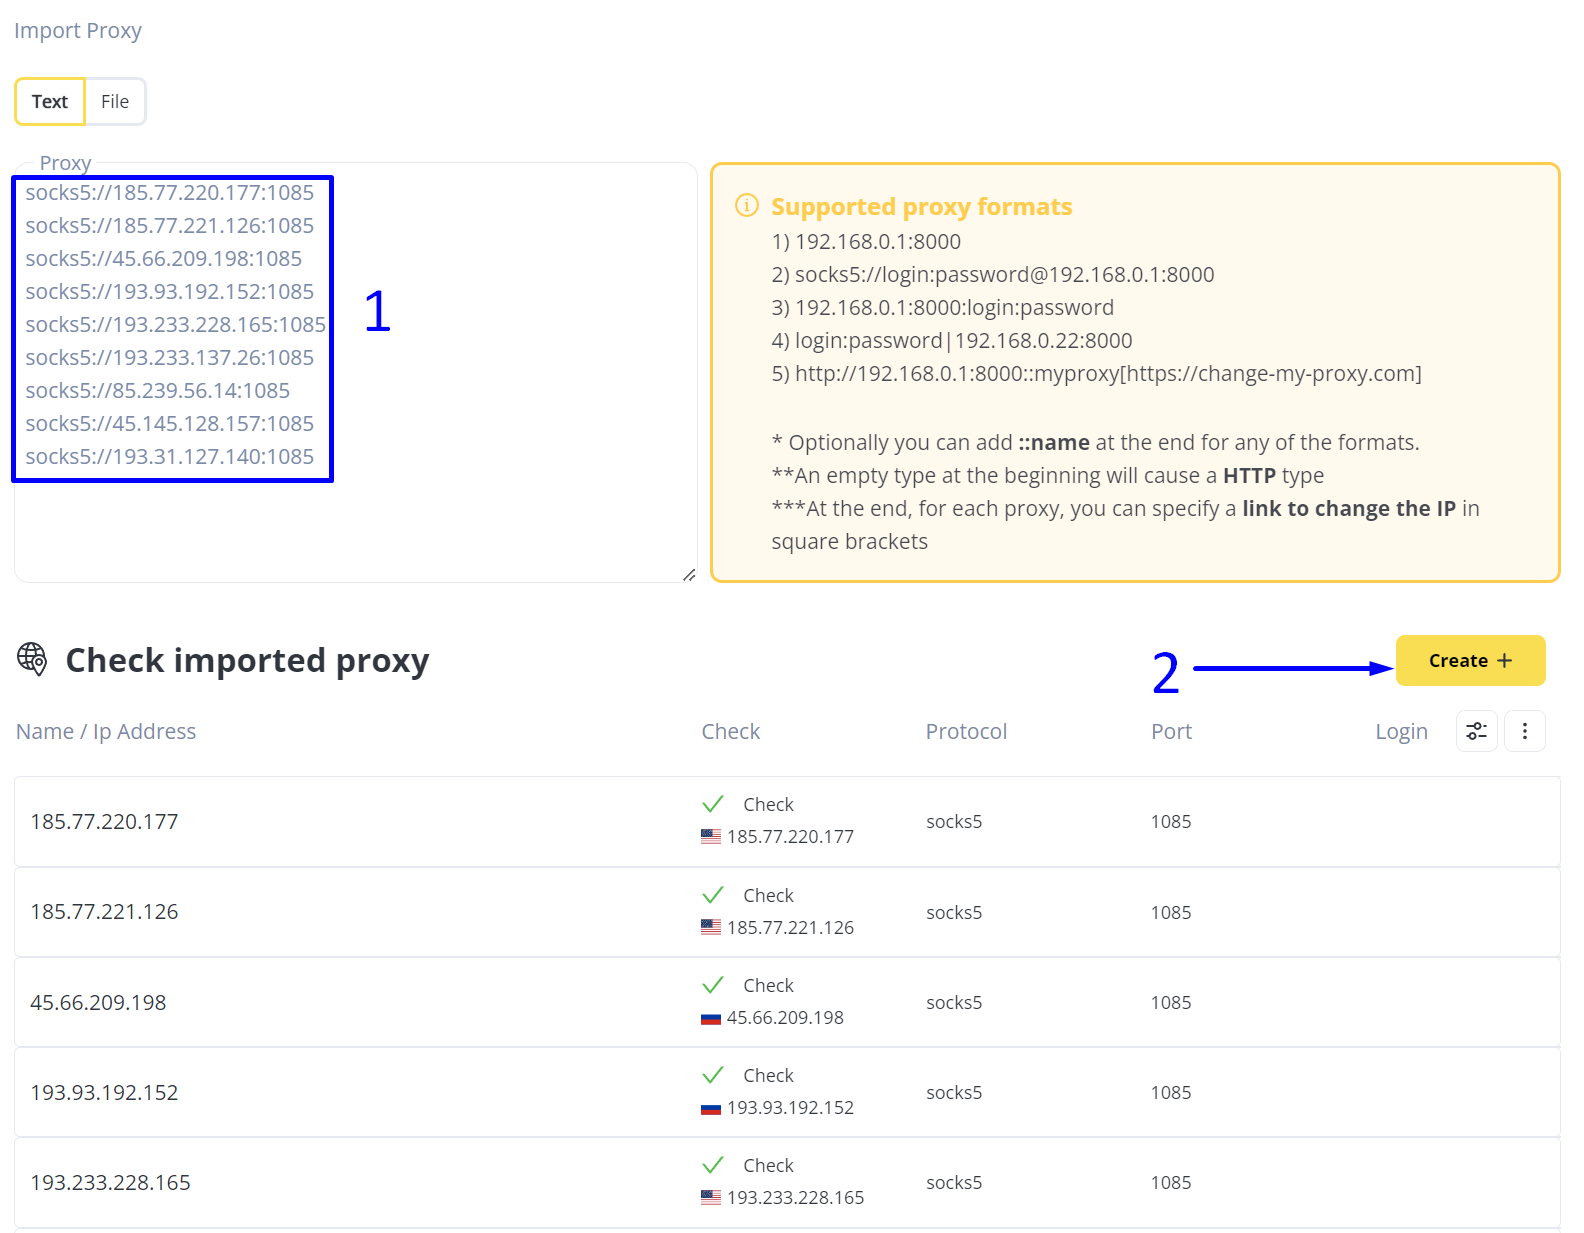
For bulk addition of proxy lists, you need to prepare them for import by formatting them properly.


In our case, we want to add 9 proxy servers that operate on the SOCKS5 protocol and do not require username and password authorization. Therefore, we will use the format:


socks5://ip-address:port


We formatted our proxy list for import into Antik Browser as follows:


socks5://185.77.220.177:1085
socks5://185.77.221.126:1085
socks5://45.66.209.198:1085
socks5://193.93.192.152:1085
socks5://193.233.228.165:1085
socks5://193.233.137.26:1085
socks5://85.239.56.14:1085
socks5://45.145.128.157:1085
socks5://193.31.127.140:1085


Moving on:


- This list can be saved in a text file for import, or simply copied and pasted into the appropriate "Proxy" field. 

- Then, click on the yellow "Create +" button to complete the import.

Antik Uploading the Proxy List

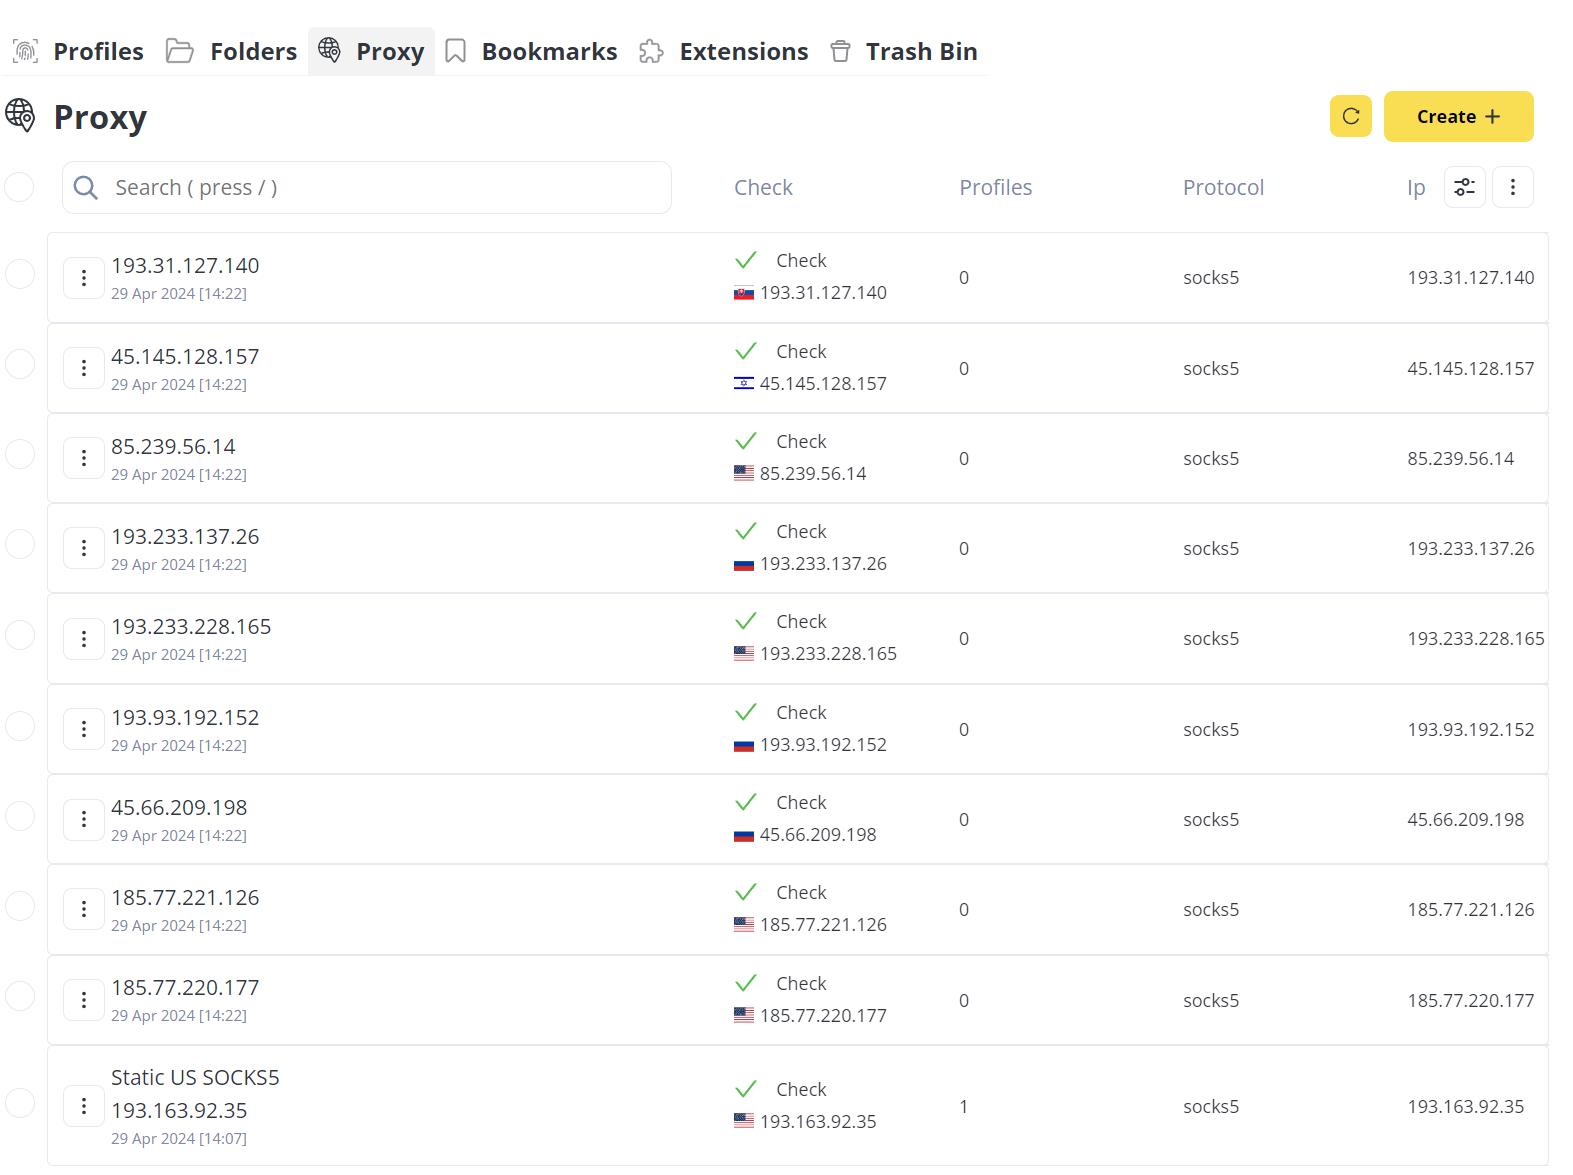
The result of importing proxies into Antik Browser


The result of importing proxies into Antik Browser

The addition of proxy servers to Antik Browser is complete. The proxies are now ready to be assigned to the relevant profiles.


https://proxycompass.com/knowledge-base/setting-up-a-proxy-in-the-antik-browser/

Dienstag, 25. Juni 2024

Setting Up a Proxy in Waterfox

Setting Up a Proxy in Waterfox

Waterfox is an anti-detect browser for secure web browsing based on the open source Mozilla platform. It supports multiple operating systems, including Windows, Linux and MacOS, and comes with built-in privacy features to prevent tracking by default. Waterfox allows for proxy server configurations to enhance user privacy and enable anonymous web browsing. This setup makes it a robust choice for users who value privacy and security online.


Because Waterfox is based on Firefox, the method for setting up proxy servers is similar.
Below, we'll show you how to set them up correctly.


Step 1: Switch to Waterfox’s Settings


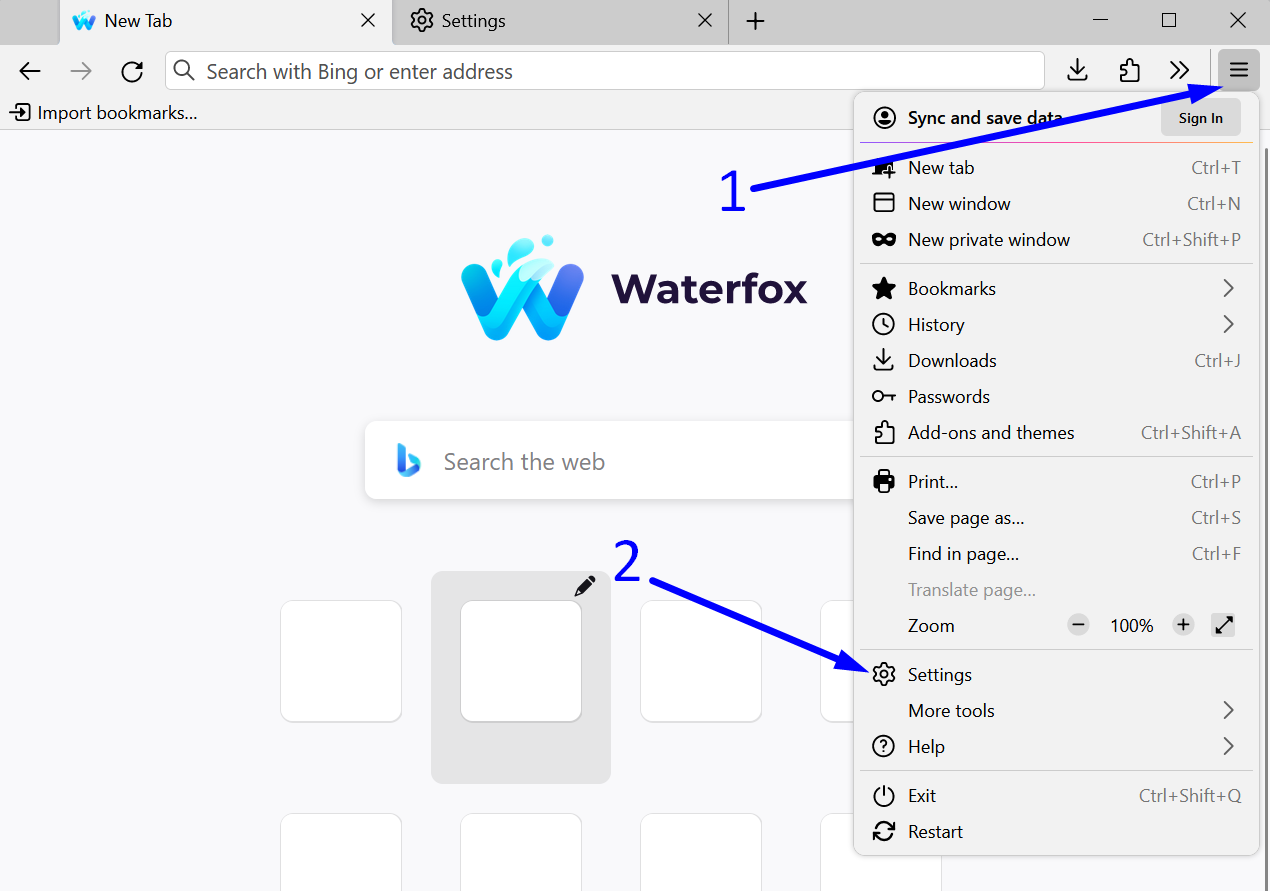
- Click on the three horizontal lines (hamburger icon) in the top right corner of the program window.

- In the menu that appears, click on the gear icon labeled “Settings”.

Switch to Waterfox’s Settings

Step 2: Open Waterfox Network Settings


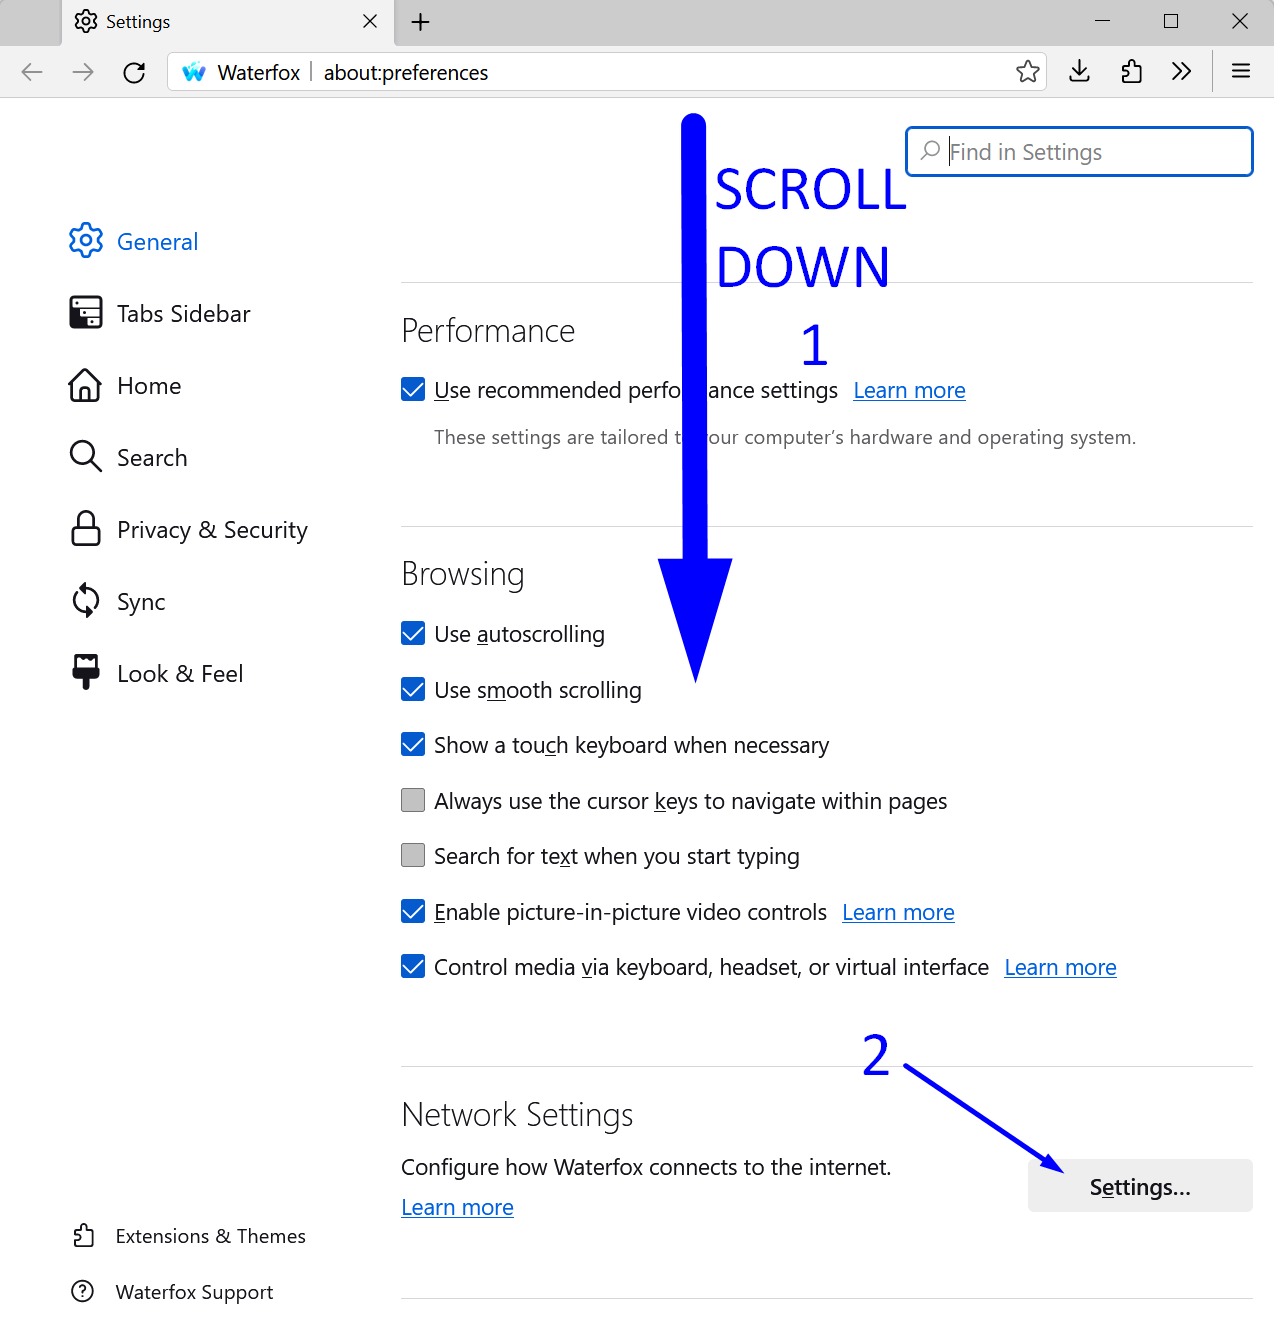
- Scroll down to the bottom of the menu.

- In the “Network Settings” section, click on the “Settings…” button.

go to network settings in waterfox

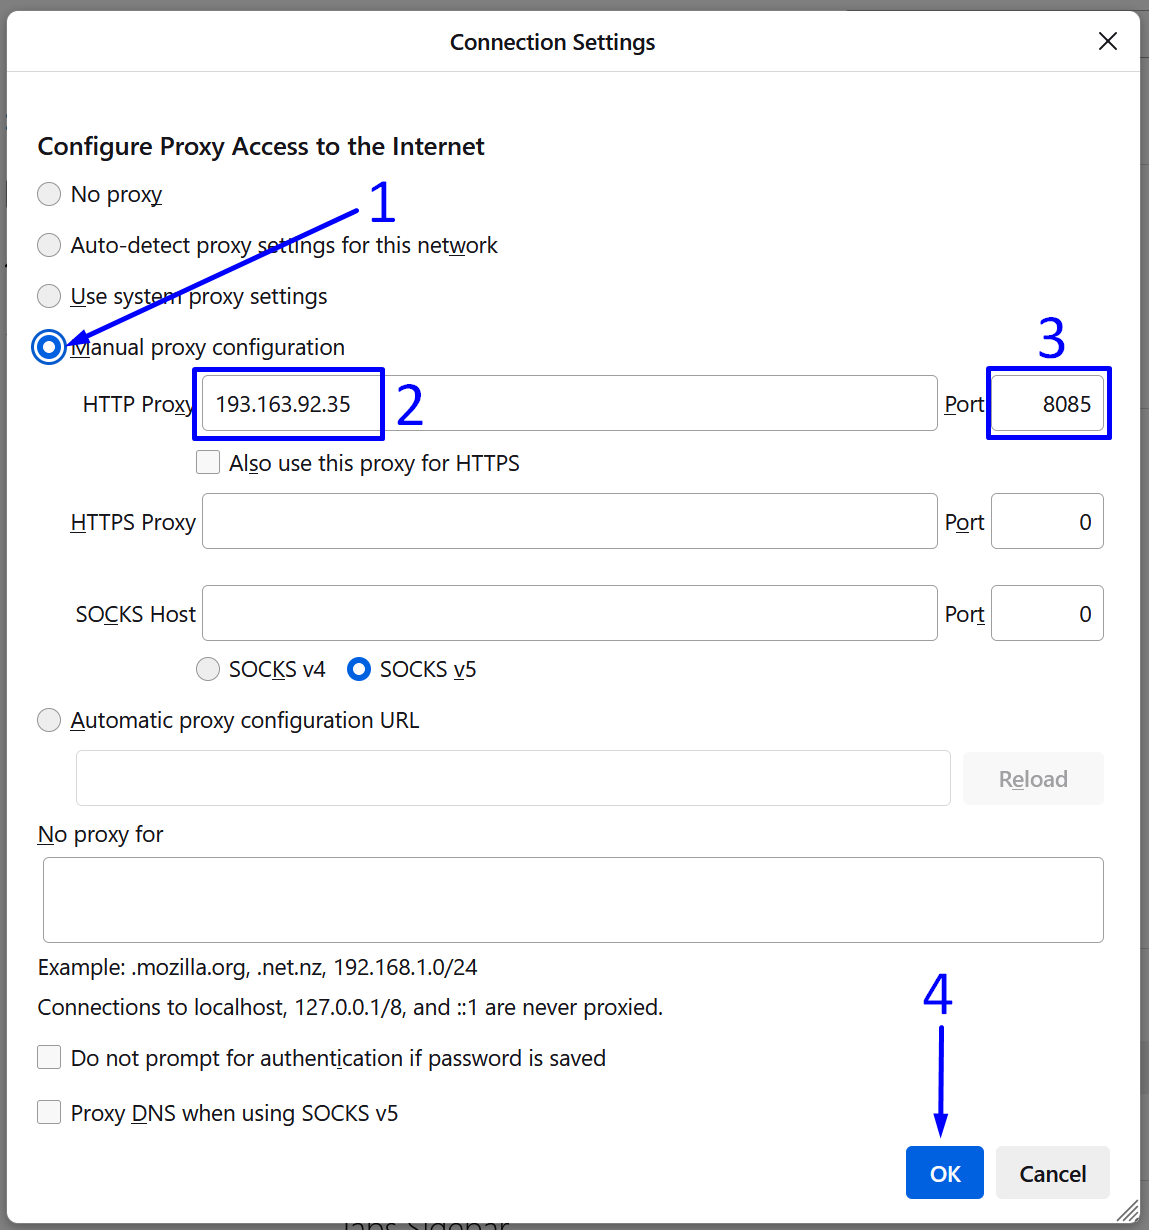
In the Waterfox proxy settings window, you have the option to choose from three available proxy protocols.


In Waterfox, you can select from three types of proxies: HTTP, HTTPS, and SOCKS5. SOCKS5 is often considered the best choice because it supports any type of traffic, offers optional authentication for added security, and does not modify the data, which improves performance and flexibility. HTTPS is suitable for secure web browsing, while HTTP is more basic and less secure.


We recommend always using SOCKS5 if your proxy supports it. Below, we will consider all three options.


Option 1: Setting Up a HTTP Proxy - Not Recommended


- Switch the browser to manual proxy setup by clicking on "Manual proxy configuration".

- Enter the IP address of your proxy into the "HTTP Proxy" field.

- Enter the port number in the "Port" field.

- Save the settings by clicking the "OK" button.

setting up http proxy in waterfox

Option 2: Setting Up a HTTPS Proxy - А Good Choice


- Switch the browser to manual proxy setup by clicking on "Manual proxy configuration".

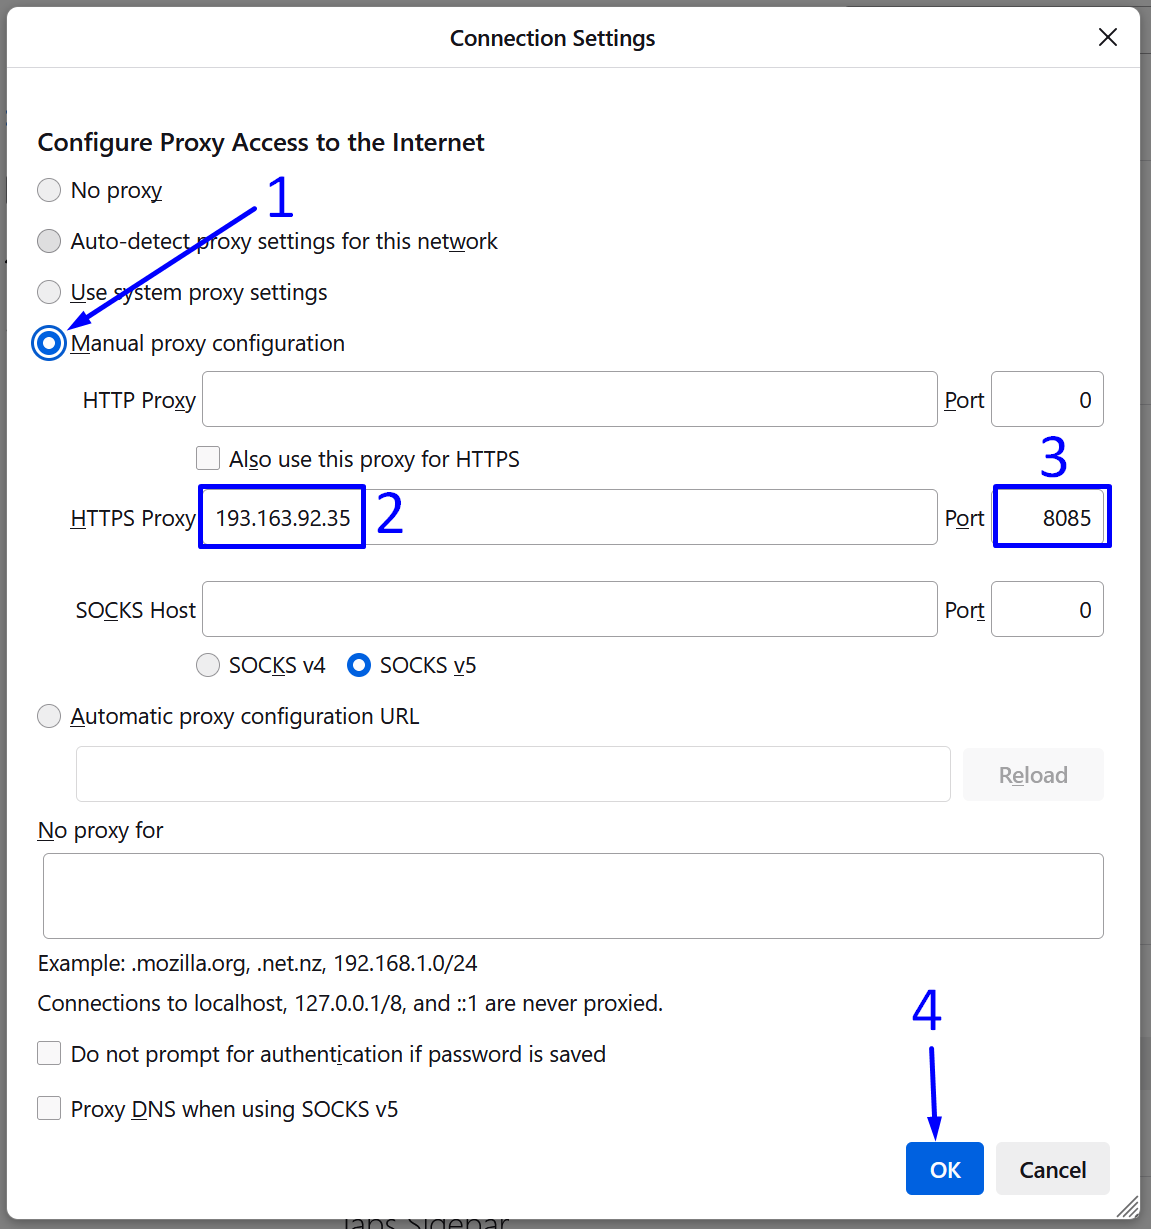
- Enter the IP address of your proxy into the "HTTPS Proxy" field.

- Enter the port number in the "Port" field.

- Save the settings by clicking the "OK" button.

setting up https proxy in waterfox

Option 3: Setting Up a SOCKS5 - The Best Choice


- Switch the browser to manual proxy setup by clicking on "Manual proxy configuration".

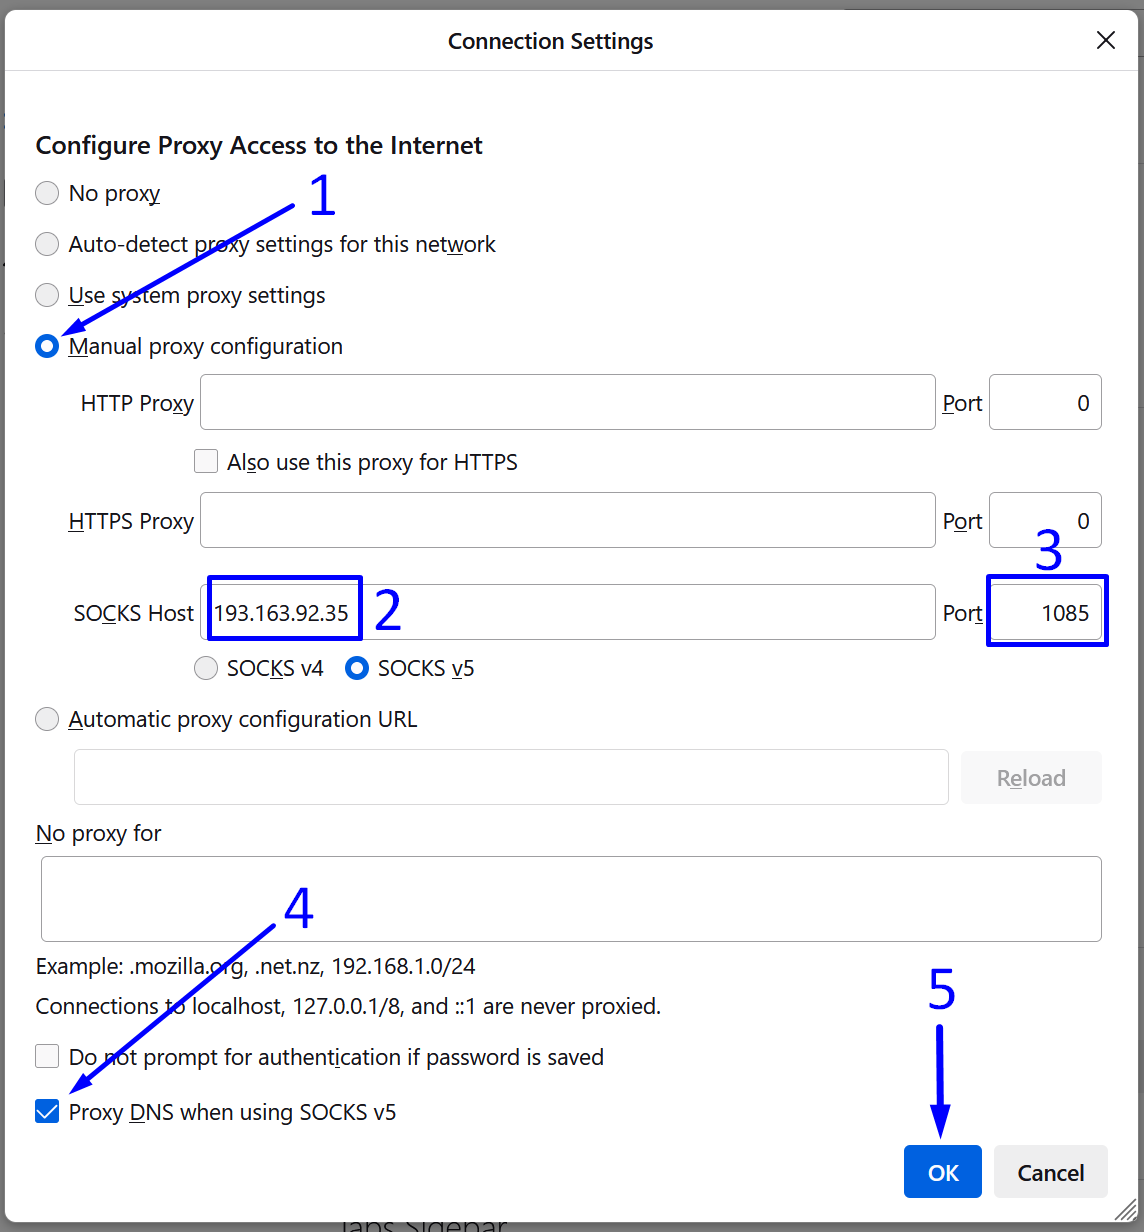
- Enter the IP address of your proxy in the "SOCKS Host" field.

- Enter the port number in the "Port" field.

- Check the option "Proxy DNS when using SOCKS v5" to route DNS requests through the SOCKS5 proxy, enhancing privacy by hiding these requests from local networks or ISPs and helping prevent DNS leaks.

- Click the “OK” button to save the SOCKS proxy settings in the browser.

setting up socks5 proxy in waterfox

The proxy setup in the anti-detect browser Waterfox is complete, and traffic is being routed through the configured IP address. Web surfing is now confidential and secure.


https://proxycompass.com/knowledge-base/setting-up-a-proxy-in-waterfox/

Montag, 24. Juni 2024

Setting Up a Proxy in the Accovod Browser

Setting Up a Proxy in the Accovod Browser

The Accovod web browser is specifically designed for users managing multiple social media accounts across platforms like VK, Facebook, Google, and LinkedIn.


Ideal for webmasters, it allows for efficient control over multiple groups, managing content, and interacting with posts and reviews. 


To fully utilize Accovod for such purposes, using proxy servers is essential, as this setup enhances the ability to manage various accounts without restrictions. 


Below, we will demonstrate how to use this program with proxy servers. Accovod supports various operating systems, including Windows, macOS, Linux, and mobile devices.


Step 1: Create a New Profile and Enter Proxy Details


To create a new profile and add specific proxy server details, follow these steps:


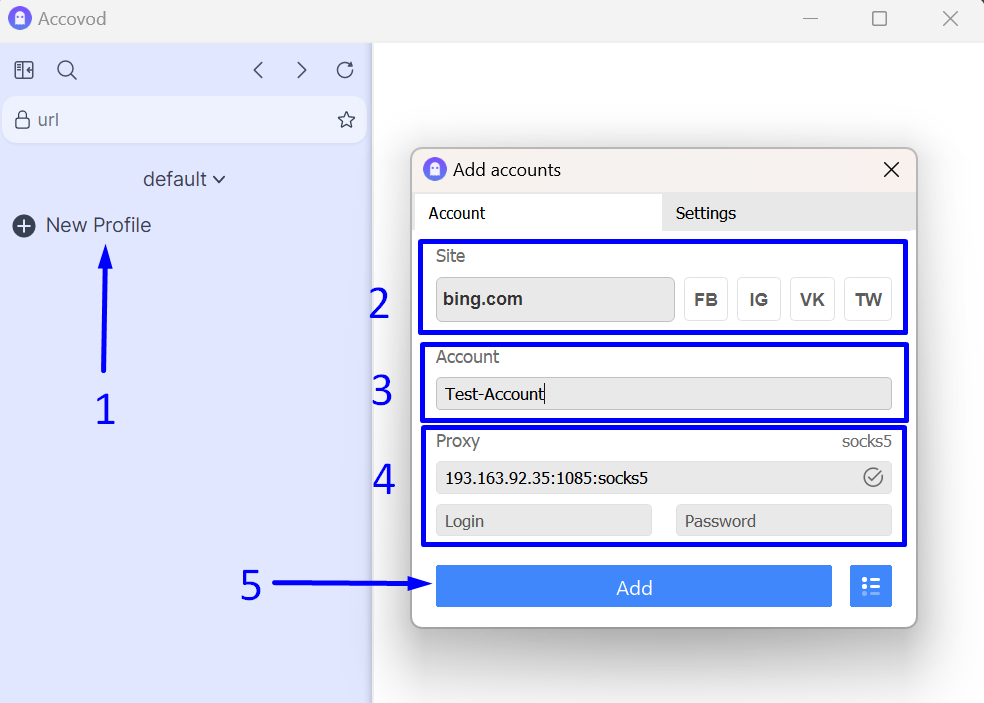
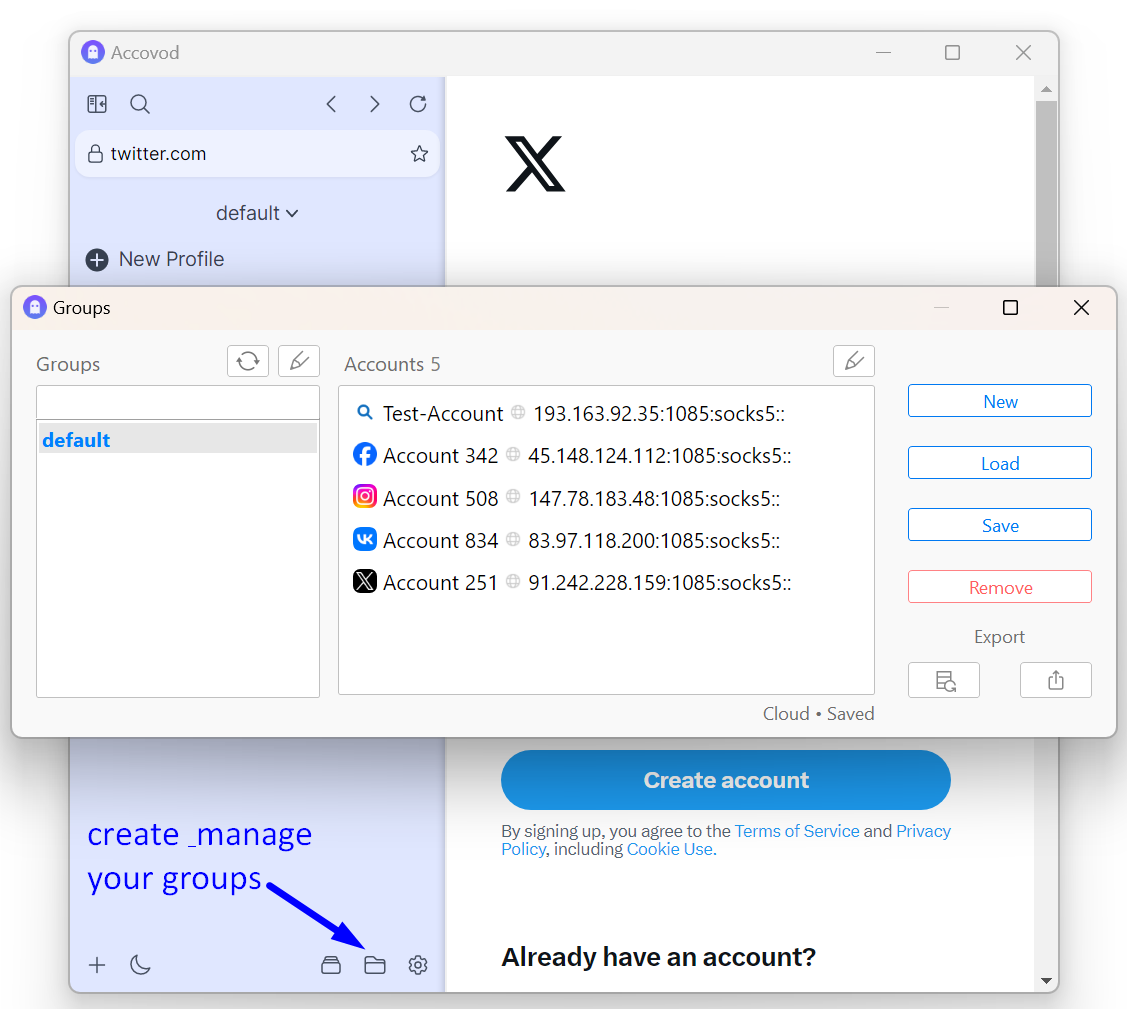
- Create a new profile by clicking on “New Profile” on the left side of the program.

- Enter the name of the desired website or choose from several offered sites/social networks.

- Invent a memorable name for the profile being created.

- Enter the IP address, port, and protocol of your proxy in the format:

ip:port:protocol

We recommend using the SOCKS protocol if possible.


- Click the “Add” button to save the newly created profile.

set proxy in accovod

Step 2: Manage Your Profiles


You can manage groups of created profiles using various features in Accovod. 


To see which specific proxy servers have been added to which profiles, click on the folder icon. 


This allows you to ensure that none of the proxy servers are duplicated for the same site to prevent your accounts from being blocked.


testing proxy connections in accovod

Now your Accovod is "charged" with profiles and protected by proxy servers.


Wishing you successful work and high traffic!


https://proxycompass.com/knowledge-base/setting-up-a-proxy-in-the-accovod-browser/

Sonntag, 23. Juni 2024

Setting Up a Proxy in the Lalicat Browser

Setting Up a Proxy in the Lalicat Browser

What Is Lalicat?


Lalicat is an anti-detection browser that helps users manage multiple online profiles securely and anonymously. It allows for extensive customization of browser fingerprints to prevent tracking and detection across different websites. This browser is particularly useful for activities such as social media management, affiliate marketing, and any other task that requires maintaining multiple discrete online identities.


Why Use Proxies in Lalicat Browser?


Using proxies in Lalicat Browser is crucial for those who want to earn money by managing multiple online profiles. Proxies help hide your real IP address and make each account appear as if it's operating from a different location. This not only increases privacy, but also significantly reduces the risk of account bans on platforms that restrict multiple account operations. By using proxies, you ensure that each profile maintains a unique digital footprint, which is essential for successful operations in activities such as affiliate marketing or social media management.


Setting Up a Proxy in the Lalicat Browser


Lalicat is an anti-detect browser designed to ensure anonymity and safeguard your online activities. It allows for the use of proxy servers to route your internet traffic, keeping your presence anonymous while enabling you to bypass geographical restrictions and avoid IP-based blocks. 


This article provides a detailed, step-by-step guide on configuring proxies in Lalicat to enhance your data security.


Step 1: Create a Profile

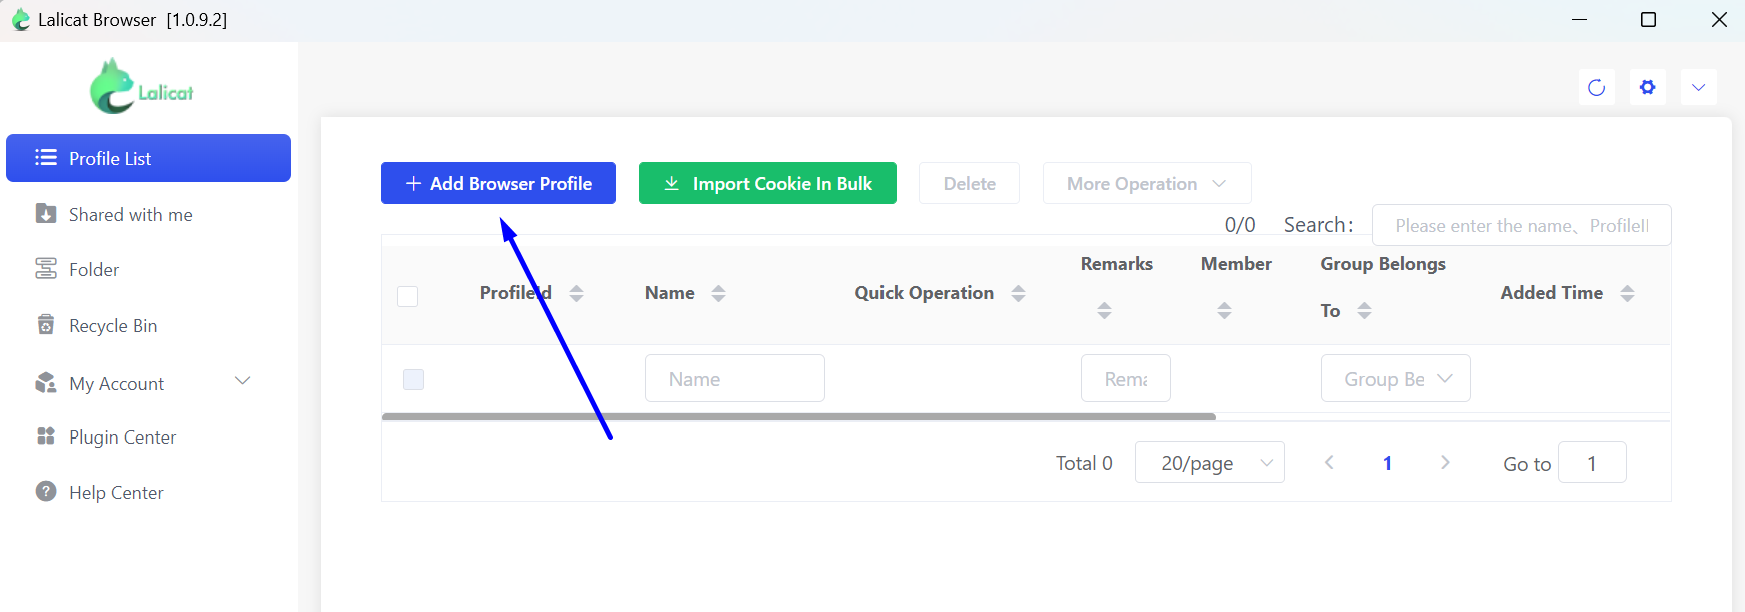
Launch the Lalicat browser and click on the “+ Add Browser Profile” button.


Lalicat add a profile

Step 2: Add a SOCKS5 Proxy to the Lalicat Profile

In the settings of your new Lalicat browser profile, do the following:


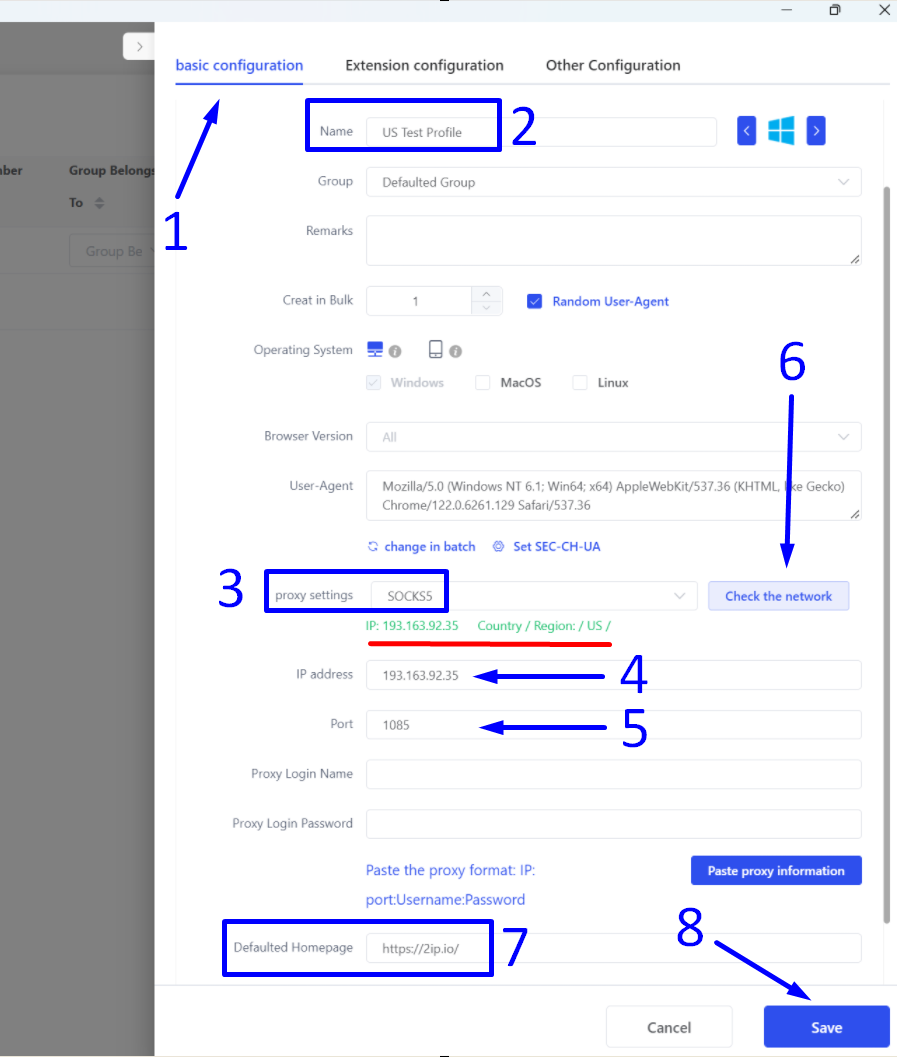
- Go to the "Basic Configuration" tab.

- Enter a name for your new profile.

- In the "Proxy Settings" field, select the protocol for your proxy. If you have a choice, we recommend using the SOCKS5 protocol, as it is the most anonymous and versatile.

- Enter the IP address of the proxy.

- Enter the proxy port. In our case, it is port 1085, which does not require a username and password. Therefore, leave the "Proxy Login Name" and "Proxy Login Password" fields empty.

- Click the "Check the network" button to test the proxy. If successful, you will see a green label indicating the geolocation of your proxy. In our case, it should show the USA (highlighted in red on the screenshot).

- Enter the start page that your new profile will load first.

- Save the profile by clicking the "Save" button.

lalicat browser proxy configuration

Now your new profile is ready for use. You can start working with the Lalicat anti-detect browser and the SOCKS5 proxy server, which will replace your real IP address.


https://proxycompass.com/knowledge-base/setting-up-a-proxy-in-the-lalicat-browser/

Samstag, 22. Juni 2024

Rotating Proxies Explained

Rotating Proxies Explained

In this article, you'll gain a comprehensive understanding of rotating proxies, including their functionality, benefits, applications, and limitations. Learn how these proxies dynamically change IP addresses to increase online anonymity and security, making them ideal for tasks that require high levels of privacy, such as web scraping and accessing websites from multiple IP addresses.


Explore the different types of rotating proxies-data center, residential, and mobile-and understand when and why to use them effectively. 


We also discuss ProxyCompass' services and provide insight into what to expect when using their rotating proxy packages.


Need fast rotating proxies for your business?
Check out our pricing for rotating proxies.


What are Rotating Proxies?


Rotating proxies, also known as dynamic proxies, automatically assign a new IP address from their pool to each of your web requests, either per request or at regular intervals such as 1, 5, or 30 minutes. 


For example, you could send 1,000 different requests to a website, and each request would appear from a unique IP address. 


This frequent changing of IP addresses increases anonymity and prevents detection by web services, which may block access if they detect multiple requests coming from the same IP.


How Do Rotating Proxies Work?


Unlike traditional proxies, which are known as static proxies and have an IP address that does not change over time, the operation of rotating proxies is much more complex. 


Let's take a closer look at how rotating proxies work using the diagram below.
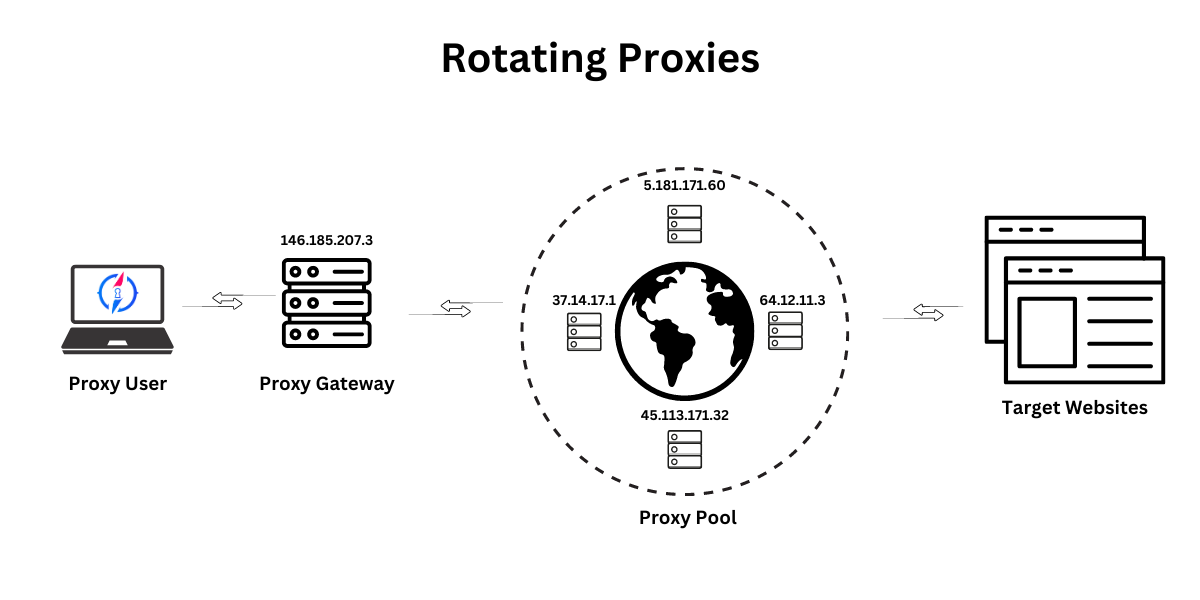


how rotating proxies work

Rotating proxies involve several key components: the proxy user, the proxy gateway, the proxy pool, and the target sites. 


Here's how it works in theory:


Proxy User: This is you or any other user who sends a request through the proxy service.


Proxy Gateway: Acts as an intermediary that receives the user's request and then forwards it to one of the end proxies. 


Proxy Pool: Contains many end proxy IPs. The gateway selects an IP from this pool each time a request is made, ensuring that each request appears to come from a different IP address.


Target websites: These are the websites that the user wants to access through the proxy.


As a result, the rotating proxy system allows the user to access target sites while constantly changing the originating IP address, which increases anonymity and reduces the likelihood of being blocked or restricted by the target sites.


Here's how it works in practice:


The user of the proxy service does not specify the IP address of the final proxy server in his software settings (browser, bot, curl, etc.), but the IP address of the proxy gateway. 


In our diagram, this IP is 146.185.207.3.


The proxy gateway chooses a random proxy from the pool and sends the request through it. 


The destination site only sees the IP address of this random end proxy, not the IP address of the gateway or the real IP address of the user of the proxy service. 


Thus, the user's real address is hidden behind two barriers.


Characteristics of Rotating Proxies


Avoid IP Blocks: Rotating proxies are critical to extensive data scraping because they frequently change your IP address to avoid bans and detection by websites.


Increased Security: The frequent IP changes offered by rotating proxies add an extra layer of security, making it difficult to trace your online activities.

Superior Anonymity: Rotating proxies assign a new IP for each request, greatly enhancing privacy and anonymity, which is especially useful for private web browsing or accessing content with geographic restrictions.


Different Types of Rotating Proxies


Rotating proxy servers can be divided into several main types based on their origin. For better understanding, we will list the main types below.


Data Center Hosted Rotating Proxies

This is the least expensive and fastest type of rotating proxy services. The entire infrastructure of such a proxy service, including proxy gateways that distribute client requests (also known as balancers) and the end proxies, is located in data centers. 


The advantages of these proxy services include unlimited traffic, excellent connection speed, and low service costs. 


The downside is that because the IP addresses are owned by the hosting providers, they are more easily identified and potentially blocked by target websites. For complex tasks involving anti-scraping measures, these proxies may not be appropriate. 

Learn more about datacenter-hosted proxies.


Residential Rotating Proxies

Residential rotating proxy services are more expensive and slower than data center proxies. Only a small portion of their infrastructure, especially the gateway, is located in data centers. The rest, overwhelmingly 99%, runs on the devices of home users - phones, tablets, and laptops - who offer their devices as hosts for the proxy network.


Residential rotating proxies are highly trusted, able to bypass anti-scraping measures, and offer detailed targeting options down to specific cities within countries. 


However, their drawbacks include unstable connections, variable speeds, potential disconnections if the device goes offline, and most importantly, high costs, as users pay for the amount of traffic they use.

Learn more about residential proxies.


Mobile Rotating Proxies

Mobile rotating proxies are a unique type of proxy that reside in mobile farms and are inherently rotating by default. Users of mobile proxy services send requests to a mobile proxy gateway, which then forwards the request to a mobile device with its own SIM card IP address from a mobile operator, which in turn forwards the request to the target website's server.


The advantages of mobile rotating proxies are their high reliability and speed. However, they also have drawbacks, such as high cost, a limited number of IP addresses in the pool, and a limited choice of mobile operators, which can increase the likelihood of detection by sites with strong anti-scraping protection.

Learn more about mobile proxies.


When to Use Rotating Proxies


Rotating proxies are highly effective for activities that require frequent IP changes to maintain anonymity, especially for extensive data scraping from sites that have anti-scraping mechanisms. 


Using a single IP for too many requests can lead to throttling, CAPTCHAs, and potential bans, which rotating proxies help avoid by frequently changing your IP. 


This increases security and reduces the risk of being detected and blocked by target websites.


When Not to Use Rotating Proxies


It's not recommended to use rotating proxies for tasks that require a constant IP address, such as developing and managing social media profiles. Frequent IP changes can lead to bans. 


In addition, rotating proxies are unsuitable for multi-step processes, such as adding items to a shopping cart and completing a purchase, because changing IPs can disrupt the completion of the transaction. 


Also, if you need to log in to a destination site, avoid using rotating proxies to prevent account bans and losses.


Rotating Proxies at ProxyCompass: What to Expect


As a customer of our proxy service Proxy Compass, you have the option to choose a rotating proxy package based on the number of requests you plan to make in a month.


Number of requests in package: Our plans are based on the number of requests. The smallest package is 2 million requests. If you're unsure of your needs, start with the smallest package or we can provide a free trial package.


Traffic volume: Traffic is unlimited.


Authentication method: The only authentication method is username and password.


Protocol support: Each proxy supports popular protocols - HTTP/HTTPS and SOCKS5.


Number of Gateways: Each user is provided with 16 HTTP/S and 16 SOCKS5 gateways or ports (see screenshot below). Users can use any or all of the 32 gateways simultaneously if they need a large number of proxies at once.
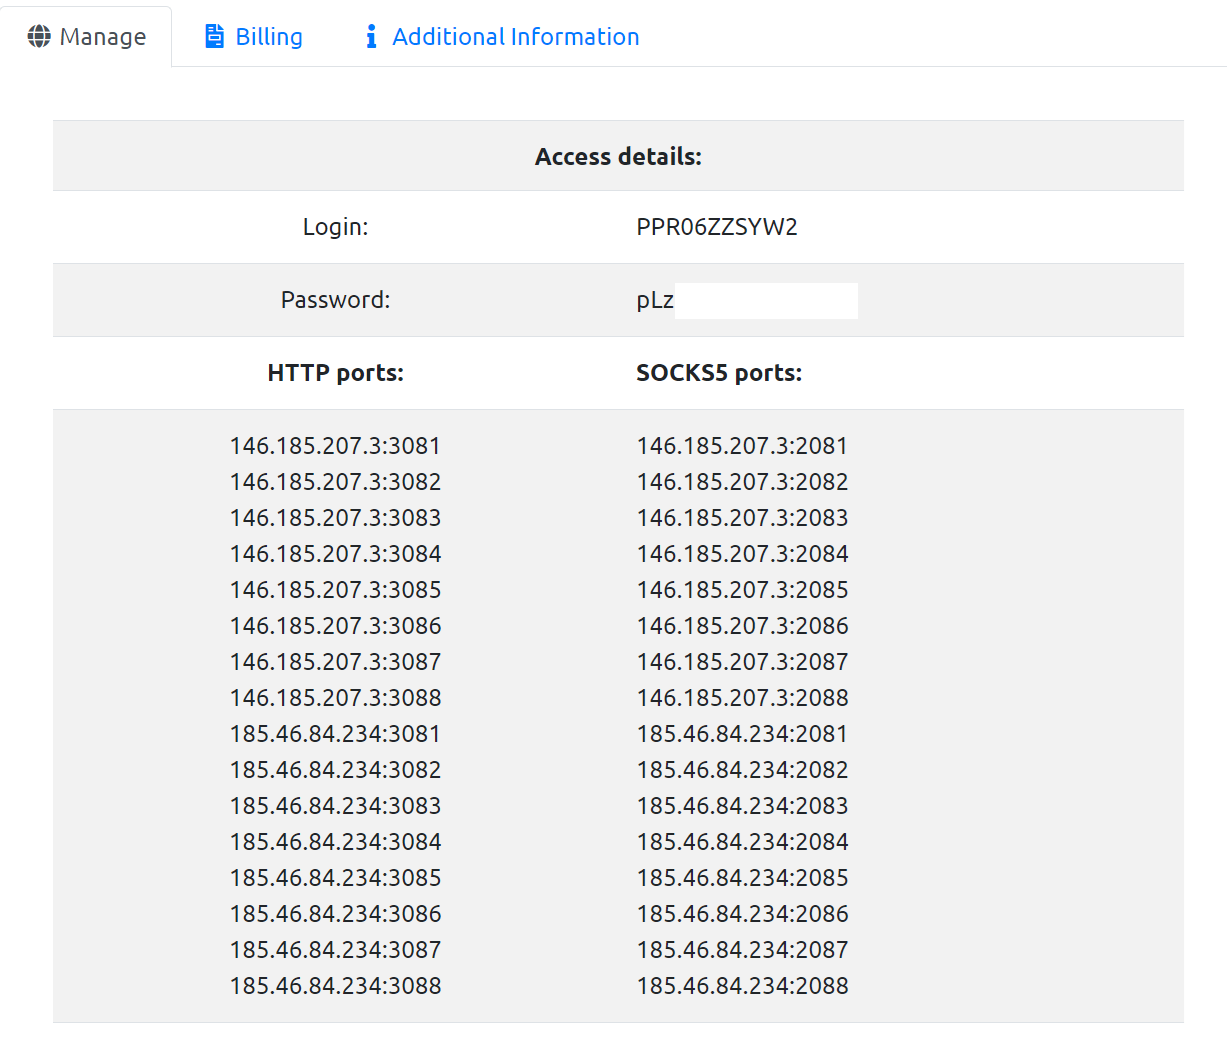


rotating proxies by proxycompass exampleList of available gateways (ports).
Each of these gateways has its own pool consisting of many thousands of end proxy IP addresses.

Proxy geolocation: Rotating proxies from ProxyCompass are not location based. Users will receive a mix of IP addresses from different countries.


How to Use Rotating Proxies


Rotating proxies are most effective when used with headless browsers such as Puppeteer, Selenium, or Playwright. These browsers do not make side connections and will block all extraneous connections when a page loads, such as ads, counters, and various other scripts that are present in large numbers on every web page. By blocking these, you save the use of rotating proxies.


However, for simplicity and clarity, we will demonstrate the connection of rotating proxies in a regular browser. We will use Firefox with the FoxyProxy extension.


Setting Up Rotating Proxies in Firefox with FoxyProxy

Open Firefox and download FoxyProxy Standard from the official add-on page.


Go to the FoxyProxy settings and create a new proxy connection. In another browser tab, keep open the page with the details of the rotating proxy package you purchased from ProxyCompass.
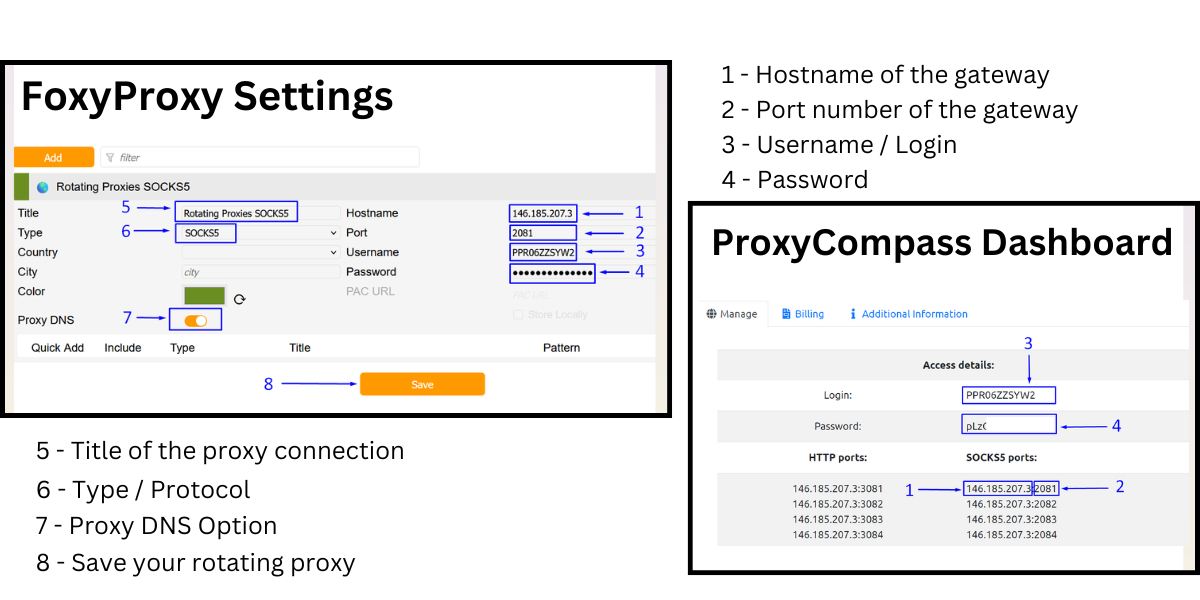


Setting Up Rotating Proxies in Firefox with FoxyProxy

Creating a New Rotating SOCKS5 Connection Step-by-Step:


- Copy one of the SOCKS gateway IP addresses from the ProxyCompass page. You will see many available gateways and can choose any of them.

We chose the first one from the list: 146.185.207.3.

Paste the copied IP into the "Hostname" field in FoxyProxy.


- Copy one of the available ports: 2081, 2082, 2083, etc. Any of them will work. We chose 2081.
Paste it into the "Port" field in FoxyProxy.


- Copy your unique username and paste it into the "Username" field in FoxyProxy.


- Copy your unique password and paste it into the "Password" field in FoxyProxy.


- Come up with a memorable name for your connection in FoxyProxy and enter it into the "Title" field. We named it Rotating Proxies SOCKS5.


- In the "Type" field, select the protocol for the proxy connection. Choose SOCKS5 as it is the most anonymous and versatile protocol.


- Toggle the "Proxy DNS" slider to the active position. This feature provides an additional level of anonymity since all DNS requests will be handled through our proxies rather than bypassing them. The SOCKS5 protocol allows for this, unlike the more basic SOCKS4.


- Save the settings by clicking the "Save" button.


Everything is set. Now, when you activate this profile in FoxyProxy, all your actions in the browser will go through the proxy, changing the IP each time you perform an action in the browser.


How to Test the Functionality of Rotating Proxies


To check if the rotating proxies are working correctly and if you really get a new IP address with every action in the browser, you can visit an IP address checking site. There are many such IP check sites, but not all of them are suitable for our needs.


Why not every IP address lookup page works correctly?


Most of these sites cache the visitor's IP address for a while and do not display the updated address. We need to make sure that we get a new IP address every time. Caching will interfere with this process.


Below is an example of a suitable page where caching does not occur and the updated IP address is correctly recognized:


https://chekfast.zennolab.com


If you follow the link above and refresh the page each time, you will see that your IP address is indeed changing.


To demonstrate the functionality of rotating proxies, we have prepared a video that shows how each action in the browser results in a new IP address. Watch the video below to see rotating proxies in action.


https://youtu.be/5RgQ3evCAF4

As you can see in the video, our proxy IP changes with each new request. The setup and testing are complete.


Thank you for reading the article to the end. We hope you found it helpful.


https://proxycompass.com/knowledge-base/rotating-proxies-explained/
Freitag, 21. Juni 2024

Static Proxies Explained

Static Proxies Explained

In this article, you will learn what static proxies are, what types are available, how they differ from dynamic (rotating) proxies, and what tasks they are and are not suitable for. 


We'll also cover their physical location, the types of IP addresses they use, and the pros and cons of using static proxies. 


In addition, we will discuss what to consider when ordering them and what to expect when purchasing access to static proxy services from ProxyCompass.


Need stable static proxies for your business?
See our pricing for static proxy.


What are Static Proxies?


Static proxies, also known as permanent, unchanging, or fixed IP proxies, use IP addresses that remain constant for long periods of time, often a month or more. 


They provide a fixed IP that does not change, providing a consistent online identity even if your own IP is dynamic. 


This stability is in contrast to rotating proxies, which change IPs frequently to increase anonymity. Static proxies are particularly valuable for activities that require a stable Internet presence.


How Do Static Proxies Work?


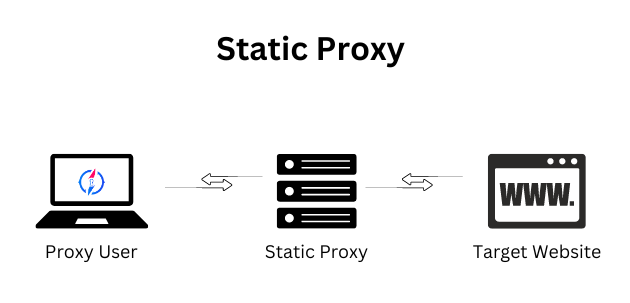
The client sends a request to the proxy server, which forwards it to the target website. 


The website responds back to the proxy, and this interaction is relayed back to the client.


how static proxies work

This process is repeated many times. Throughout this cycle, the proxy server maintains the same IP address over time, ensuring consistency in the client's online activities.


Characteristics of Static Proxies


Steady IP: Static proxies provide a stable IP address, improving online consistency. Ideal for tasks such as streaming content or downloading large files.


High-speed connectivity: Typically hosted on servers designed for rapid data transfer, these proxies facilitate activities that require fast Internet speeds, such as streaming media or downloading large files.


Fixed location: Changing the geographic settings of static proxies can be cumbersome, requiring a selection based on your specific location needs.

Ideal for Continuous Identity: Static proxies are ideal for maintaining a consistent identity over time, which is critical when managing multiple accounts or navigating multi-step processes such as online shopping.


Different Types of Static Proxies


Static proxy servers can be categorized into several main types based on their origin.


Data Center Hosted Static Proxies

Data center hosted static proxies are the most common type of static proxy, known for their speed, stability, and cost-effectiveness. 


Clients are not charged based on the amount of data processed, but rather on the number of IP addresses used. 


The main advantages of these proxies are their affordability and reliability, high connection speeds, constant availability, and the absence of charges based on the amount of uploaded and downloaded traffic. 


However, their main disadvantage is the lack of complete anonymity, as their IP addresses are owned by the hosting providers and can be more easily identified and potentially blocked by major e-commerce sites such as Amazon, eBay, and Booking.com.

Learn more about data center hosted proxies.


Residential Static Proxies

Residential static proxies, also known as ISP proxies, are a more expensive type of static proxy. Unlike data center proxies, their IP addresses belong to residential Internet service providers (ISPs). They are comparable to data center proxies in terms of speed and connection stability. 


The advantage of ISP proxies is that their IPs are generally more trusted due to their association with residential ISPs, resulting in fewer blocks and captchas. 


However, their main disadvantage is their higher cost.

Learn more about residential proxies.


Mobile Static Proxies

Mobile static proxies are essentially non-existent due to the nature of mobile IP addresses, which cannot be maintained by a single user for long periods of time. Mobile network operators periodically change the IP addresses assigned to each SIM card.

In mobile proxy farms, mobile proxy providers may offer a compromise known as "sticky IP", which allows a mobile proxy user to temporarily fix an IP address for a short period of time-typically 10-30 minutes and rarely up to an hour. 


Therefore, calling a mobile proxy "static" is a bit of a stretch.

Learn more about mobile proxies.


Free or Public Static Proxies

Free or public static proxies are often servers or home computers that have become externally accessible due to misconfiguration or virus infection. 


These proxies should not be considered reliable tools for serious tasks due to their unpredictable nature and potential security risks. They may provide temporary solutions for less critical applications, but don't expect them to provide fast or secure service. 


The length of time a free proxy will maintain its IP address is unpredictable. 

Learn more about free proxies.


When to Use Static Proxies


Static proxies are ideal for activities that require a consistent online identity. They provide uninterrupted access by maintaining a stable IP address, which is essential for logging into websites without repeatedly entering credentials. This makes them ideal for managing multiple accounts, web crawling for SEO purposes, streaming media, downloading large files, and navigating multi-step processes such as online shopping checkout. Static proxies help maintain anonymity while allowing users to perform these tasks efficiently.


When Not to Use Static Proxies


Static proxies may not be appropriate for tasks that require frequent changes in proxy settings, such as location adjustments. They are also less effective for scraping large amounts of data from dynamic websites in industries such as e-commerce, travel, and hospitality. 


In addition, tasks that require continuous IP address changes to maintain anonymity are better served by using rotating proxies rather than static ones.


Static Proxies at ProxyCompass: What to Expect


As a customer of Proxy Compass, you get access to static proxy servers based on the selected number of proxies in the package and the geographical location according to the Ripe.net database.


Rental period for static proxies: The minimum rental period is one month. The list of IP addresses remains the same during the rental period. When renewing this package, the list of IP addresses will be carried over to the following months without any changes.


Optional list update: Customers can do an optional update of their IP address list. This option is available every 8 days and can be accessed by clicking the "Get new IP" button in the client's control panel.


Protocol support: Each proxy in the client's list supports all major protocols, including HTTP/HTTPS and SOCKS4/SOCKS5. Clients can use each proxy for all protocols simultaneously without switching or additional configuration.


Static proxies are available for simultaneous use over both SOCKS5 and HTTP/S protocols.

Proxy Authentication: The authentication method is based on the client's IP address. When enabling a package of static proxies, the client must enter the IP address of the device from which they need to access the proxy in the special "Binding IP" field.


Access to the list of static proxies: Clients can download the list of their proxies in advance or access it through the API. Additionally, the API allows to retrieve random IPs from the available list.


https://proxycompass.com/knowledge-base/static-proxies-explained/
Donnerstag, 20. Juni 2024

Setting Up a Proxy in the Brave Browser

Setting Up a Proxy in the Brave Browser

What is Brave Browser?


Brave Browser is an innovative web browser that prioritizes privacy, speed, and ad-blocking capabilities. Most notably, Brave allows users to earn cryptocurrency (Basic Attention Tokens, or BAT) by choosing to view privacy-respecting ads. This feature provides a unique way for users to safely monetize their browsing activities. By blocking unwanted content, Brave significantly reduces page load times while improving privacy. It's a compelling choice for those who want to combine efficient browsing with the potential to earn money from their online activities.


Why Brave Browser Needs Proxies to Be Fully Effective?


While Brave Browser excels at privacy and ad blocking, its functionality can be enhanced through the use of proxies. Proxies allow users to change their IP address, providing an additional layer of anonymity and security. This is critical for those who need to access geo-restricted content or protect their browsing activity from being traced to a specific location. Additionally, for marketers and researchers who manage multiple accounts, proxies allow them to operate without risking account bans or restrictions, maximizing Brave's privacy and monetization potential.


brave browser baner

Setting Up a Proxy in the Brave Browser


Built on the Chromium engine, Brave Browser shares many features with Google Chrome but places a greater emphasis on security and user anonymity while browsing. This browser is compatible with Windows, Mac, and Linux and supports proxy server integration. 


However, unlike Chrome, Brave does not allow direct proxy settings within the browser interface. Instead, users must configure proxy settings at the system level in Windows to specify a particular IP and proxy for the browser.


This guide will teach you how to properly add a proxy server to the Brave Browser to enhance your online browsing anonymity.


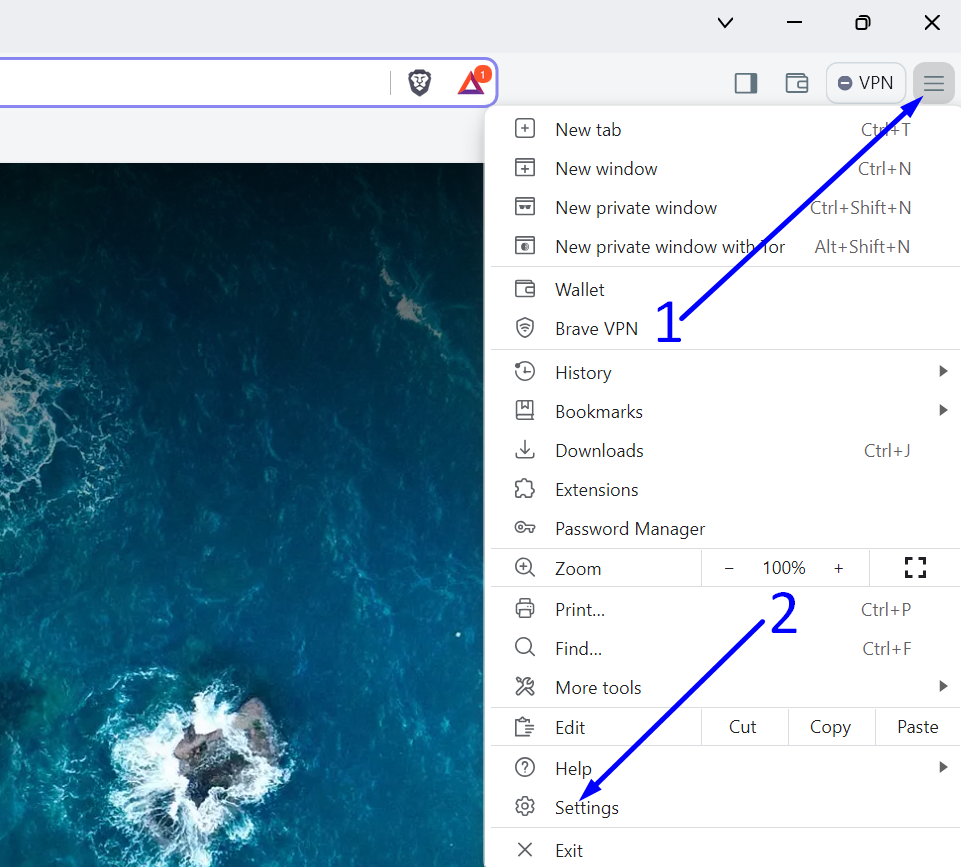
Step 1: Navigate to the network settings in Brave Browser

- In the upper right corner of the Brave Browser, click on the hamburger icon (three vertical lines). 

- Then, select "Settings" from the menu that appears.

bravebrowser add proxy

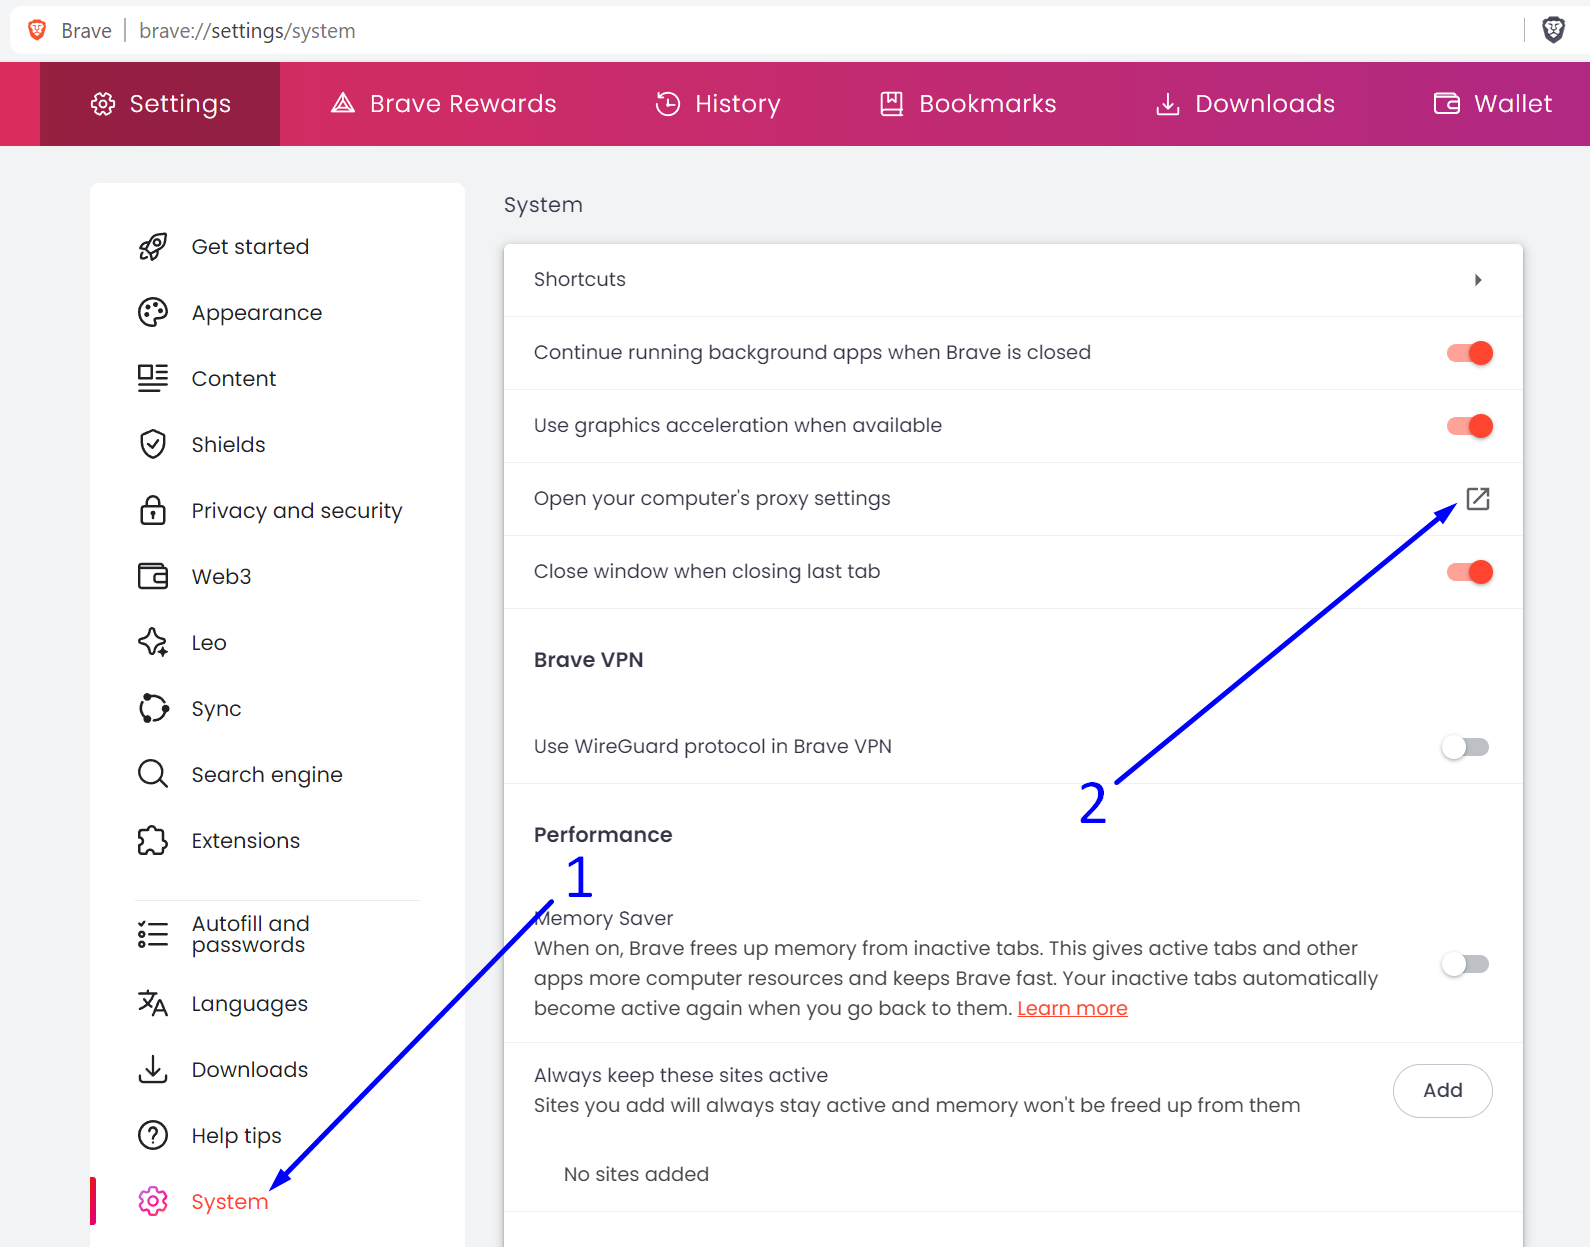
Step 2: Navigate to your operating system's system settings

- Click on the “Settings” menu section.

- Click on “Open your computer’s proxy settings”.

brave browser open network settings

Step 3: Open System Settings

In the “Manual proxy setup” section, click the “Set up” button.


bravebrowser windows proxy settings

Step 4: Set Up HTTP Proxy

Due to Brave Browser using system settings and lacking independent network configurations, you cannot use advanced proxy settings. SOCKS protocol, and proxy authentication with username and password are unsupported. You are limited to using the less anonymous HTTP proxy.


To set up an HTTP proxy, follow these steps:


- Toggle the "Use a proxy server" switch to "On"

- Enter the IP address and port of your proxy.

- Save the settings by clicking the “Save” button.

bravebrowser enter HTTP proxy data

Overall, it can be said that Brave Browser serves as an alternative to Chrome. However, it does not offer the broad set of features available in competitors such as Firefox, which includes the powerful and highly reliable FoxyProxy extension.


https://proxycompass.com/knowledge-base/setting-up-a-proxy-in-the-brave-browser/