Mittwoch, 19. Juni 2024

Setting Up a Proxy in the Marketer Browser

Setting Up a Proxy in the Marketer Browser

What is MarketerBrowser?


MarketerBrowser is a professional anti-detect browser designed to manage multiple accounts on different websites simultaneously. It provides users with tools to control and customize their digital fingerprints, ensuring anonymity and security online. This browser is especially useful for digital marketers and social media managers who need to operate multiple different profiles without triggering security protocols that could lead to account restrictions or bans.


Why Are Proxies Essential for MarketerBrowser?


Proxies are critical to MarketerBrowser because they allow users to manage multiple online profiles on different platforms without being detected. By using proxies, each profile can appear to come from a unique IP address, increasing anonymity and reducing the risk of account bans or restrictions. This is especially important for digital marketers who need to simulate access from different geographic locations to test campaigns or effectively manage different marketing strategies. Proxies also help maintain the operational efficiency and security of each profile.


MarketerBrowser banner

Setting Up a Proxy in the Marketer Browser


In this guide, we will demonstrate how to set up proxies in Marketer Browser, which supports both HTTP and SOCKS4/5 protocols. You have the option to use static proxies, which have a consistent IP, or rotating proxies, which change IP addresses dynamically with each action.


For both scenarios, we will use the SOCKS5 protocol as it provides the highest level of anonymity and versatility for the tasks you can perform with Marketer Browser.


Step 1: Adding a New Proxy

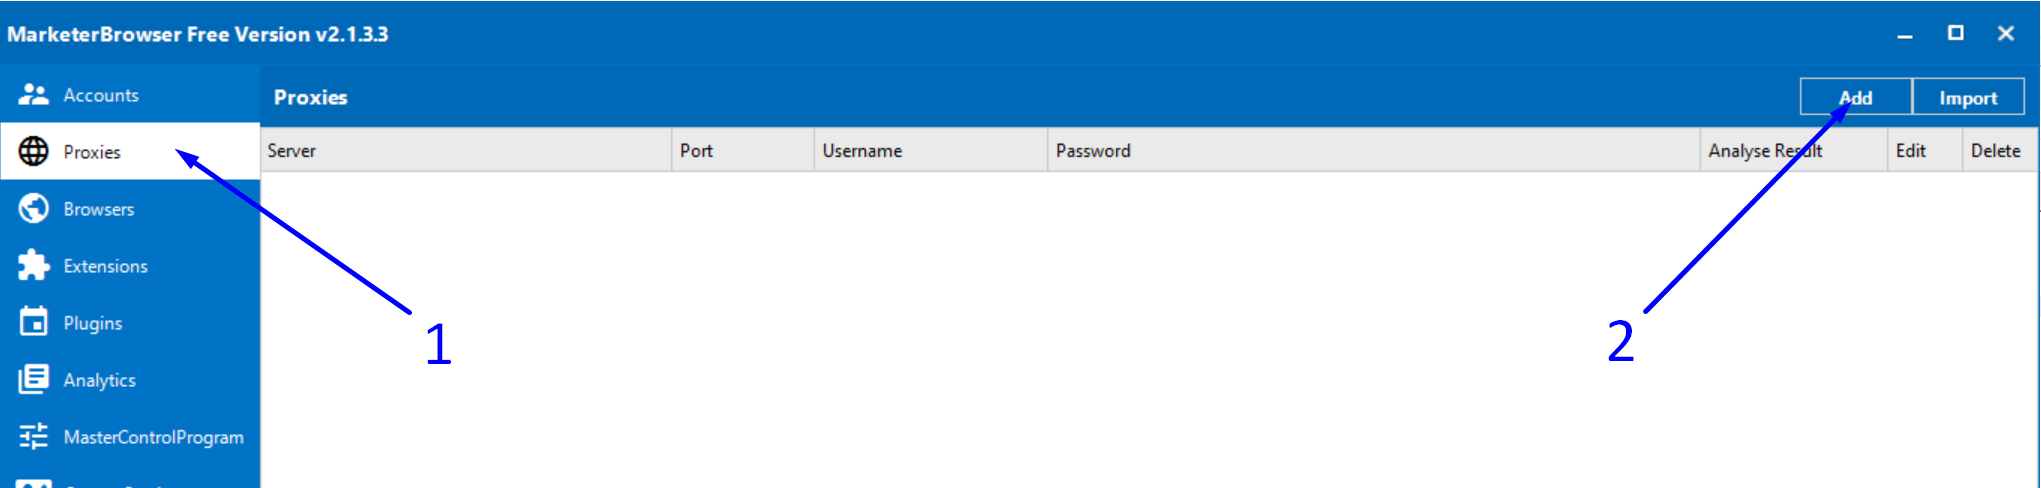
- Navigate to the “Proxies” section.

- Click on the “Add” button located in the upper right corner of the program.

marketerbrowser add proxy

Step 2: Setting Up a Static Proxy

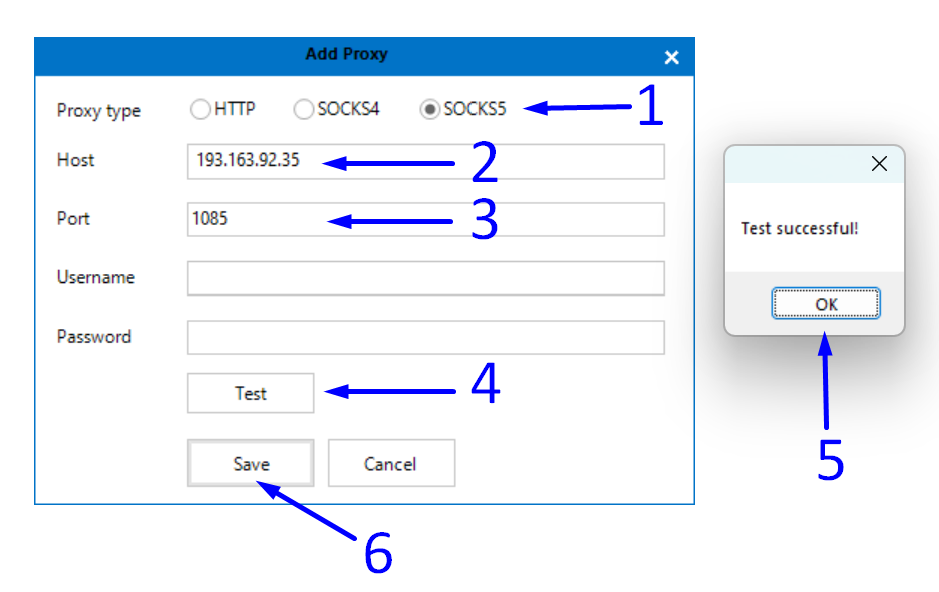
- Switch to SOCKS5 mode.

- Enter the IP address of your static proxy into the "Host" field.

- Enter the appropriate port in the "Port" field.

Note: Our SOCKS proxy does not require a username and password for connections through port 1085, so leave these fields empty. Note that your setup might differ.


- Click the "Test" button to verify the connection with the proxy.

- If the test is successful and you see a "Test successful" message, everything is set up correctly. Simply close the window by clicking "OK".

- Save your proxy settings by clicking the "Save" button.

marketerbrowser add static proxy

Step 3: Setting Up a Rotating Proxy

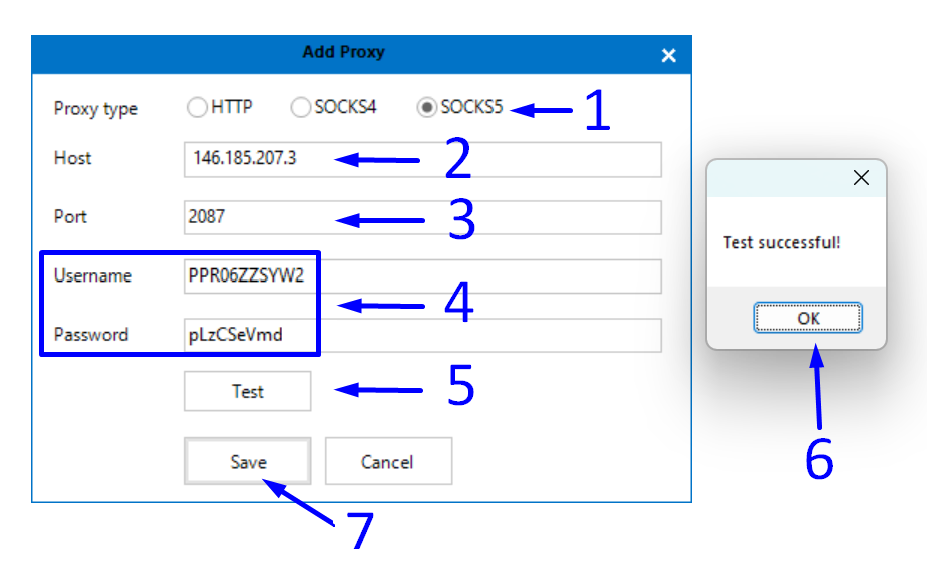
- Set the SOCKS5 protocol.

- Enter the IP address of the rotating proxy gateway in the "Host" field.

- Enter the required port in the "Port" field.

- Authorization by password is necessary for rotating proxies. Enter your username in the "Username" field and your password in the "Password" field.

- Click the "Test" button to check the connection to the proxy.

- If the test is successful and a "Test successful" window appears, everything is in order. Simply close the window by clicking "OK".

- Save the proxy settings by clicking the "Save" button.

marketerbrowser add rotating proxy

Now you know how to configure a proxy server for the Marketer Browser antidetect browser. To ensure your accounts are securely protected, use private proxy servers for each account. This way, you'll avoid blocks and continue to promote your business online.


https://proxycompass.com/knowledge-base/setting-up-a-proxy-in-the-marketer-browser/

Dienstag, 18. Juni 2024

Setting Up Proxies in the GoLogin Browser

Setting Up Proxies in the GoLogin Browser

What is GoLogin Browser?


GoLogin Browser is an anti-detection software designed to manage multiple online profiles while maintaining anonymity. It allows users to control their digital fingerprints by effectively spoofing browser parameters to avoid detection by anti-fraud systems. GoLogin is ideal for tasks that require multiple accounts, such as affiliate marketing and social media management, by allowing users to create multiple unique profiles that operate independently. The software also includes team collaboration features with options to securely share profiles and proxies.


Why Are Proxies Necessary in GoLogin?


Using proxies in GoLogin is essential for increasing anonymity and operational efficiency. Proxies allow users to manage multiple profiles from different geographic locations without triggering security alerts on platforms. This is critical for activities such as affiliate marketing, where avoiding detection and bans is important. In addition, proxies help maintain the integrity of each unique digital fingerprint by diversifying the apparent origin of web activity, further securing online operations and preventing account flagging or closure.


Setting Up Proxies in the GoLogin Browser


The GoLogin browser offers a robust toolkit for managing various types of proxy servers, catering to both novice and advanced marketers who need to maintain multiple online profiles. 


Using Your Own IP Address: While GoLogin allows you to browse using your direct IP, this method exposes you to potential security risks. It is feasible for managing one or two profiles, but for larger operations, it poses a significant risk of losing all your data and hard work.


Supported Proxy Protocols: GoLogin supports a range of protocols including HTTP, SOCKS4, and SOCKS5. These options enhance your browsing security and flexibility, enabling safe and anonymous internet usage.


IPv4 and IPv6 Proxies: The browser accommodates both widely used IPv4 proxies and the less common, yet more economical, IPv6 proxies, giving users more choices based on their needs and budget.


Proxy Options within GoLogin: Users have several choices when it comes to configuring proxies:


- Free Proxies: These are available but not recommended due to security vulnerabilities. Learn more about free proxies.

- Built-In Proxies: Users can buy proxies from providers affiliated with GoLogin.

- Tor Network: While secure, using Tor can significantly slow down your browsing speed.

- Your Own / Purchased Proxies: For the best security and performance, you have the option to use either your own proxy servers or proxies purchased from external providers.

At Proxy Compass, we specialize in providing specific guidance on how to integrate our own high-quality proxies into GoLogin. This ensures that our clients can fully leverage their browser’s capabilities while maintaining the highest levels of security and efficiency.


Let's consider two typical scenarios for using GoLogin:


1. Using a profile with a static, constant IP:


This setup is ideal for operations requiring a consistent geographical appearance over time, such as managing long-term social media profiles or performing continuous monitoring.


2. Using a profile with a dynamic, constantly changing IP:


This approach is suited for tasks requiring high anonymity, such as web scraping, accessing geo-restricted content, or avoiding detection and blacklisting by target websites.


In both cases, we will be setting up SOCKS5 proxies, which are more anonymous and versatile compared to HTTP proxies. HTTP proxies are faster but provide less anonymity.


Case 1: GoLogin Browser Profile with a Permanent, Static IP

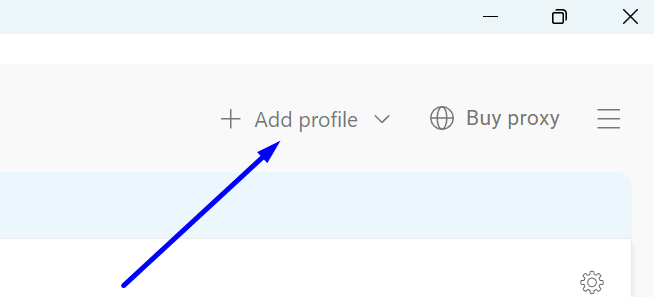
To create a profile with a static proxy, click on the "+ Add profile" label in the upper left corner of the program.


gologin creating a profile

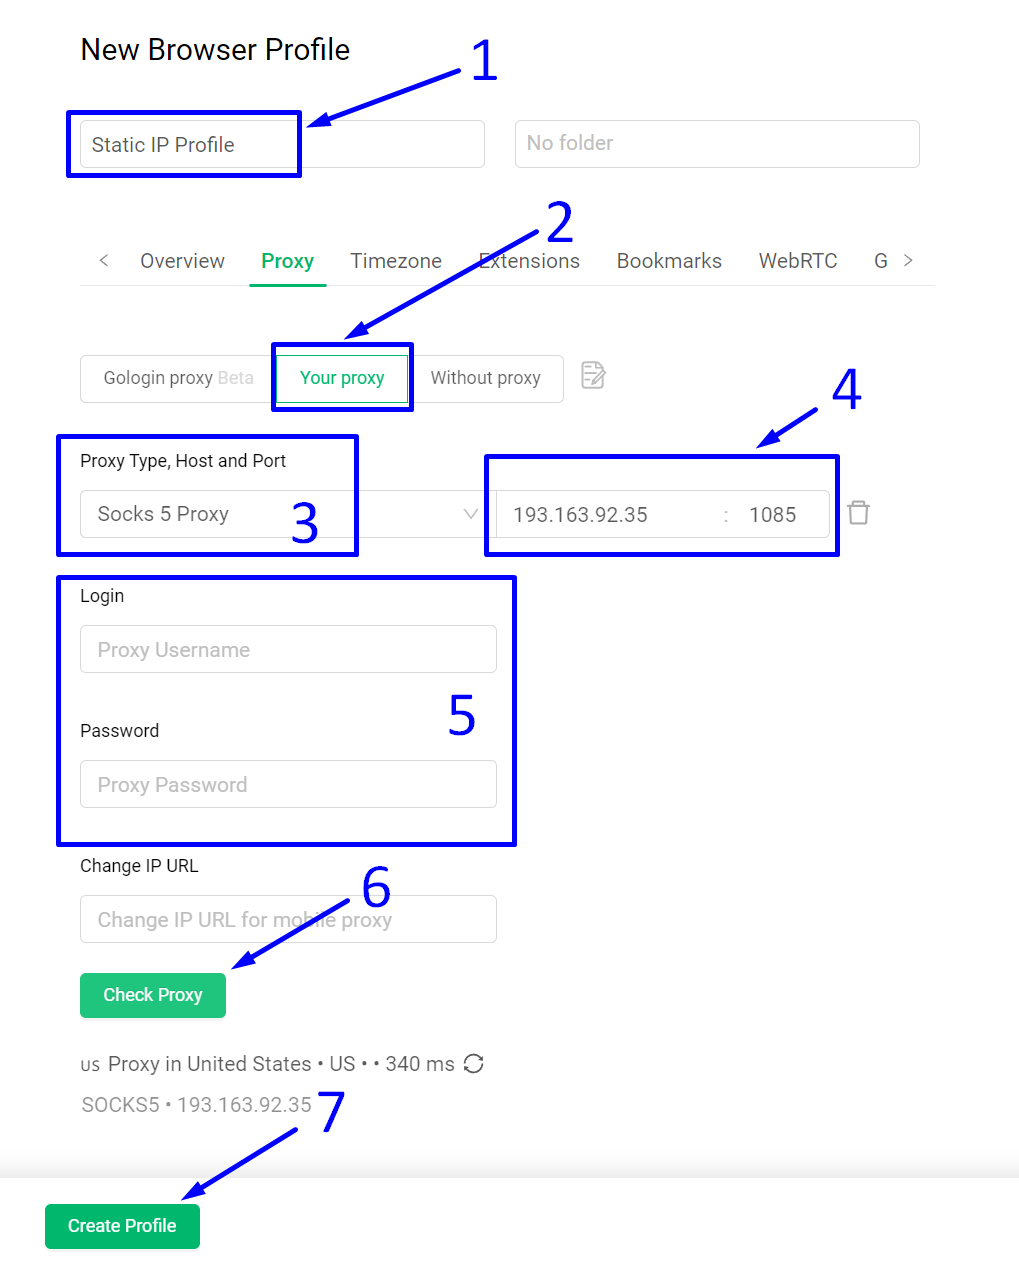
Navigate to the new profile settings. There, you need to:


- Fill in the “Title” field with a memorable name.


- In the connection selection field, choose “Your proxy.”


- From the available options in the “Proxy Type” field, select “Socks 5 Proxy”.


- In the “Host and Port” field, enter the IP address of your proxy and its port.


- If your proxy requires authentication, enter the Username and Password. For Proxy Compass clients, these fields are not required if you are using a SOCKS proxy with port 1085.


- Check your proxy by clicking the “Check Proxy” button. If data on the proxy's geolocation and response time in milliseconds appears, the proxy is ready for use.


- Save your new profile by clicking the “Create Profile” button.

Now, you can use this profile in GoLogin. Your proxy will remain unchanged.


gologin static proxy

Case 2: GoLogin Browser Profile with Dynamic, Changing IP

For certain tasks, you may need to configure a profile such that its IP address constantly changes. This can be achieved by adding a list of proxies, or more simply, by using a rotating proxy. This can be accomplished by adding just the IP address of a proxy gateway to your profile.


Below, we will show you how to do this.


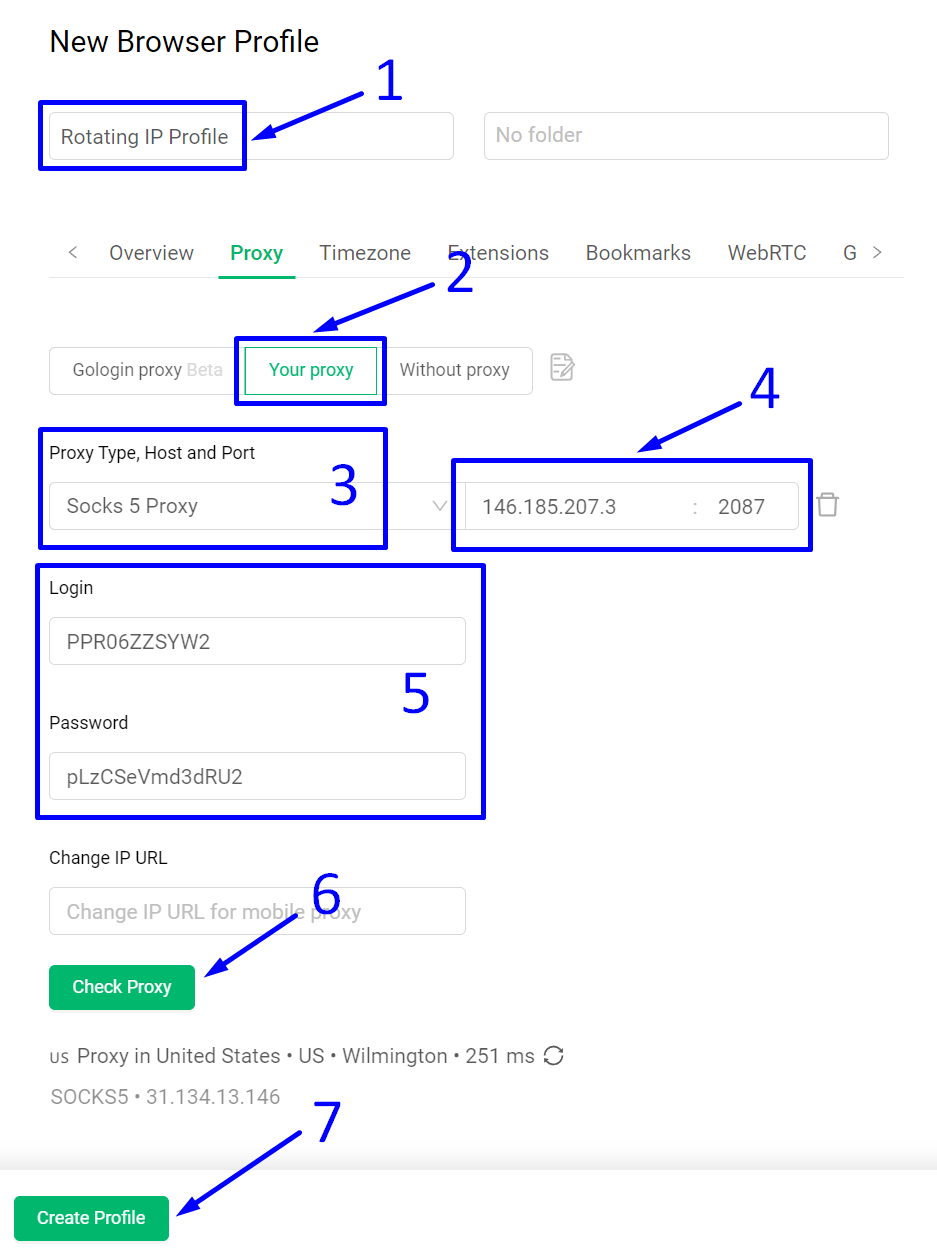
To begin, create a new profile as shown in the previous example. Then follow these instructions:


1. Name the profile by entering a memorable title in the “Title” field.


2. Click on “Your proxy”.


3. Select “Socks 5 Proxy” from the dropdown list.


4. Now, pay attention here: In the “Host” field, instead of entering the IP address of a single proxy server, enter the IP address of a proxy gateway. This is the gateway address through which your profile will receive random IP addresses with each new action in the browser, such as clicking a link, refreshing a page, or navigating to a different site.


In the “Port” field, enter the port of your gateway. For Proxy Compass services, you can enter port 2087.


5. Rotating proxies require authentication using a username and password. Enter these in the “Login” and “Password” fields.


6. Click the “Check Proxy” button to test the connection with the gateway. If data about the proxy's geolocation and response time in milliseconds appear, the rotating proxy is ready to use.


7. Save the profile by clicking the “Create Profile” button.


gologin rotating proxy

In summary, setting up proxies in GoLogin is both essential and easy. The platform is designed to make proxy integration seamless, ensuring that even users new to proxy setups can easily manage their configurations. The need for proxies in GoLogin cannot be overstated, as they are critical to maintaining anonymity and security while managing multiple profiles. This simple setup process allows users to focus more on their jobs and less on the complexities of digital identity management.


https://proxycompass.com/knowledge-base/setting-up-proxies-in-the-gologin-browser/

Montag, 17. Juni 2024

Setting Up Proxies in Octo Browser

Setting Up Proxies in Octo Browser

What is Octo Browser?


Octo Browser is an advanced anti-detect browser designed for multi-accounting with maximum protection against browser identification. It allows users to maintain an unlimited number of virtual profiles, making it impossible for websites to track real browser fingerprints.


The browser is tailored for users who need to efficiently manage multiple accounts, such as in affiliate marketing, e-commerce, and other digital activities that require maintaining numerous separate identities online. Octo Browser supports detailed customization of browser settings and integrates with automation tools to streamline repetitive tasks, making it a powerful tool for digital marketers and privacy-conscious users alike.



banner octo browser

Why Are Proxies Needed in Octo Browser?


Proxies are essential in Octo Browser for several reasons:


Improved anonymity and security: Proxies mask your real IP address, making it difficult for websites to track your activity. This is critical when managing multiple accounts to avoid detection and potential bans from platforms that monitor for suspicious activity.
Geo-targeting and content access: By using proxies, you can access content or platforms that are geo-restricted, allowing you to operate in different markets without being physically present in those locations. This is particularly useful for tasks such as ad verification and social media management across multiple geographies.
Performance optimization: Proxies can improve load times and reduce bandwidth usage by caching data. This is beneficial when accessing the same resources repeatedly across different profiles managed by Octo Browser.
Risk mitigation: Using different proxies for different profiles reduces the risk of banning all accounts if one is detected. This is especially important for users engaged in sensitive activities such as market research, affiliate marketing, or data scraping.
Collaboration and scalability: Proxies allow teams to manage profiles without overlapping or interfering with each other's activities, which is essential for collaborative projects and large-scale operations using Octo Browser.


These features underscore the importance of proxies in maintaining operational efficiency and security when using Octo Browser to manage multiple online profiles and tasks.


Setting Up Proxies in Octo Browser


This guide will walk you through the steps to set up proxies in Octo Browser, ensuring that each account operates under its own IP address to avoid potential blocks and safeguard your digital operations.


Octo Browser supports proxy protocols including HTTP/S, SOCKS4/5, and SSH. It also offers the option to use static proxies, rotating proxies, and the ability to upload an entire list of proxies.


We will demonstrate two different ways of using proxies in Octo Browser:


1. Creating a profile with a static proxy, where the IP address will be constant. This IP address will be assigned to the profile and used for every internet activity conducted through this profile.


2. Creating a profile with a rotating proxy, where the IP address is dynamic, changing with each new action the profile takes (opening a new page, refreshing a page, clicking on a link, etc.). For this, a rotating type of proxy is necessary.


In both scenarios, we will use SOCKS5 proxies, as they provide a higher level of anonymity compared to HTTP proxies.


Step 1: Adding New Proxies in Octo Browser

First, we want to add two different types of proxies to the Octo Browser proxy manager. Later, these proxies will be assigned to different browser profiles to handle various types of tasks.


To add a new proxy in Octo Browser:


- Click on the "Proxies" label at the top of the program's screen.

- Press the "Add Proxy" button located in the upper right corner.
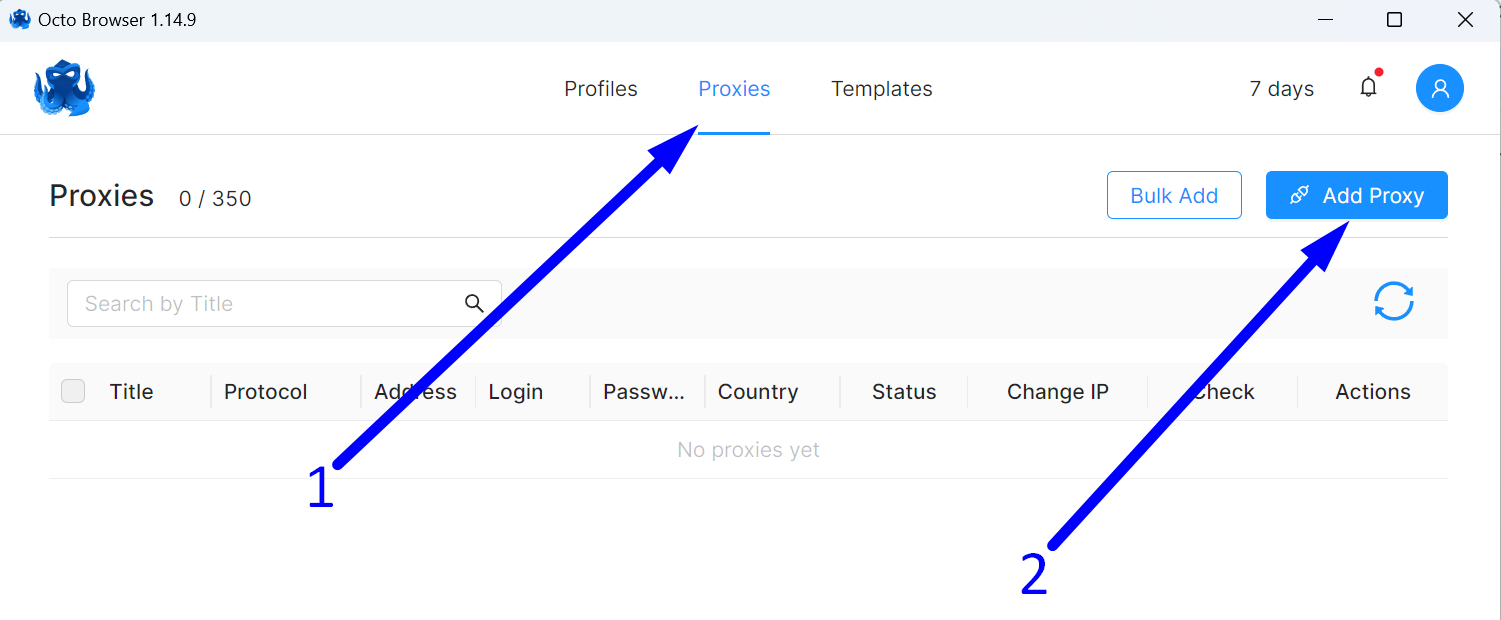
octobrowser add a proxy

Step 2: Entering Static Proxy Data

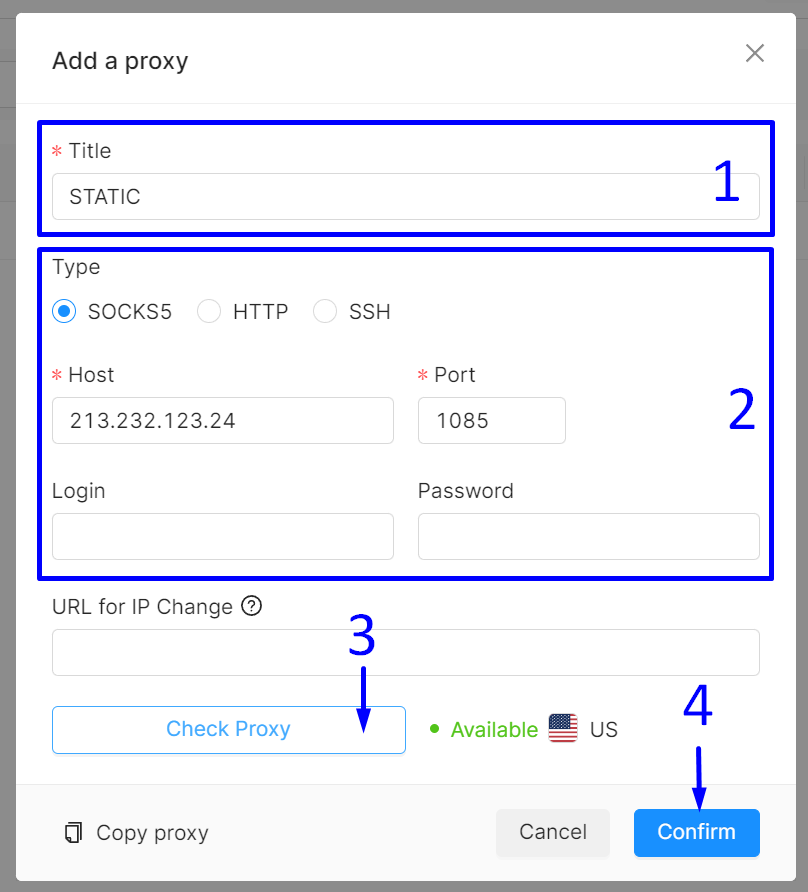
- Let's come up with a memorable name for the proxy, such as "STATIC," and enter it in the "Title" field.

- In the "Type" section:

- Choose the proxy protocol - SOCKS5 (reliable and anonymous).

- Enter the IP address of our static proxy in the "Host" field.

- Enter the port number 1085 in the "Port" field.

For Proxy Compass clients, we always recommend using port 1085 for creating SOCKS connections. When using this port, there is no need to fill in the "Login" and "Password" fields.


- Click on the “Check Proxy” button to test the proxy connection. If a green "Available" label and the country's flag appear, everything is set up correctly.

- Click on the “Confirm” button to save the proxy.

octobrowser static proxy details

Step 3: Entering Rotating Proxy Data

In this step, we assign the title "ROTATING" to the rotating proxy profile.


In the "Type" section:


- Select the proxy protocol - SOCKS5, known for its robust security and anonymity.

- In the "Host" field, input the IP address of our rotating proxy gateway.

Note:146.185.207.3 is not the actual proxy IP but the IP of the general rotating gateway through which you, as a Proxy Compass client, will receive random IP addresses.


- In the "Port" field, enter the port number 2087.

- Input your Login credentials in the "Login" field.

- Enter your Password in the "Password" field.

Click on the “Check Proxy” button to test the proxy connection. If you see a green “Available” sign and the country flag, the connection is successfully established.


Click the "Confirm" button to save the proxy settings. All done!
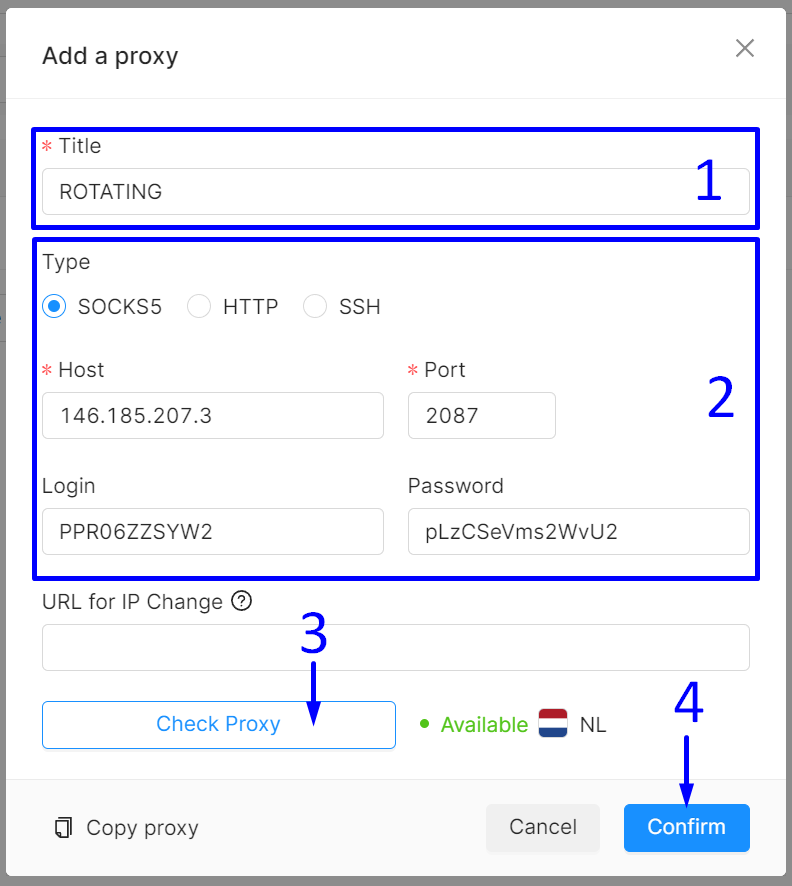


octobrowser rotating proxy details

Step 4: Quick Profile Creation

To quickly create the desired number of profiles, follow these steps:


- Navigate to the “Profiles” section.

- Click the “Quick Profile” button as many times as needed to create multiple profiles instantly.
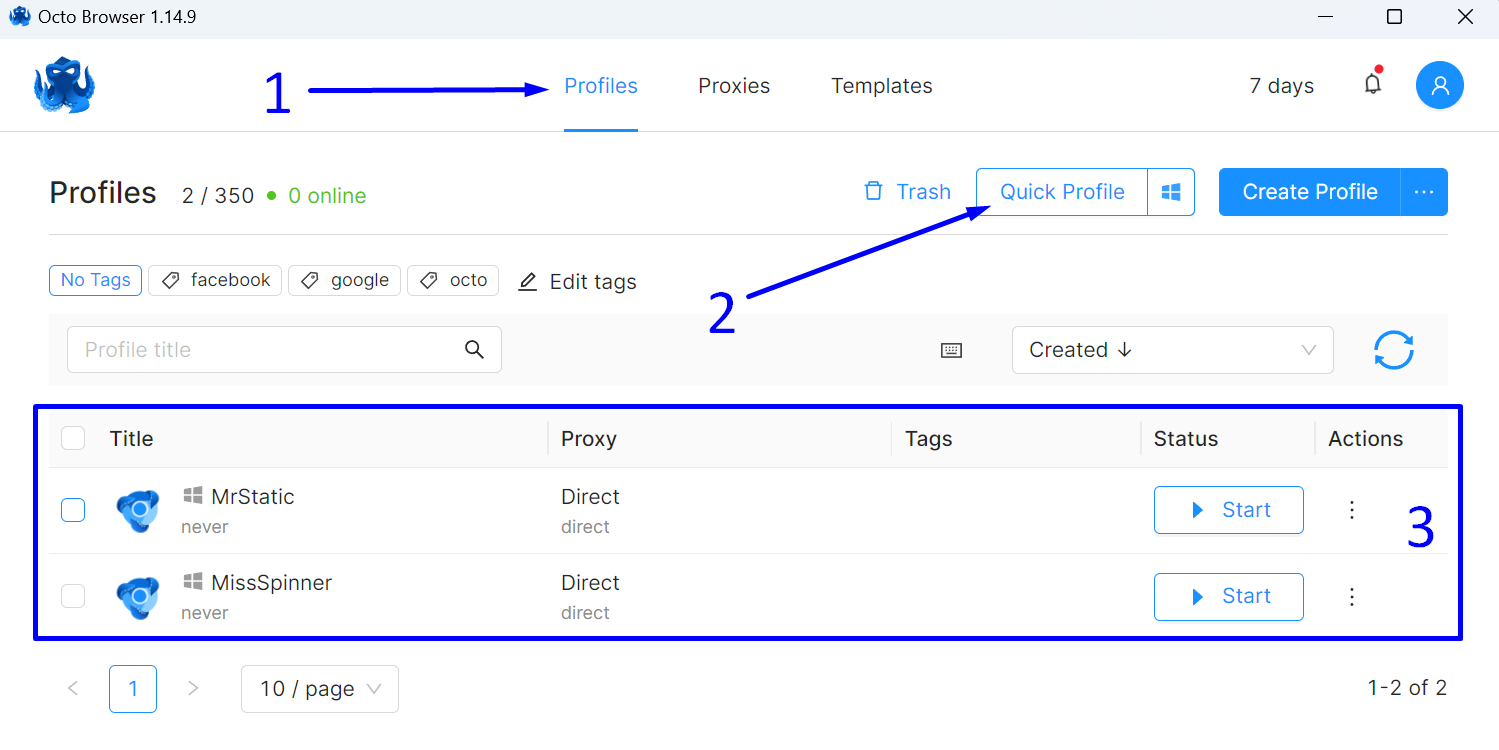
octobrowser creating profiles

We will click the “Quick Profile” button twice to create two distinct profiles. We'll give them memorable names for easy identification.


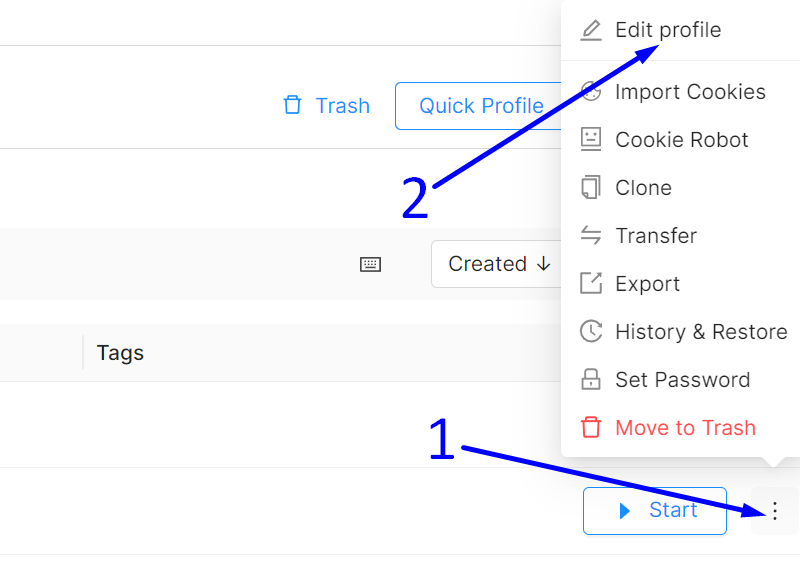
To change a profile's name, you should:


- Click on the three dots icon next to the desired profile.

- In the popup menu that appears, select “Edit profile”.

octobrowser edit profile

Step 5: Assigning a Proxy to Each Profile

We previously created two test profiles named MrStatic and MissSpinner.


Now, we need to connect the static proxy to the MrStatic profile, which will always maintain the same IP address.


For the MissSpinner profile, we'll connect a rotating proxy, allowing this profile to continuously change IP addresses.


To modify the connection settings and assign a specific proxy to a profile, click on the "Direct" label next to the corresponding profile.
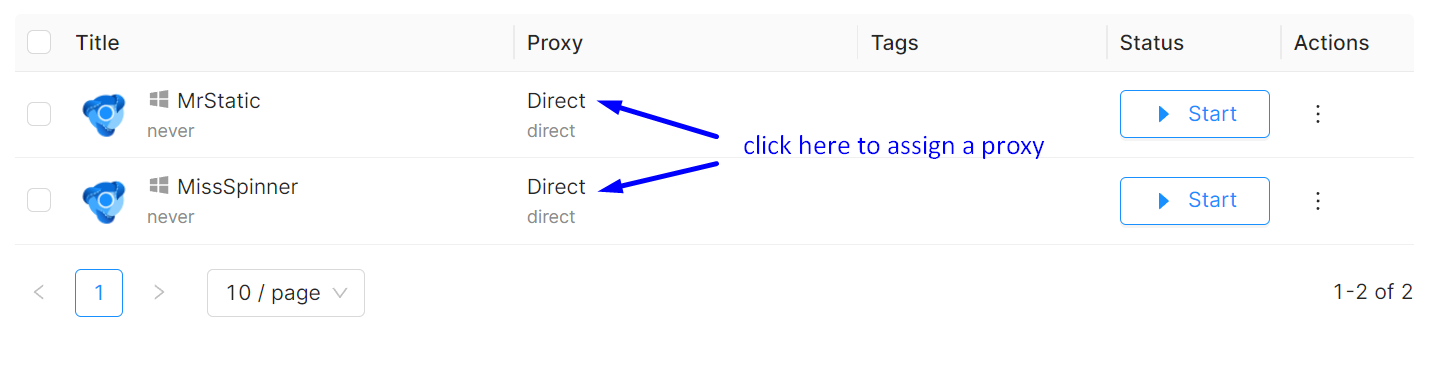


octobrowser assign a proxy to a profile

For the MrStatic profile, we will set up a static proxy.
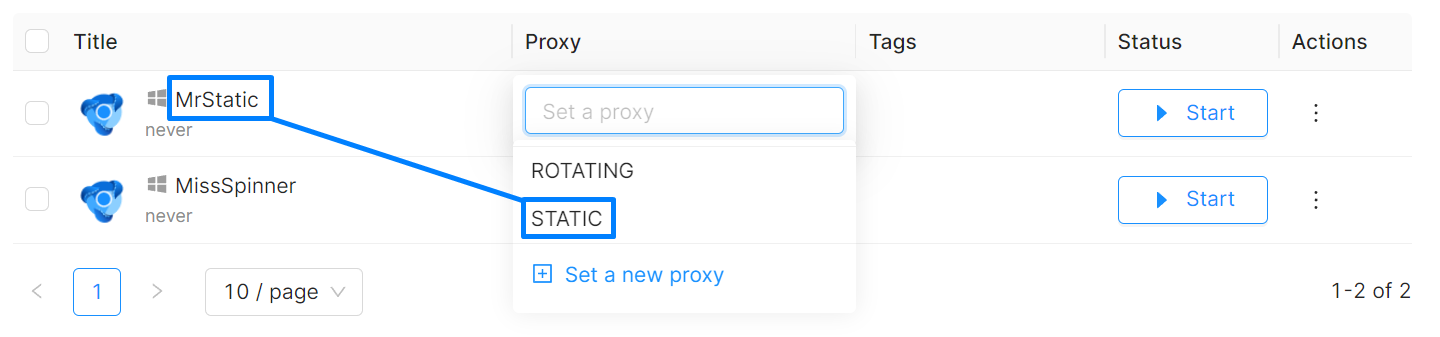


octobrowser assign a static proxy

For the MissSpinner profile, we will set up a rotating proxy.
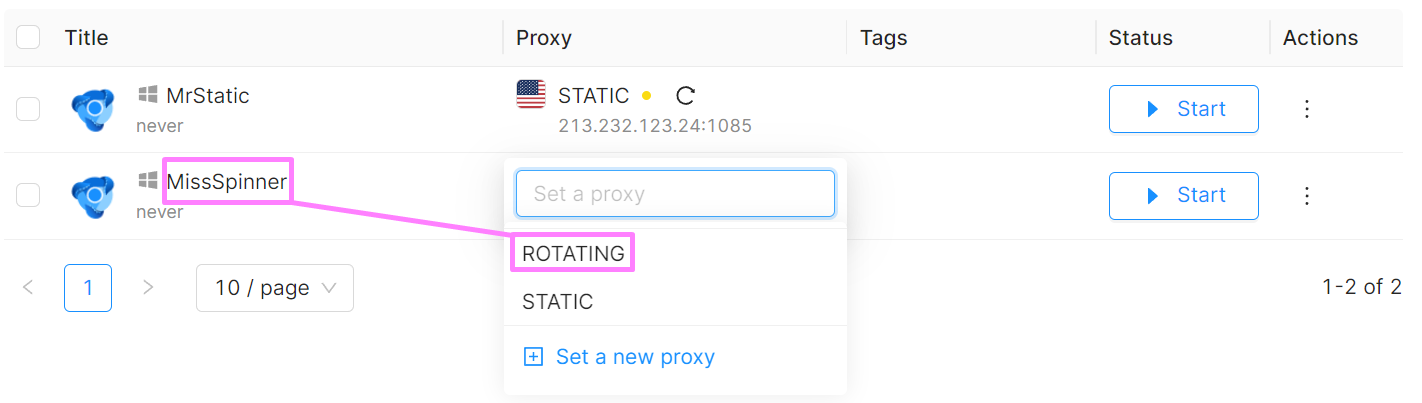


octobrowser assign a rotating proxy

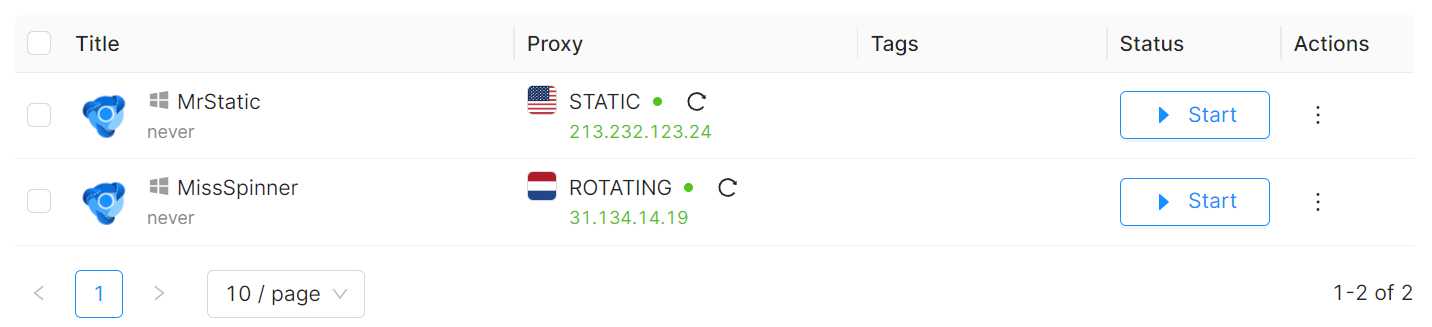
And here's what we've achieved.


octobrowser proxies assigning results

The profiles have received their respective proxies and are ready for use, each tailored for specific tasks.


Step 5: Bulk Proxy Upload in Octo Browser

Octo Browser's Advanced version supports up to 1200 profiles, each capable of having its unique proxy.


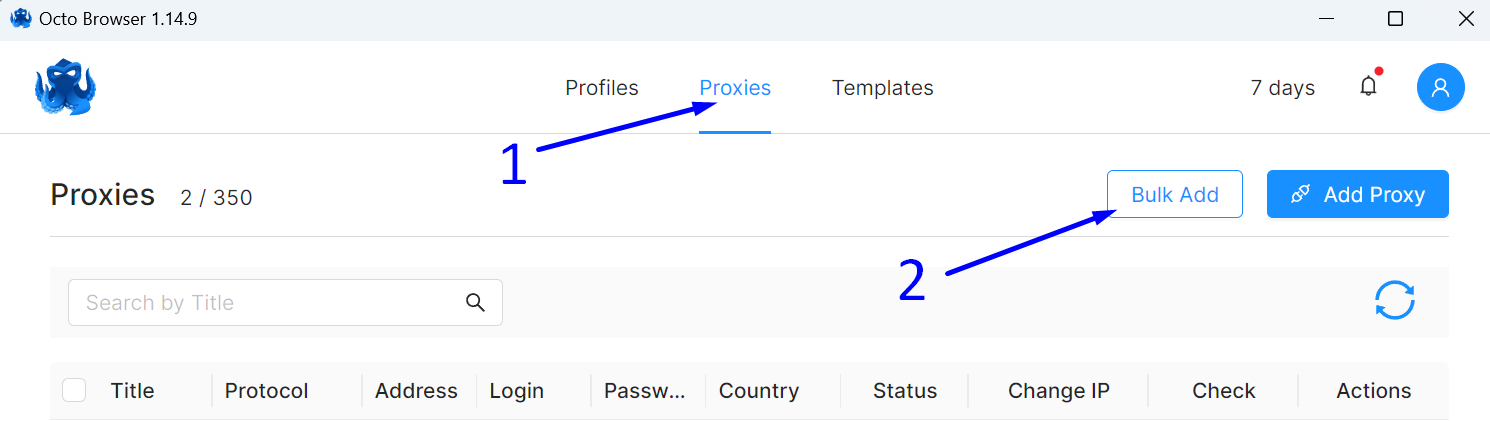
To massively add a large number of proxies to the Octo Browser proxy manager, you need to:


- Navigate to the proxy manager by clicking on the "Proxies" button.

- Click on the "Bulk Add" button.

octobrowser bulk proxies

Before uploading, you need to prepare your list of proxies in the following format:


To add SOCKS proxies:


socks://:
socks://:
socks://:
socks://:
socks://:


To add HTTP or HTTPS proxies:


http://:
http://:
http://:
http://:
http://:


We prefer SOCKS and create a list of our proxies in a text editor in the following format:
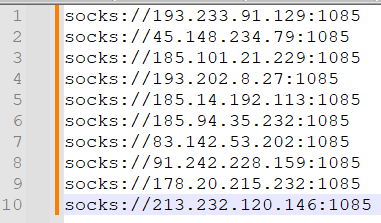


octobrowser prepare your proxy list

We copy the entire list and:


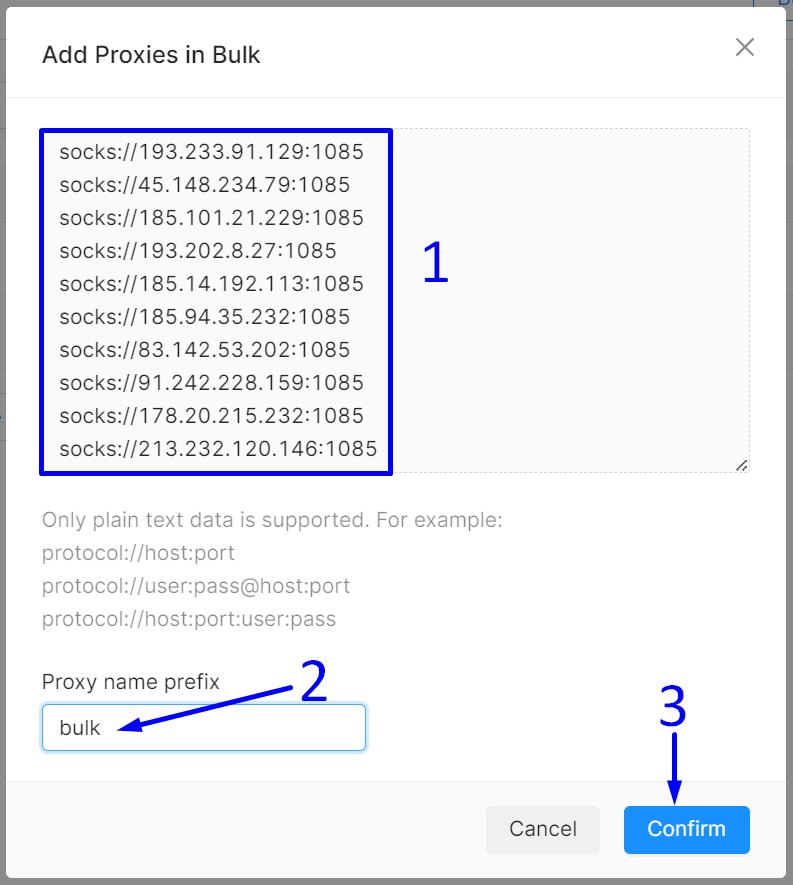
- Paste it into the Octo Browser proxy manager.

- Specify any prefix in the "Proxy name prefix" field to tag this group of proxies.

- Click the "Confirm" button.

octobrowser paste bulk proxies

Voilà! Our proxies are added and ready for action!
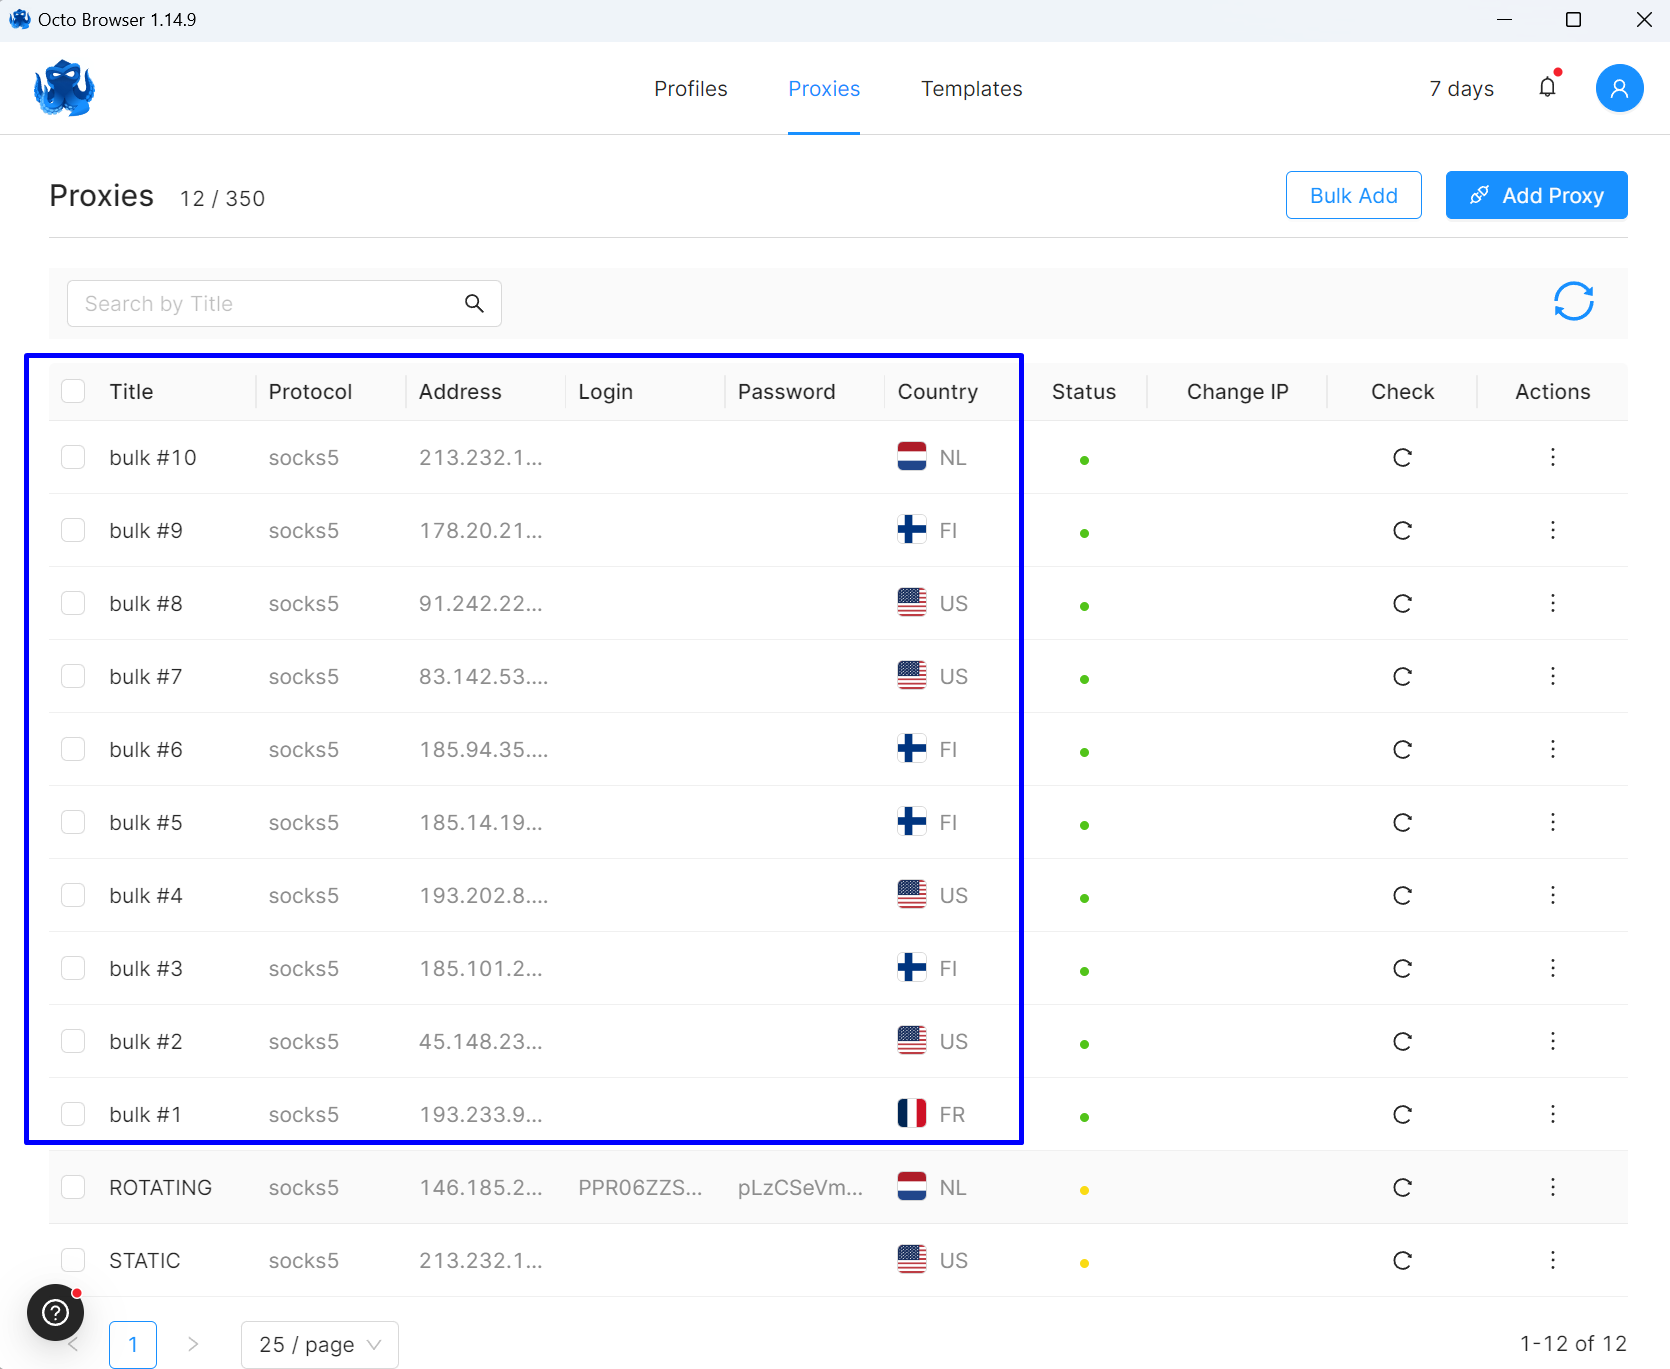


octobrowser bulk proxies added
https://proxycompass.com/knowledge-base/setting-up-proxies-in-octo-browser/
Sonntag, 16. Juni 2024

How to Monitor Competitor Prices: Data-Driven Strategies to Boost Revenue

How to Monitor Competitor Prices

Are you struggling to match your competitors' prices in the ever-evolving environment you’re in?


Competitor price tracking is essential to remain competitive, but it is a rather tedious process.


Here, based on scientific research, you will find out how to monitor competitor’s prices like the pros do, and how to use this information to set the right pricing strategy at all times.


We will discuss the findings of a highly cited 2017 research on competition-based dynamic pricing to help you increase your revenue without having to cut your profit margins.


Read on to find out the tips that can help you get it right with competitor price monitoring.


Why Competitor Price Tracking Should be Automated


Online retail pricing transparency enables customers to easily compare prices. 


This results in keen competition because the retailers are always seeking to outdo each other.


It is a big mistake not to pay attention to the competitors, as one may end up out of business.


The so-called "competition-based dynamic pricing" is used by advanced retailers: the prices are set in response to the competitors' prices, which are monitored 24/7. Happens because with so many competitors and products, it’s impossible to do it manually even with an army of VAs.


Advanced retailers need to gather competitor data and feed it into their dynamic pricing models. Real-time market information helps the firm change prices in order to get the most revenue.


The researchers from that study we mentioned, were able to raise revenue by 11% of their test company, while at the same time maintaining margins; which is not something easy to do!


It is not enough to be a fast follower; one has to be a pioneer with data and technology.


So go ahead and track prices automatically, use our proxies to avoid getting blocked while scraping, set dynamic pricing, and out compete your competitors. No time to lose!


A Step-by-Step Guide to Track Competitors' Prices


Step 1: Define your Market Positioning

First, it is necessary to determine the positioning of the brand in the market: is it a luxury brand, an affordable option, or something in between? The “Competition-Based Dynamic Pricing in Online Retailing” study indicates that this positioning determines your pricing strategy and entails the evaluation of customer tastes and decision-making patterns. It also reveals that the value offered by a retailer in terms of quality, service or features influences consumers’ decision.


Step 2: Study the competition like a maniac

Determine your direct competitors – similar businesses offering similar products/services and targeting the same audience. Consider their pricing strategies like dynamic pricing, coupons, and loyalty programs. However, not all competitors equally influence consumer decision-making. Focus on rivals with a large market share whose prices significantly impact your demand.


Step 3: Identify the Best Competitor and Products to Track

Choose competitors and products to track based on market share, product-relatedness, and competitive effects. The research studied baby-feeding bottles because product features are tangible and measurable for comparing performance. Tools to identify competitor websites and products include web scraping, price comparison sites, and market research.


Step 4: Get Real-Time Pricing Information

Tools to track and compare competitor prices in real-time include web scraping, APIs, or price monitoring services. The study shows that flexible online retail pricing and timely information help firms set the right prices and respond to market changes.


Step 5: Test The Pricing Data For Your Products

Cross-check the collected prices with other sources and conduct controlled trials. The study shows that using a randomized price experiment with a proper design can validate pricing data findings. This enabled obtaining actual price elasticity measures.


Step 6: Identify Problems And Adjust Strategy

Price monitoring challenges include wrong data, delayed updates, and misinterpreting competitor strategies. Ensure proper validation methods and correct monitoring techniques, and adjust your approach as needed.


Step 7: Make Price Monitoring Part of Daily Operations

Treat price monitoring as a core business process assigned to specific employees. The study's successful real-business collaboration shows price monitoring should be part of daily activities. Implement it through dashboards and tools that provide the right, up-to-date data.


Benefits of Monitoring Your Competitors' Prices


1. Measure price elasticities accurately to optimize margins

This paper also describes how a randomized price test can be used to estimate price elasticities without the bias of past sales data. You will be able to find out the price levels that will enable you to reach the desired margins on revenues for each product, taking into consideration its price elasticity of demand.


2. Respond to competitor price changes based on consumer behavior

Another factor that affects the most suitable price response strategy is the level of cross-shopping by consumers. Tools that can give alerts of competitors' prices to enable you to match their prices or even beat them can speed up the process.


3. Differentiate responses based on competitor significance

Industry rivals are not the same in the level of interference with consumers’ decision making process. With the help of AI, web scraping and data mining, one can track competitor prices on a regular basis, study customers’ behavior, identify competitors’ strategies and vulnerabilities, as well as determine the proper price level for each product to increase the total revenue.


4. Incorporate competitor stock-outs into pricing decisions

Besides prices, monitoring stock-outs of competitors give valuable information on the consumers’ trends and their response to price changes. Own and competitor stock-outs are the most important source of variation used in the study to estimate its demand model. Competitors’ stock-out also reveals chances of capturing clients’ attention when rivals are out of the game.


5. Automate pricing decisions with a data-driven algorithm across channels

Compare collected prices with those from other sources and conduct controlled experiments. It is also possible to confirm pricing data conclusions with a randomized price experiment with an appropriate design, the study reveals. This made it possible to obtain actual price elasticity values.


6. Enhance competitive insights with frequent price experiments

Price reactions are more significant in the context of online retailing because consumers’ search costs and menu costs for retailers are lower than in other types of stores. According to the study, it is suggested that price experiments should be conducted on a regular basis to re-estimate the models and to adapt to the changing market conditions. During such days as Black Friday, Cyber Monday, and the like, brands go head to head in a pricing war. Monitoring tools give information on competitors’ activities and enable creation of automation rules to change prices round the clock, even when you are not physically present to do so.


7. Make a Price Monitoring Routine

It is necessary to state that price monitoring should be viewed as one of the most important business processes that can be carried out. The study we talked about so much emphasizes that pricing monitoring should be incorporated into the daily tasks of a business. It can be done easier with the help of dashboards, tools and some scraping knowledge. 


Referenced article: Fisher, M., Gallino, S., & Li, J. (2017). Competition-Based Dynamic Pricing in Online Retailing: A Methodology Validated with Field Experiments. Product Innovation eJournal. https://doi.org/10.2139/ssrn.2547793.


https://proxycompass.com/how-to-monitor-competitor-prices-data-driven-strategies-to-boost-revenue/

10 Benefits of Web Scraping for Market Research

10 Benefits of Web Scraping for Market Research

Do you like to always stay one step ahead of the competition? Using web scraping for market research can help you obtain information about the customers, competitors, and trends. 


In this article, we will look at the top 10 advantages of web scraping for market research and how it can assist you in getting the right data at the right time and improve your product development and decision-making.


Here’s Why Market Researchers Should Scrape Everything!


Data obtained through web scraping is accurate, relevant, and timely for the company’s needs. They provide valuable insights, useful in decision-making and in the formulation of strategies. 


Everything that you need is online nowadays, so you better use it to make smart, data-driven decisions based on recent trends, customer preferences, and so on. 


The most valuable insights are those A) relevant to the company and B) recent.


Benefit 1: Gain Insights into Customer Needs and Preferences

Through web scraping, customer behavior, concerns, and preferences are revealed, to help companies adjust their approaches and improve their products to increase satisfaction. 


This is because segmenting customers puts companies in a position to come up with campaigns that are relevant to the particular group which increases conversion rates.


Customer’s needs can be identified thanks to data-gathering, which could be useful in product development as well as in identifying the features and changes that customers are craving. 


Also helpful with customer acquisition as it can reveal the right messaging for your audience.


Benefit 2: Conduct Comprehensive Competitor Analysis

Web scraping helps businesses to keep track of their competitors’ prices and obtain a competitive advantage by tracking their prices in real-time. 


The analysis of the organization in comparison with competitors reveals the areas that require improvement and offers suggestions for enhancing the company’s performance.


Benefit 3: Identify Market Trends and Opportunities

Real-time monitoring of social media and forums helps with tracking trends and changes in consumer behavior. Using techniques such as sentiment analysis, topic modeling, and time series analysis on this data can play a major role in hitting those elusive KPIs.


Immensely powerful in the right hands; you could extract trends, for example, to check on consumers’ attitudes towards certain products, and see if there are swings in any direction. 


Benefit 4: Optimize Product Development and Positioning

Web scraping gathers consumers’ opinions on the features of the product and its price from different websites, allowing them to identify real-time market trends and consumer preferences.


This is useful in product development where the probability of developing features or even products that the market does not require is reduced.


Benefit 5: Make Data-Driven Decisions and Strategies

Actual data collected through web scraping allows companies to check hypotheses and assumptions about customers’ behavior, market conditions, and products. 


This approach allows managers to plan the companies’ resources accordingly.


Knowing your customers’ needs and behavior can be used to design targeted marketing and sales strategies tailored to each group, which would lead to reducing waste in your ad spend and increase conversion rates.


Benefit 6: Faster Data Collection, Scalability, and Cost Efficiency

Web scraping is a more efficient and cost-effective way of extracting data than having to do it manually. Much cheaper doing surveys, that we can assure you!


This way of data extraction according to the business needs helps to gather data for various purposes such as market analysis of competitors, customers’ feedback, or trends. 


The dynamics of web scraping make it possible for a business to have market research that is flexible and can answer new questions as they are developed.


Benefit 7: Monitor Brand Reputation and Manage Online Presence

The process of identifying brands, products, and competitors’ online presence becomes easier with the help of web scraping. 


Through the analysis of online reviews and social media conversations, it becomes very easy for a business to identify the negative sentiment that may harm the business. 


Tracking their own presence online can help to stay consistent and identify potential opportunities,


Benefit 8: Enhance Lead Generation and Sales Prospecting

The contact information such as emails and phone numbers can be collected from the official websites and other online directories through scraping. 


The information collected can be used to generate leads for sales and marketing purposes, for instance, for sending out emails. 


It can also help to identify potential customers by analyzing things such as: company’s size, industry, and online activity, allowing the sales team to concentrate on the juiciest leads. 


Benefit 9: Improve the SEO and the Content Strategy.

Web scraping can help businesses identify what ranks and why. 


By collecting data on keywords, links, and content, companies can improve their content and SEO to rank higher and drive more organic traffic.


For example, you could determine the ideal length for blog post titles, or the introduction.


Benefit 10: Gain a Competitive Edge and Stay Ahead of Industry Trends

When you analyze recent data, one can identify new markets and unknown opportunities.


Thanks to web scraping, market researchers can help businesses make better decisions, encourage creativity, and hence, gain a competitive advantage in the market. 


Having an early mover advantage is mandatory to stay one step ahead of the competition.


https://proxycompass.com/10-benefits-of-web-scraping-for-market-research/

Setting Up a Proxy in the MultiBrowser

Setting Up a Proxy in the MultiBrowser

What is the MultiBrowser?


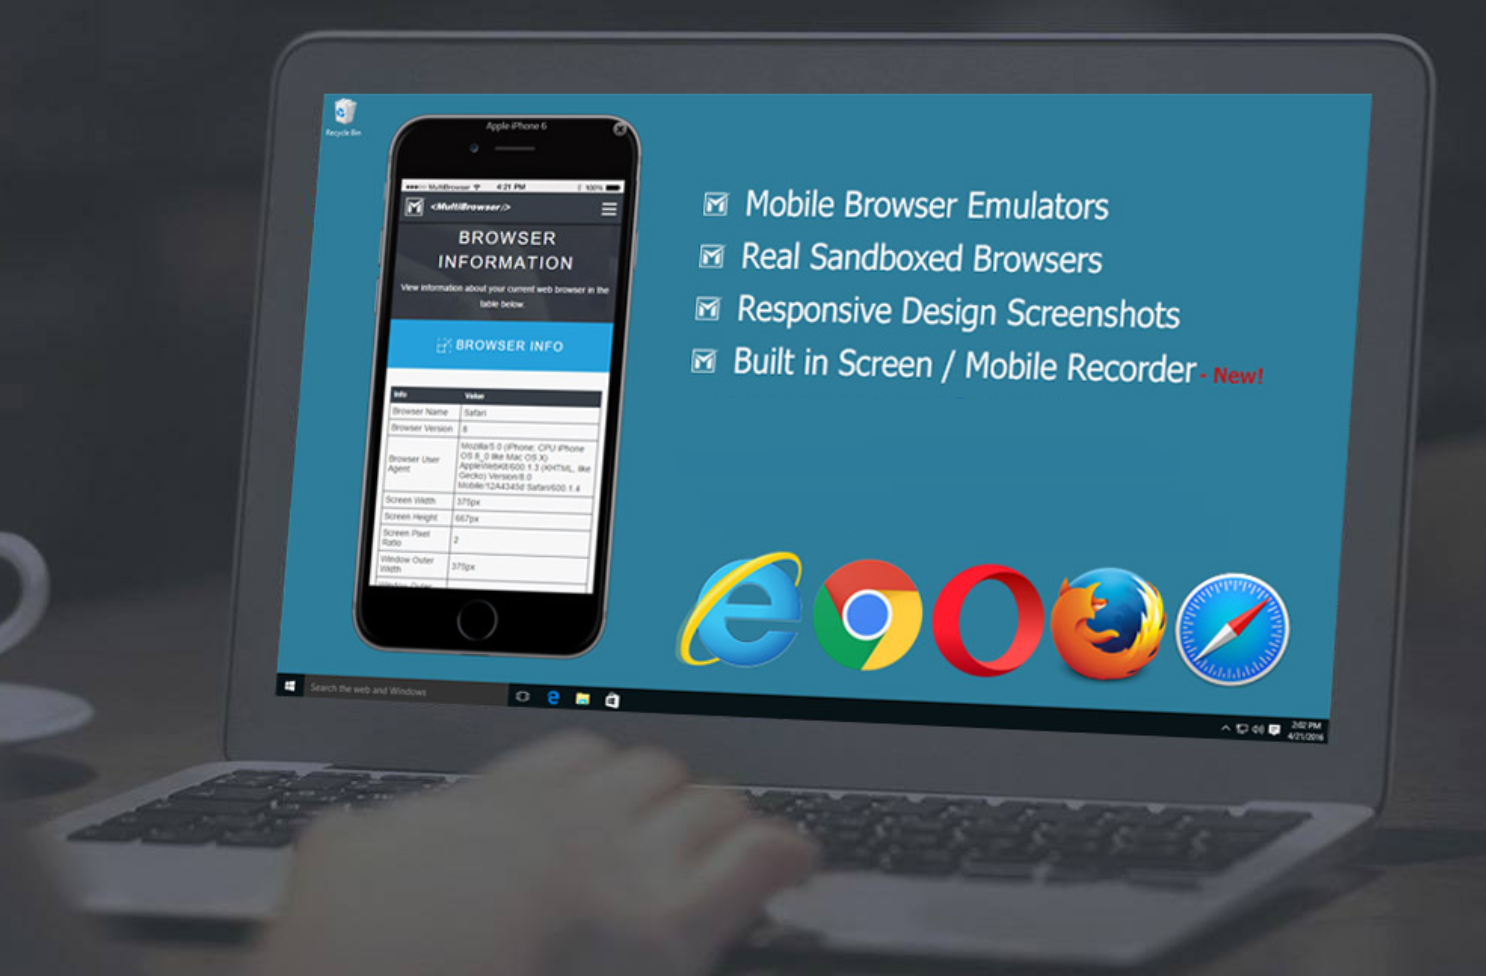
MultiBrowser is a software tool designed for responsive, mobile and automated cross-browser compatibility testing. It allows users to run real, sandboxed web browsers and mobile emulators on their desktops, enabling seamless testing across different browser versions without the need for virtual machines. MultiBrowser includes features such as standalone browser operation, mobile browser emulation, responsive design testing, integrated video recording and automated web testing capabilities. This makes it ideal for developers and testers who need to ensure that their websites perform well across multiple devices and browsers.


multibrowser banner

Why Are Proxies Necessary for MultiBrowser?


Proxies are essential for MultiBrowser users primarily because of their ability to simulate traffic from different geographical locations, which is crucial for testing how websites perform in different regions. This capability is particularly valuable for companies looking to optimise their digital marketing strategies and improve user experience on a global scale. In addition, proxies help to maintain anonymity and security during these tests, avoiding potential IP bans and ensuring that testing activities do not interfere with real user data, thereby driving better business results and maintaining operational integrity.


Setting Up a Proxy in the MultiBrowser


This guide will show you how to configure a proxy server in MultiBrowser to prevent account bans and increase your online privacy.


Important note: MultiBrowser does not support the SOCKS protocol. Therefore, we will demonstrate the process of setting up an HTTP proxy in MultiBrowser.


Step 1: Open MultiBrowser Network Setting

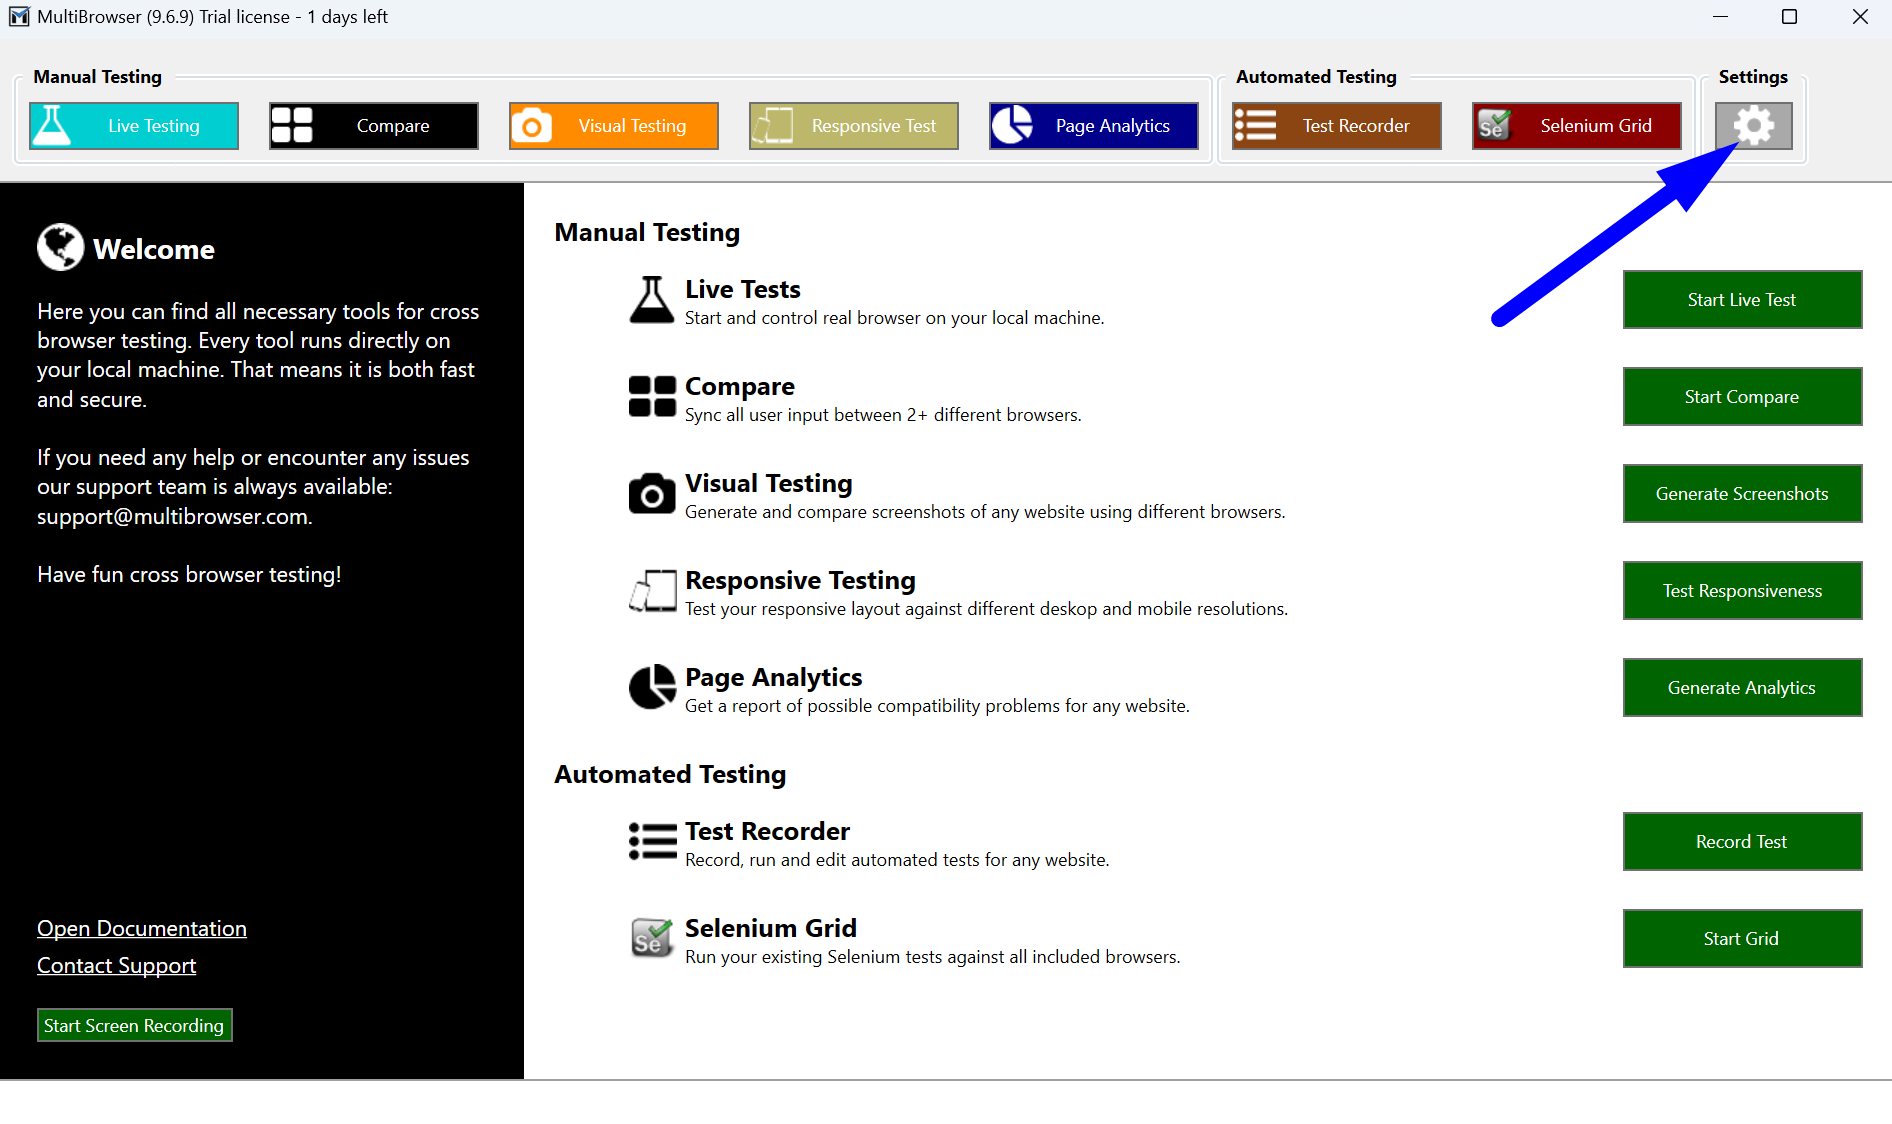
To access the settings, click on the gear icon located in the upper right corner of the screen.


multibrowser open proxy settings

Step 2: Setting Up a HTTP Proxy and Resolution

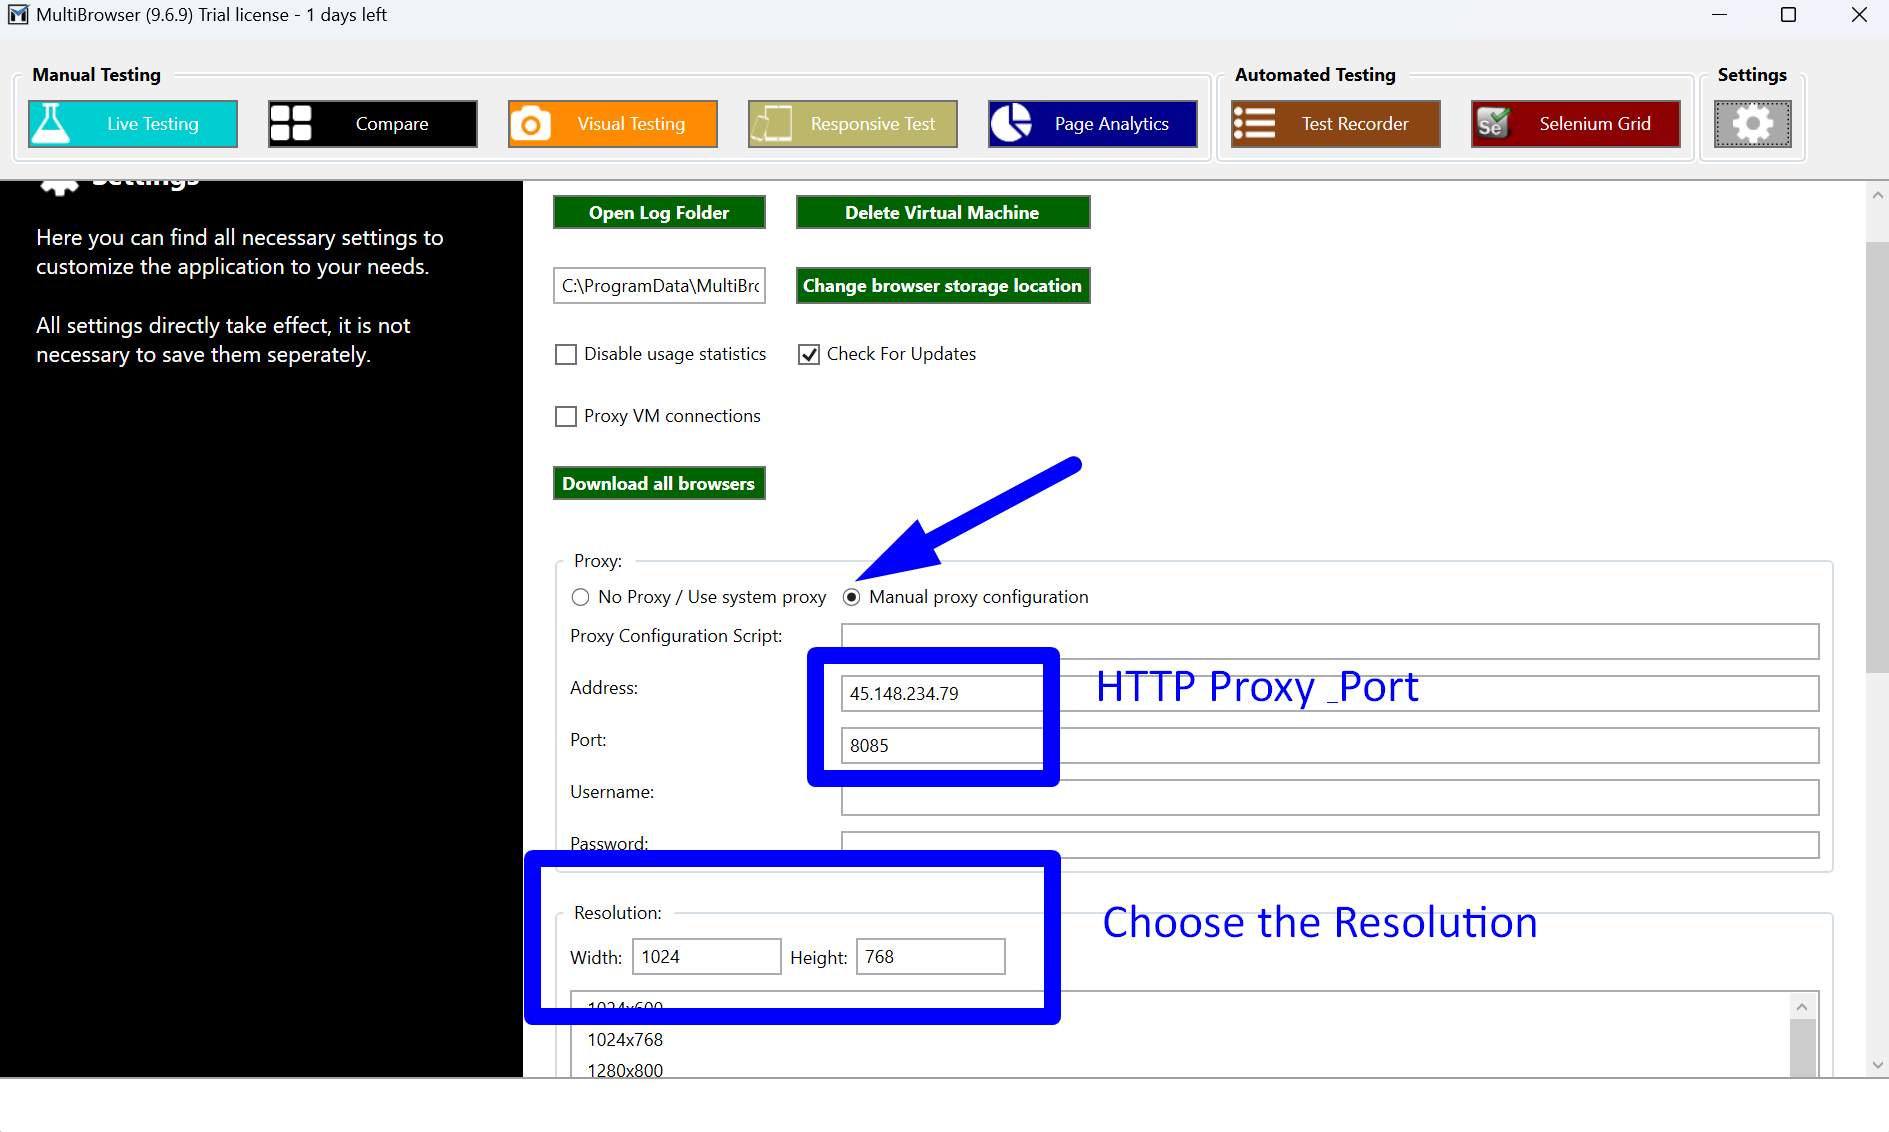
In the "Proxy" section of the settings, switch MultiBrowser to manual proxy configuration mode. In the "Address" field, enter the IP address of our proxy, and in the "Port" field, enter the port used for the HTTP connection.
In the "Resolution" section, you need to specify the desired resolution. This will be the resolution set in the MultiBrowser working window when operating through the proxy. Enter "1024x768" or any other resolution you require.


multibrowser enter proxy details and resolution

Step 3: Live Testing of the Proxy

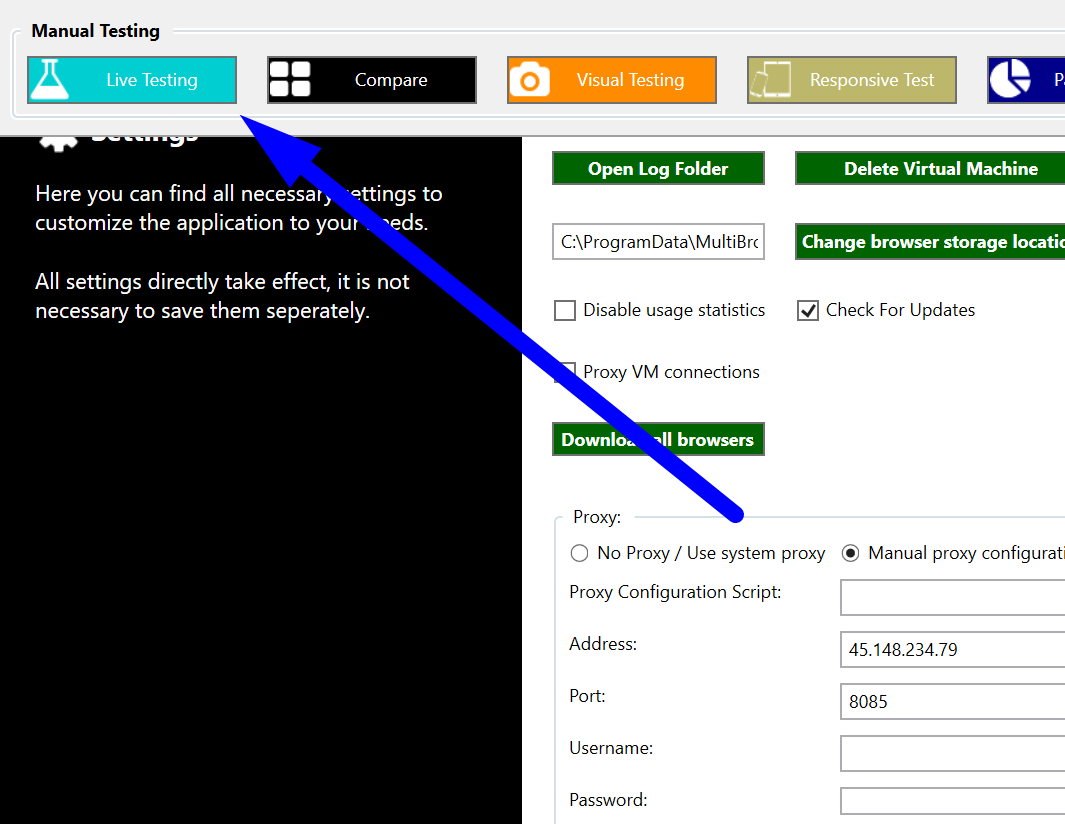
Next, return to the proxy testing section by clicking on the "Live Testing" button.


multibrowser back to live testing

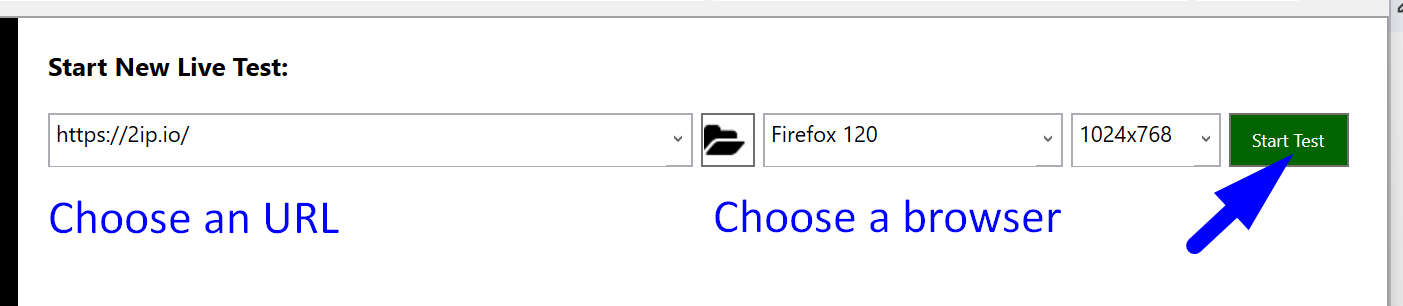
In this section, you need to specify:


- The browser that is required for working through the proxy. For example, choose the browser you intend to use. In our case it’s Firefox 120.

- The page for testing the results of the proxy setup. Choose, for example, https://2ip.io/ to verify the proxy's functionality.

multibrowser choosing a browser and a web page

After that click on “Start Test”.


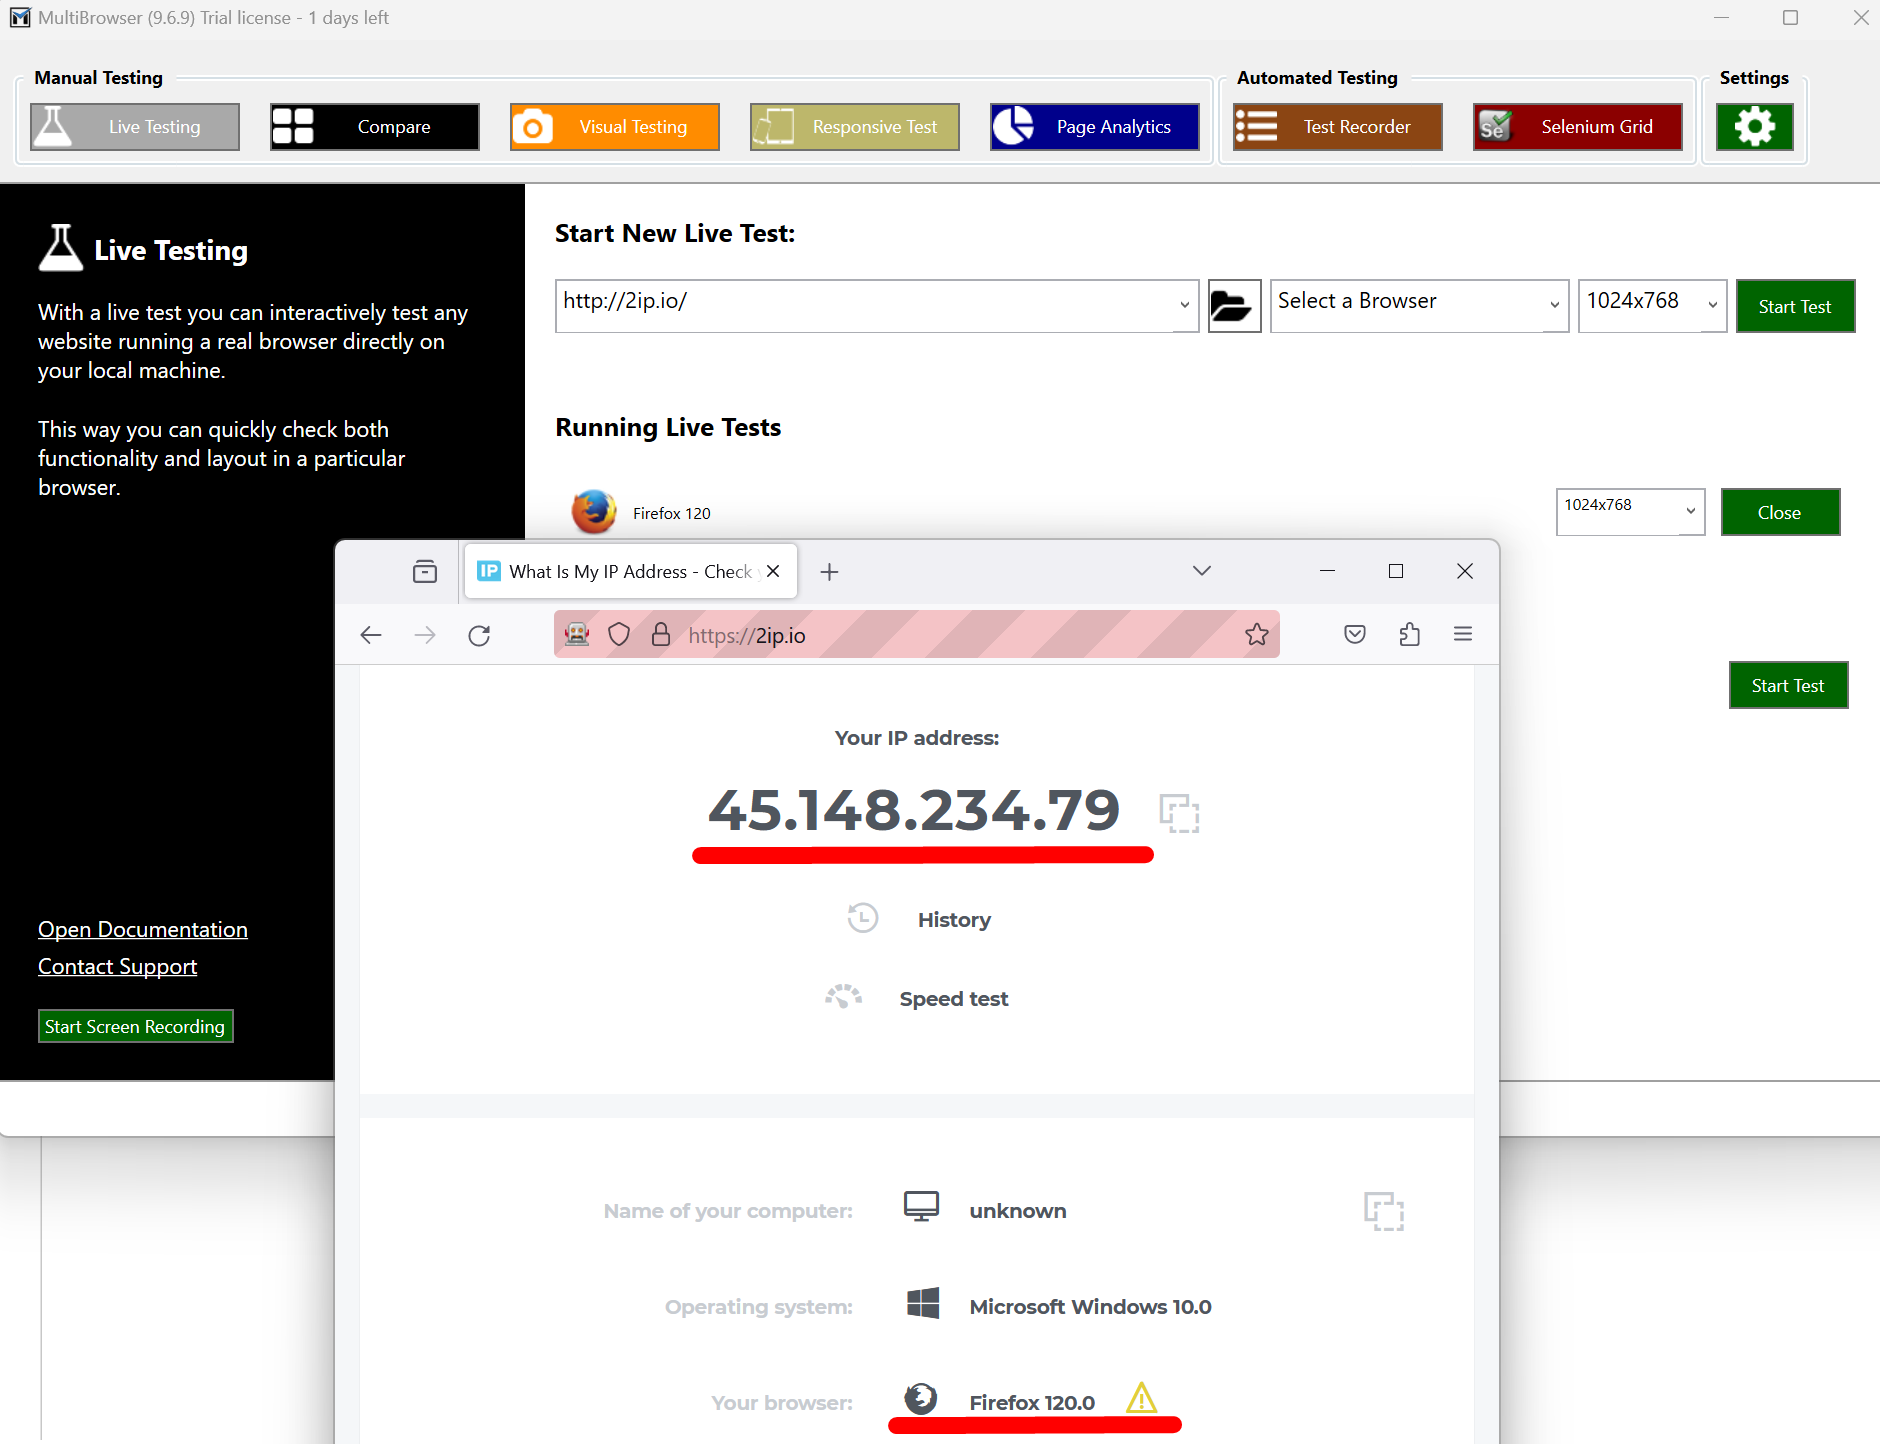
In the new browser window, the previously selected website will open according to the chosen browser parameters, resolution, and using the configured proxy server.


multibrowser checking results

Everything is great! The proxy is connected. You can now start working with MultiBrowser.


https://proxycompass.com/knowledge-base/setting-up-a-proxy-in-the-multibrowser/

Samstag, 15. Juni 2024

Setting Up a Proxy in the ClonBrowser

Setting Up a Proxy in the ClonBrowser

What is the ClonBrowser?


ClonBrowser is a versatile virtual browser that excels in privacy and multi-account management. It's designed to manage multiple profiles simultaneously, providing each with a unique, virtual browsing environment to ensure privacy and security. This is achieved through advanced fingerprint protection, which masks your real browser fingerprint using sophisticated algorithms.


The browser supports the setup of diverse proxy configurations and is compatible with major proxy providers, enhancing its utility for users needing to manage multiple accounts across different regions or platforms. This makes it particularly useful for tasks like social media management, affiliate marketing, and digital advertising, where multiple, distinct online identities or profiles are necessary.


clonbrowser banner

ClonBrowser also offers robust team collaboration tools, allowing users to share profiles and manage tasks collectively without compromising security or efficiency.


Why You Should Use Proxies with ClonBrowser?


Using proxies with ClonBrowser is crucial for several reasons, especially when managing multiple social media profiles for monetization purposes:


- Account Security and Anonymity: Proxies help mask your actual IP address, making it more difficult for platforms to associate and link the multiple accounts you manage with one another. This reduces the risk of account bans or restrictions, which is vital when you are handling numerous profiles for marketing or business activities.

- Geolocation Flexibility: Proxies allow you to access the internet from different geographical locations. This is particularly useful for social media strategies where content needs to be tailored and appear local to specific audiences. It also helps in bypassing geo-restrictions and accessing content or functionalities limited to certain regions.

- Simultaneous Operations: By using proxies, ClonBrowser can perform tasks across multiple accounts at once without triggering security protocols that detect and block suspicious activities from a single IP address. This is essential for efficient operation across various platforms, allowing for mass actions like posting, liking, or commenting.

- Improved Performance: Some proxies offer faster connection speeds and improved reliability when accessing servers from distant locations, ensuring smoother operation of the ClonBrowser, especially when handling high data loads.

- Enhanced Privacy Controls: Proxies in conjunction with ClonBrowser’s anti-detect features provide a robust defense against tracking and fingerprinting techniques. This protects the privacy of the user and the integrity of their marketing strategies.

Using proxies in ClonBrowser ultimately supports the scalability and safety of digital marketing and social media management, enabling users to maximize their productivity and profitability without compromising security.


Setting Up a Proxy in the ClonBrowser


ClonBrowser offers comprehensive support for all recognized proxy server types and protocols.


In this guide, we'll walk you through the steps to configure rotating and static proxies, as well as how to bulk upload your proxy list into ClonBrowser. 


It's important to note that there are two primary proxy protocols: SOCKS, including versions 4 and 5, and HTTP, along with its secure variant HTTPS. 


In this article, we'll focus on using SOCKS5 due to its superior anonymity features. However, the method for setting up the quicker HTTP/HTTPS proxy protocol is similar and straightforward.


Step 1: Add a Single Proxy IP

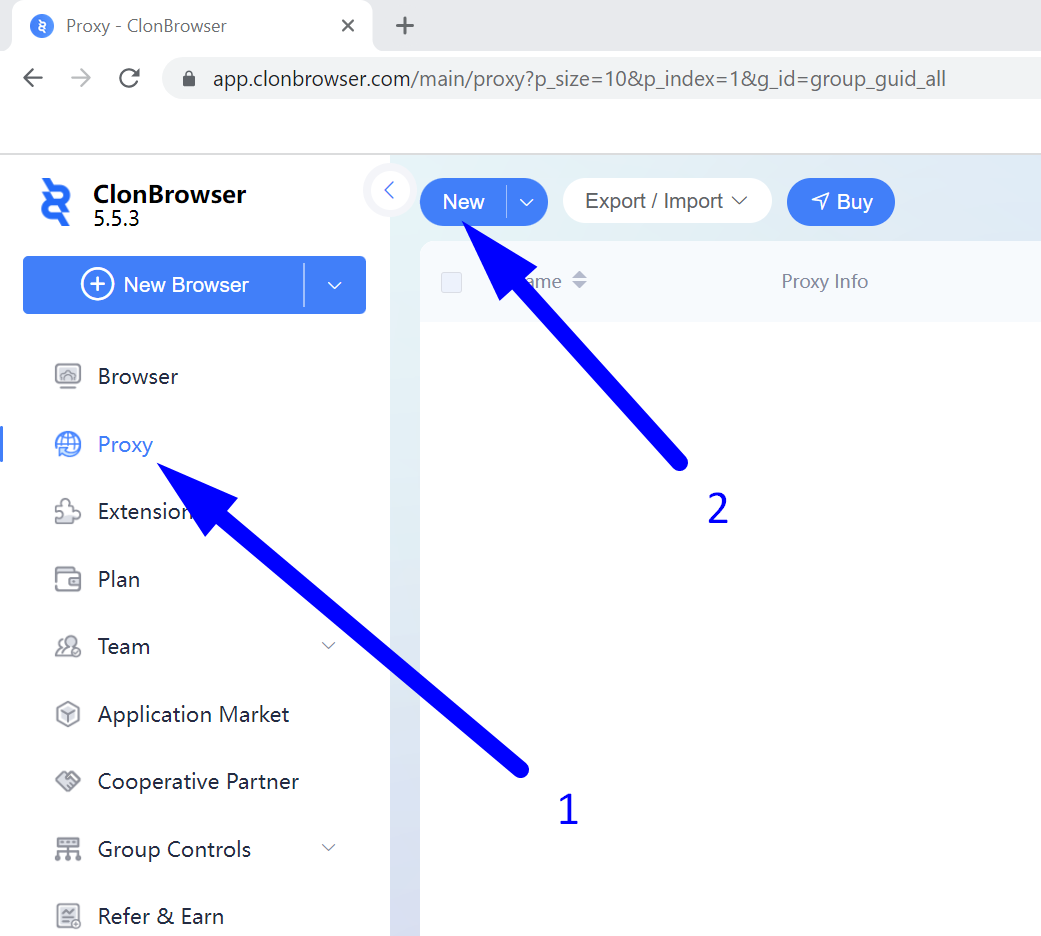
First, click on the "Proxy" menu item on the left side of the screen. Then, click on the "New" button at the top of the screen.


clonbrowser setting up a proxy

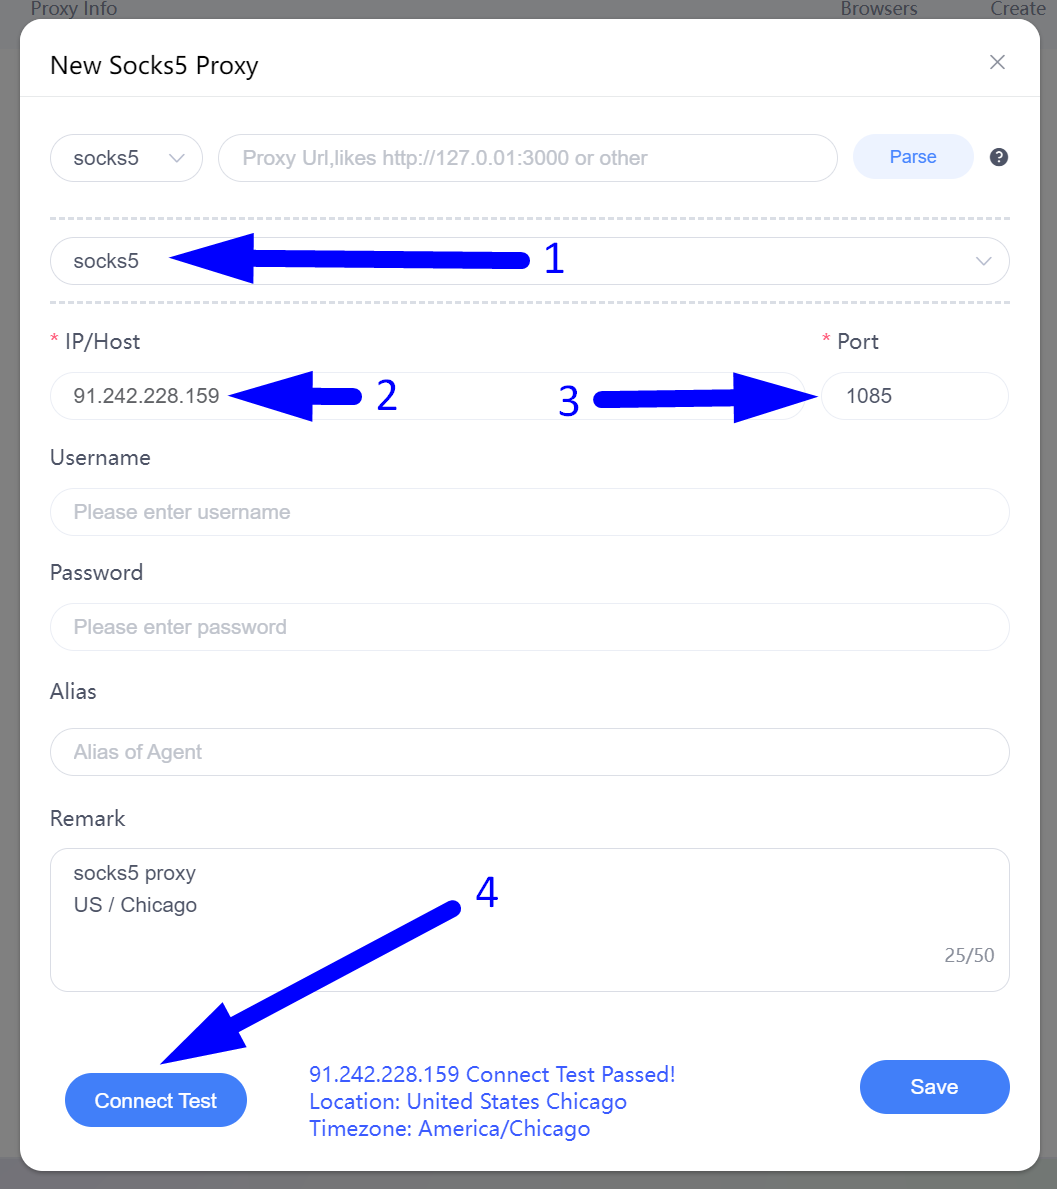
Step 1.1: Setting Up a Single Static Proxy

- Select the appropriate proxy protocol. In our case, it's SOCKS5.

- Enter the IP address of your proxy.

- Enter the required port.

- Check the proxy connection by clicking the “Connect Test” button.

- If ClonBrowser has successfully tested the connection, save your settings by clicking the "Save" button.

clonbrowser setup static socks5

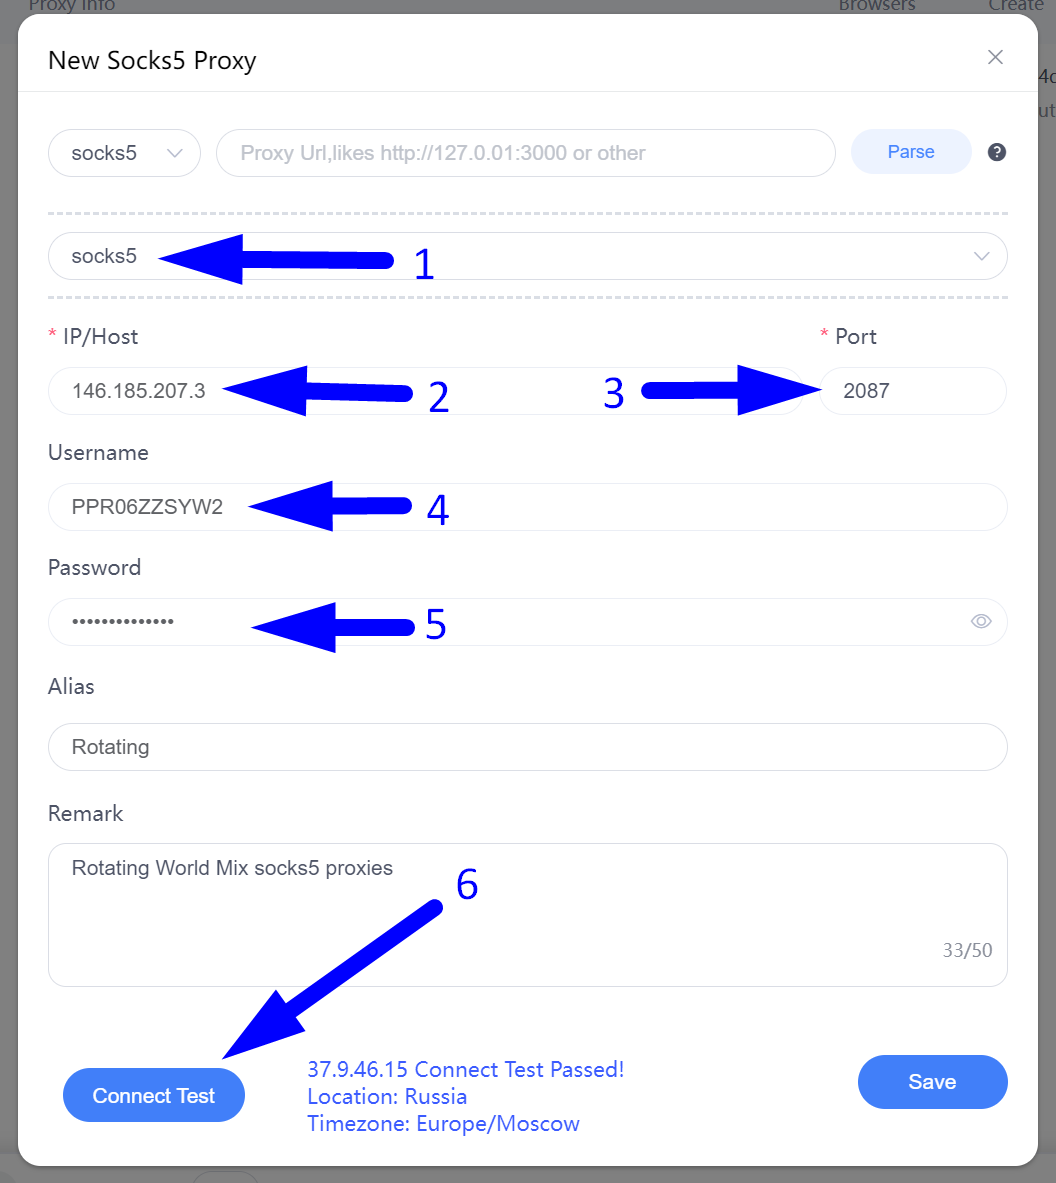
Step 1.2: Setting Up Rotating Proxies

- Select the needed proxy protocol. In our case, it's SOCKS5 again.

- Enter the IP address of your proxy gateway. For some proxy providers, this may be a gateway that includes letters and looks like "gate.proxyprovider.com" or similar.

- Enter the required port.

- Your Username

- Your Password

- Check the proxy connection by clicking the “Connect Test” button.

- If ClonBrowser has successfully tested the connection, save your settings by clicking the "Save" button.

clonbrowser setup rotating socks5

Step 2: Uploading the Proxy List

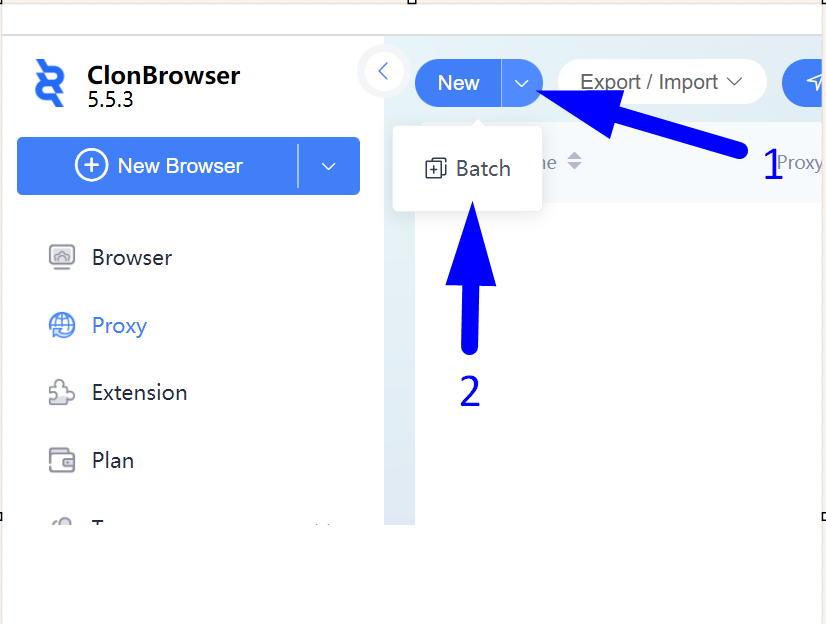
To upload your proxy list, first hover your mouse over the right side of the "New" button and click on the "Batch" submenu item that appears.


clonbrowser upload a proxy list

Step 2: Paste and Test Your Batch of Proxies

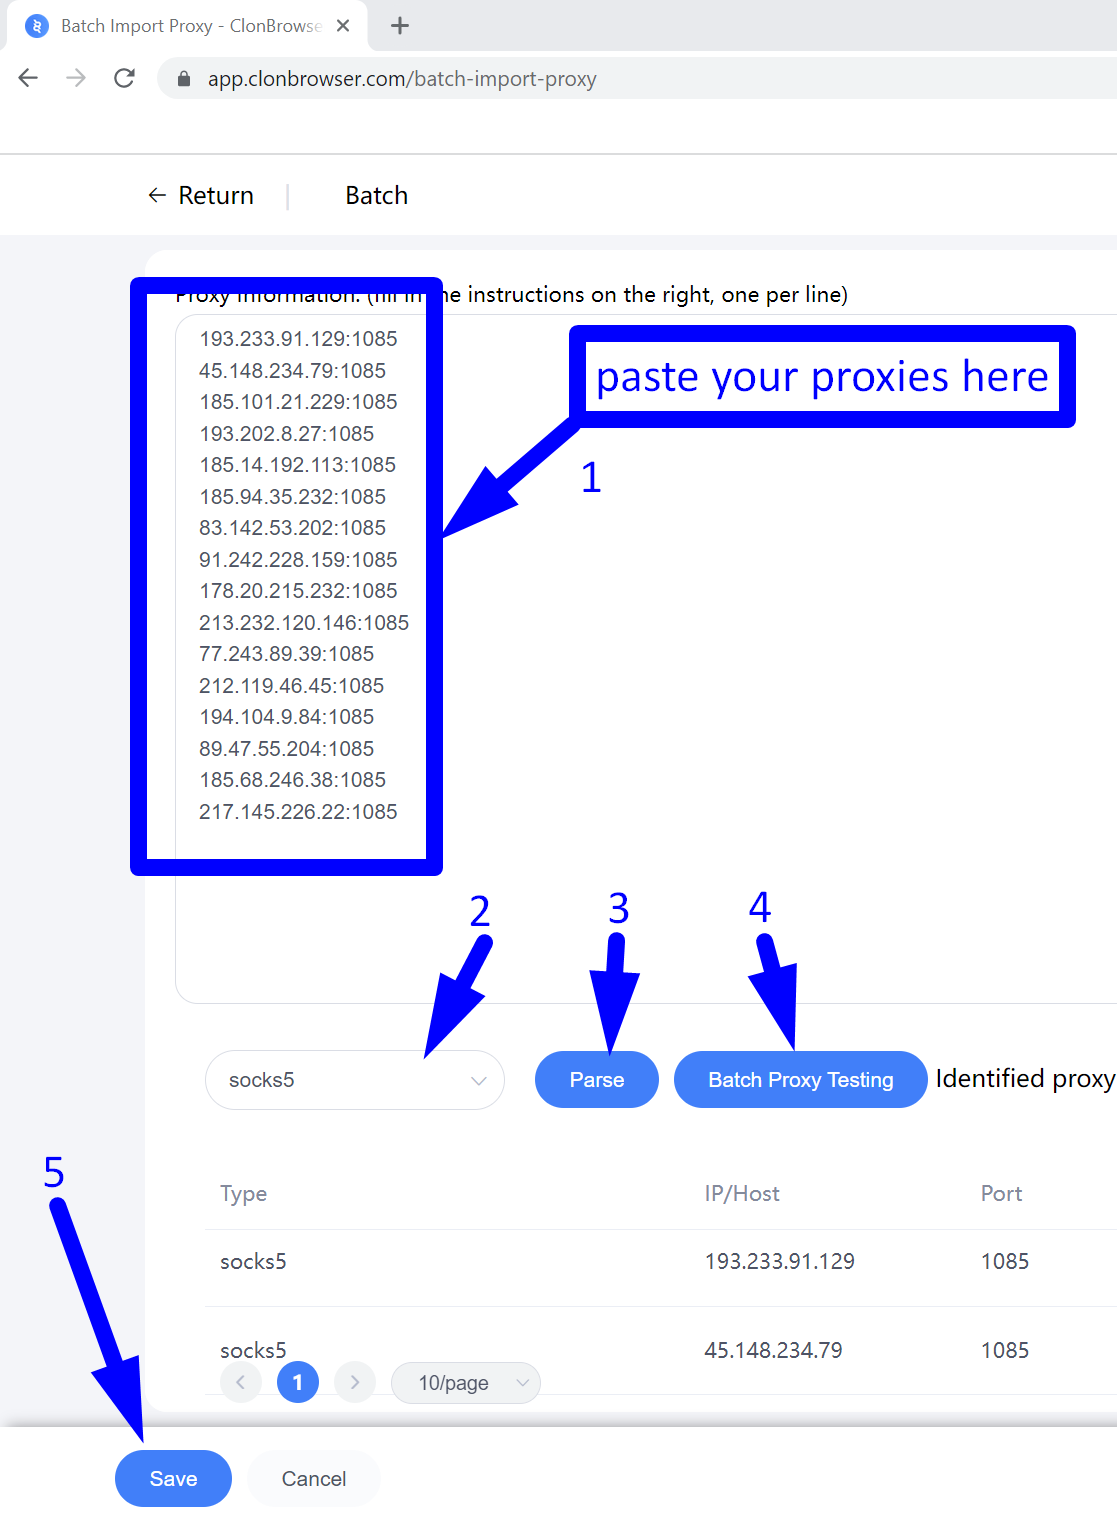
- Copy your list of proxies, including ports, usernames, and passwords (if applicable), in one of the following formats and paste it into the appropriate field.

Supported formats:


:::{alias}


:@:


://:::{alias}


://:@:


- Select the proxy protocol.  

- Click the "Parse" button to allow ClonBrowser to automatically identify the IPs, ports, usernames, and passwords.  

- Click on "Batch Proxy Testing" for a bulk check of the proxies.  

- If everything is successful, save the proxy list by clicking the "Save" button. If not, double-check the format of the proxy list you have copied and pasted to ensure it is correct.

clonbrowser paste and test the proxy list

In the ClonBrowser, you can create multiple different proxy profiles and use each of them for various tasks and situations.


https://proxycompass.com/knowledge-base/setting-up-a-proxy-in-the-clonbrowser/